![[New] 2024 Approved How to Execute a Budget-Friendly Youtube Seminar](https://thmb.techidaily.com/141f2083ce8f9807f7858bc78fabb4787ff1855b350de1df5ec61d6fc21bf535.jpg)
"[New] 2024 Approved How to Execute a Budget-Friendly Youtube Seminar"
How to Execute a Budget-Friendly Youtube Seminar
How to Host a Webinar on YouTube for Free


Max Wales
Mar 27, 2024• Proven solutions
Promoting products, offering educational content or in-depth tutorials on virtually any subject through webinars will enable you to reach new audiences and offer your services on a worldwide market. There are thousands of webinar software products and online platforms, but most of them are quite expensive and they require you to have a considerable amount of experience with the process of setting up and recording webinars.
An alternative solution is available if your budget is tight, but you’d still like to produce a great webinar. We are going to take you through all the steps you’ll need to take if you’d like to host a webinar for free and help you spread the word about the products and services you’re offering.
![]()

The All-in-One Screen Recorder & Video Editor
- Record desktop screen, voiceover, and webcam simultaneously
- Edit recorded clips quickly with a wide range of professional tools
- Built-in plentiful templates and effects
- Export to MP4, MOV, MKV, GIF and multiple formats
For Win 7 or later (64-bit)
For macOS 10.12 or later
 Secure Download
Hosting a Webinar for Free
The world’s largest video sharing platform also features broadcasting options that enable its users to schedule events and thus host webinars free of charge. Previously known as the Google Hangouts on Air, the YouTube Live feature is fairly simple to set up, but before you start your first webinar you will need to choose a landing page and a chatbox. If you already have a website you can simply copy and paste the embed link and create a landing page for your webinar, or you can use landing pages software products such as LeadPages or Unbounce if you don’t have your own online domain. For setting up chatboxes for your webinars we recommend using Chatroll or RumbleTalk platforms, although you’ll have to pay a fee if you choose to chat with your audience using these computer programs. So here’s how you can host your first webinar on YouTube for free.
Step 1. Create a YouTube Event
If you don’t already have an account on YouTube, you’ll have to create one before you can schedule your first live event. After making sure that you are logged in to your YouTube account head over to the Creator Studio, and click on the Live Streaming tab. Select the New Live Event option and proceed to insert the basic information about the event such as the title, date when the event should take place, tags or a short description of the webinar you’re planning.
The Advanced Settings tab will enable you the access to options that will allow you to assign the license and the owner of the webinar. You can also choose the language, set the location or select the category of the event.
Step 2. Copy the Embed Code and Paste it To Your Webinar’s Landing Page
When you adjust all the settings for your upcoming event, you should click on the Share button. This action will grant you access to the video’s embed link, so you can just copy it to your website, or to the landing page you’ve created with the appropriate software.
Step 3. Add the Chatbox to The Webinar’s Landing Page
Communicating with the audience during the webinar is important, and for that reason, embedding the chatbox link on the webinar’s landing page is a crucial step that will allow you to interact with the participants of your webinar. Chatbox platforms for live events such as Chatroll or RumbleTalk offer amazing features, but they cannot be used for free, which means that you’ll have to invest a certain amount of money in order to include a chatbox in your webinar.
Step 4. Publish the Webinar’s Landing Page and Get the URL
Making the event public a week or a few days before it takes place will provide you with enough time to promote it. Include the webinar’s landing page URL in the promotional social media posts and make sure to send out invites for your webinar to your friends and colleagues. Email marketing methods can help you get a larger number of attendees, which is the reason why investing time in the promotion of your webinar can prove to be extremely beneficial.
Step 5. Start your Webinar
Hit the Go Live Now button, when you are ready to start your first webinar and enjoy sharing your skills and knowledge with your audience. Even though YouTube offers a simple way to host webinars for free, it lacks the advanced options that enable you to use the prerecorded footage, keep track of the webinar’s analytics or create virtual whiteboards and polls.
Read More to Get : 10 Best Free Video Hosting Sites for Private/Business Online
Max Wales
Max Wales is a writer and a lover of all things video.
Follow @Max Wales
Playlist Perfection: Weaving YouTube Videos Into Webpages
YouTube is an excellent resource for entertainment, education, and general information, but did you know you can also display a YouTube playlist on your website?
Embedding a YouTube playlist will allow you to showcase a collection of videos on a topic or theme on your website. It’s also a great way to keep your visitors engaged on your site for more extended periods.
To help you with the process, we’ll explore different step-by-step methods to embed a YouTube playlist on a website to add interactivity to your site.
So, if you’re ready to get started, read on!
How To Embed a YouTube Playlist on a Website
If you want to embed and display a YouTube playlist on your website, we’ll give you a complete rundown of the three methods you can try to get this done. But, of course, each method has its pros and cons, so you’ll need to decide which is right for you.
Here’s how to embed a YouTube playlist on a Website:
Embedding a YouTube Playlist on Website Using WordPress Plugin
The plugin is the simplest way to add a YouTube Playlist to your WordPress website. This will help you get this done in no time without having to write any code for the process.
With plugins like YouTube Feed Pro by Smash Balloon , you can extend your website’s functionality and create, customize, or embed a YouTube playlist with just a few clicks of a mouse.
To embed and add a YouTube playlist on your website page/post, do the following steps in sequence:
Step1 Launch a browser on your PC and head to your WordPress website’s login page. Sign in to your dashboard using your username and password.
Step2 Click the “Plugins” option from the left-hand side menu on the WordPress dashboard. Now, click “Add New” and use the search option to find and install the YouTube Feed Pro plugin. Afterward, click the “Activate” option to enable the plugin.
Step3 Click the “YouTube Feed” option from the left menu and open “All Feeds.” On the next page, click “Add New” at the top left of the screen.

You will now be asked what type of feed you want to create. Select “Playlist” and click “Next.”

Step4 You need to create your YouTube API Key , copy it, and paste it into the pop-up. Click “Add” to connect your YouTube account to the plugin.
Step5 Select the Playlist you want to display on your WordPress website and take its ID. Paste that in the next pop-up window and click “Next” to continue the process.

Your YouTube playlist will be connected to your WordPress website. To further customize it, select the template you want and click “Next.” You can also configure the Feed Layout and Color Scheme.

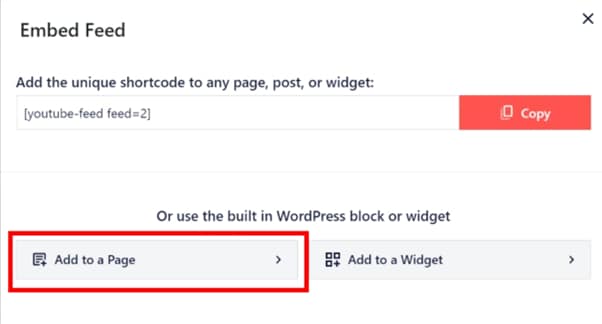
Step6 Once you are done with customization, click the “Embed” option on the top-right side of the screen, and a pop-up window will appear. Next, click “Add to a Page,” and a list of pages on your website will be displayed.
Choose your page and click “Add” at the bottom of the pop-up window. You’ll be directed to a new page where you can embed the feed. Click the “Plus” icon at the top-left of the screen, search for YouTube Feed and choose the Feeds for YouTube block to embed and add your playlist.
That’s about it! You’ve successfully embedded a YouTube playlist on your WordPress website.
Embedding a YouTube Playlist on a Website Using oEmbed Code
Another method to embed a YouTube playlist on your WordPress website is to use oEmbed Code. This method requires basic CSS, HTML, or Java knowledge; otherwise, you won’t be able to customize your playlist.
Moreover, this method is too complicated for beginners, and you will miss the customer support provided by WordPress plugin developers in case of any mishaps.
To use the oEmbed Code method, do the following steps:
Step1 In the first step, head to your YouTube account and access the Playlist you want to embed. Next, click the three dots below it and copy its URL.
Step2 Now, login to your WordPress dashboard and open the post or page editor where you want to add the playlist.
Step3 Paste the URL directly in the editor and click “Update” to save the changes.
WordPress will grab your playlist from YouTube and automatically show it in your post using oEmbed. The outcome is a single video with a menu that your viewers can click to see other videos in the playlist.