![[New] How to Convert YouTube to MP3 Without Compromising Security - 3 Tips for 2024](https://thmb.techidaily.com/a74c765fb6818efdc56bfc7805aa17daf214ba70cf5906bbca11c158a428c514.jpg)
"[New] How to Convert YouTube to MP3 Without Compromising Security - 3 Tips for 2024"
How to Convert YouTube to MP3 Without Compromising Security - 3 Tips
How to Convert YouTube to MP3 in 3 Ways [Safe]

Benjamin Arango
Mar 27, 2024• Proven solutions
There is a wide range of prominent tools available in the digital market to convert YouTube to MP3 files. The basic idea behind these tools is that you can extract the audio content from your favorite youtube video and save it to an mp3 file. The RIP of the audio process differs from the program built-in within the application. Many sound professionals opt for an mp3 file format because of its smaller file size, high-frequency audio quality, etc.
After you convert youtube to mp3, you will be able to listen to the background music or audio offline and the MP3 file format guarantees flawless audio quality for you.
You may also like: Best Free Youtube to MP3 Converters You Should Know

Three Ways to Convert YouTube Videos to MP3
Now it is a perfect time to explore unique ways to convert youtube to mp3 files. I will share three different ways in this article. Let’s take a quick look at it below:
- **1. How to Convert YouTube to MP3 by an Online YouTube to MP3 Tool
- **2. How to Convert YouTube to MP3 by q Video Converter
- **3. How to Convert YouTube to MP3 by a Video Editing Software
1. How to Convert YouTube to MP3 by an Online YouTube to MP3 Tool
It is a free service and allows you to convert any videos within the one-hour time limit. The whole conversion process completes within a few minutes effectively. There is no need to register to avail of this online service. You can save the converted files at your desired location and play it during your comfort zone. This online application is compatible with PC, gadgets, tablets, etc.
- Get YtMp3 tool: Click Here on your browser and step into the online YouTube converter platform
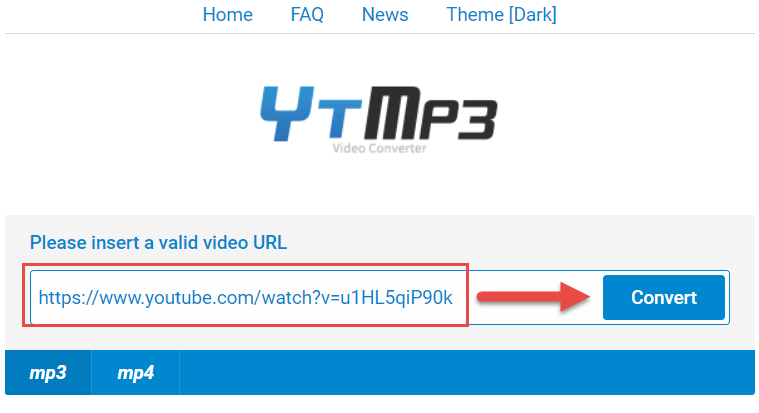
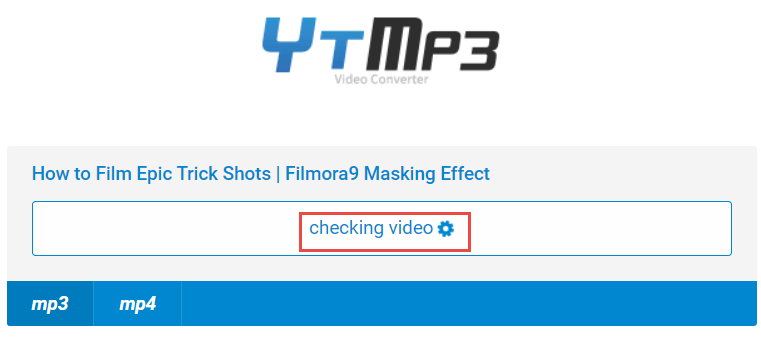
- **Paste the URL: Now copy your favorite track URL from YouTube and paste it on the box. Then hit the ‘Convert’ button beside the pasted URL. You have to wait for a few minutes until the conversion process completes.
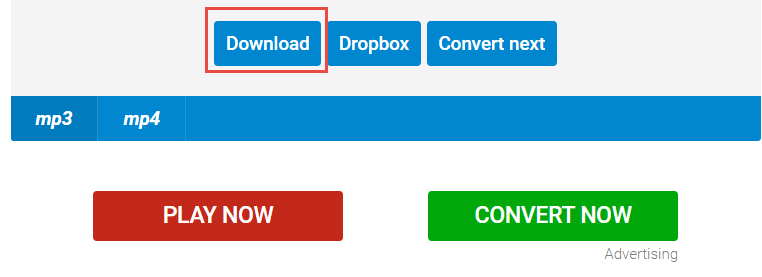
- **Download mp3: Immediately you must tap the ‘Download‘ button and choose the desired location by navigating between drives and folders to save the converted MP3 files. You can also choose the ‘Dropbox’ option to store it on the virtual location for easy retrieval.
Tips:
The converted YouTube video in the MP3 file format is available for further transfer to other external gadgets. Make use of the MP3 files according to your convenience without any limitations.
2. How to Convert YouTube to MP3 by a Video Converter
If you take a deeper look at the converter tools at the online platform you will end with piles of collection of software. The key factor which you must bear in your mind is the reliability of the conversion program. Wondershare Uniconverter is an ultimate tool and it meets the expectations of the users without any compromises. Let’s see how to convert youtube to mp3 with this video converter:
- Click Here to download and install Wondershare Uniconverter on your computer
- Visit your favorite YouTube channel and copy the link of your favorite tract at its address bar.
- Launch Wondershare Uniconverter, then click the ‘Paste UR L‘ option at the top left side of the screen and select ‘Download MP3‘ from the drop-down icon. The audio extraction process commences immediately.
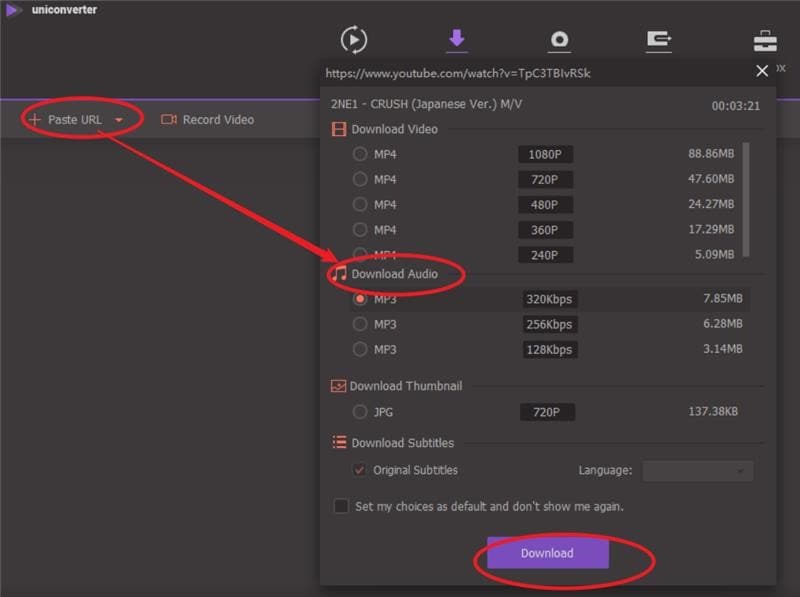
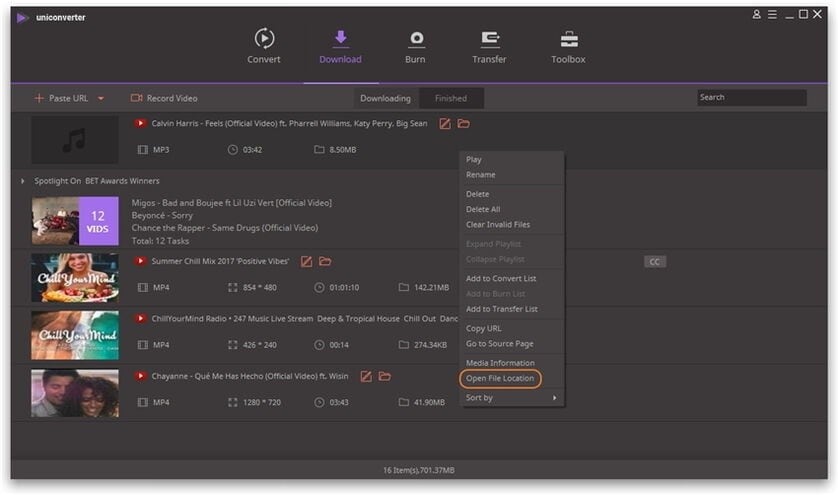
- After the download completes, you must hit the ‘Finished’ tab at the top of the screen to obtain the audio view. If you want to find out the folder details then you have to right-click and choose ‘Open File Location‘. This action takes you to the folder where the MP3 is available to carry out further tasks on it.
3. How to Convert YouTube to MP3 by a Video Editing Software
This method gives you access to convert Youtube to mp3 using a Video Editor. Wondershare Filmora not only offers many basic and professional editing tools and video effects but also can convert youtube to mp3. If you need further editing for mp3 after converting, Filmora will be the right one for you.
Here are the guidelines to convert YouTube to MP3 using Filmora:
Note:
This is a video editing software, and cannot convert a Youtube URL to an mp3 directly. You should convert the youtube URL to a local video in mp4 or other supported video formats first. You can read Convert Youtube to MP4 Guide and try some Youtube video downloaders to convert Youtube to mp4.
- Once you convert Youtube to mp4, please download Filmora below and install it on your computer
 Download Mac Version ](https://tools.techidaily.com/wondershare/filmora/download/ )
- Open Filmora, then go to File-Import-Media to load the converted mp4 video to the Media Library

- Add or drag the video to the timeline(If you need to further edit or cut your video, you can double click the video on the track, and get more video and audio editing tools as you like, such as audio fade in/out and volume adjustment).
Parental Control Software
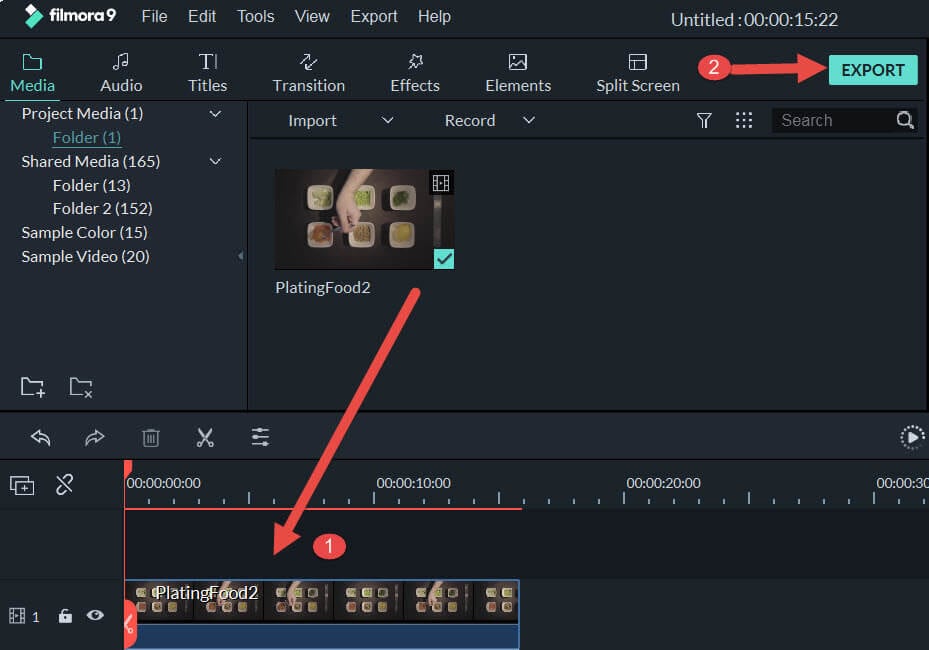- Then hit the ‘Export‘ button and select ‘MP3’ format from the expanded list. You can click Settings in the export panel to customize the output audio settings, such as the audio bitrate for higher audio quality.

Warnings
Authorized Download—YouTube allows only legal download and conversion of videos on its platform. You can work on your videos on YouTube without any issues. You must own the copyrights if you want to download third person videos. As per the legal policy of YouTube, unauthorized download is strictly prohibited.
To sum up
There are multiple methods to convert youtube to mp3 effectively. The great challenge you may face while choosing the perfect app which fits your needs optimally. It is highly recommended to follow the YouTube copyrights guides and carryout legal downloads without any issues.
Stay tuned for more exciting facts on video converters. Leave your valuable comments and suggestions on this article.
Benjamin Arango
Benjamin Arango is a writer and a lover of all things video.
Follow @Benjamin Arango
Cutting the Excess: A Guide to Shortening YouTube Videos
How to Trim YouTube Videos?

Richard Bennett
Mar 27, 2024• Proven solutions
The world’s largest video sharing platform currently has nearly two billion active monthly users who upload over 400 hours of video content to their channels each minute. It is to see from these statistics why every video aspiring YouTubers post on their channels has to be perfect in every way in order to reach a wide audience. Fortunately, trimming a video even after you’ve uploaded it to YouTube is a quick and easy process, and in this article, we are going to show you a few different methods you can use to trim the videos you upload to YouTube. So, let’s get started.
In this article
- How to Trim a Video After You Upload it to Your YouTube Channel?
- Trimming a Video Before Posting On YouTube with Filmora Video Editor [4 Ways]
- Using Online Video Editing Platforms to Trim YouTube Videos
How to Trim a Video After You Upload it to Your YouTube Channel?
The YouTube Studio is no longer in beta phase, which means that the feature is here to stay. This is good news for all video creators who frequently update their YouTube videos after they upload them, as they no longer have to go through the endless uploads just because they wanted to trim a video.
Make sure that you’re signed into your YouTube channel, then click on your profile picture and select the YouTube Studio (Beta) option. On the left side of the screen, you’ll be able to see a menu that contains different subcategories like Analytics, Dashboard or Videos, so just click on the Videos option and proceed to select a video you’d like to trim. After the Videos submenu appears on the screen you should click on the Editor option and the video you selected will open in the YouTube’s video editor.


Click on the Trim button to start trimming the video and drag the blue bars located at the start and the end of the file to designate the portion of the video you’d like to remove. Preview the changes and confirm what you’ve made by clicking on the Save button located in the upper right corner of the screen and the new shortened version of the video will become available within a couple of hours.
In this way, you don’t need to take down the original video, edit it and re-upload. One of the benefits of trimming YouTube videos with the Trim feature in YouTube Editor is that this will keep your video URL and views and ranks etc.
Trimming a Video Before Posting On YouTube with Filmora Video Editor

Method 1: Trim on Timeline
YouTubers who don’t want to rely on YouTube’s video editing capabilities can trim their footage with Filmora (to be honest, the Editor in YouTube platform has limited features). Filmora video editing software for PC and Mac computers offers a few different tools for trimming videos. After you’ve created a new project in Filmora, you should import a video clip into the editor by clicking on the Import drop-down menu and select the Import Media Files option. Each file you add to a project will be displayed in the Media tab, and you can just drag and drop it to a video track on the timeline.
All you have to do in order to trim a video after you’ve placed it on the timeline is drag one of its ends to the left or to the right. As you drag one of the clip’s edges the editor will only display the remaining footage while rendering the rest invisible. If at any point you want to access a portion of the video you’ve trimmed you just have to extend the file by dragging it until you’re able to see the segment you’re searching for.

Method 2: Using Filmora Split Tool
Filmora’s Split tool can help you separate the portion of the clip you want to remove from the segment you’d like to keep. Simply place the playhead at the exact location in the video clip where you want to make a cut, and click on the Split icon that looks like a pair of scissors. After the video is split, you should click on the clip you no longer need in order to select it and then hit the Delete button on your keyboard to remove it from the timeline.
Method 3: Using Scene Detection
Wondershare’s video editor also offers an automatic way to split a video clip into a number of separate scenes. Right-click on the video file located in the Filmora’s Media tab, and select the Scene Detection option from the menu and proceed to click on the Detect button, after the Scene Detection window pops up on the screen. The software will then automatically analyze the footage and divide it into separate scenes. Simply click on the Add to Timeline button once the process is completed to continue editing the video clip you’ve just split.

Method 4: Using Instant Cutter Tool
The Instant Cutter Tool enables you to quickly trim or merge high-resolution files recorded on action cameras as soon as you import them into a project in Filmora. Select the Import with Instant Cutter Tool option from the Import drop-down menu and wait for the Filmora Instant Cutter window to appear on the screen. In the upper left corner of this window, you will be able to see Trim and Merge tabs. Make sure that the Trim tab is selected and then click on the Open File button to import a video clip you’d like to trim. You can then use the trimming sliders to designate the parts of the video you’d like to remove or the set the In and Out points by clicking on the Set In Point or Set Out Point icons. Click on the Export button to save the new version of the video clip and click OK to complete the process.


Using Online Video Editing Platforms to Trim YouTube Videos
In case you’re looking for a tool that lets you save extracts of scenes from YouTube to your computer free of charge YT Cutter may be one of your best options.

This online video editing platform is remarkably easy to use since you just have to copy the link to the YouTube video you’d like to trim into YT Cutter’s URL box and then select how long the new video should be. Click on the Start and End buttons to set the duration of the video and click on the Download button to choose if you want to create a video, GIF or an audio file. The trimmed YouTube video will be available for download as soon as the platform processes it, and you just need to specify a folder on your hard drive before clicking on the Save button.
There’re many online video trimmers available on the market, some of them are totally free to use, check our guide about How to Trim Videos for Free Online .
Read More to Get : How to Download YouTube Videos without Any Software Easily >>
Conclusion
Trimming a video online or with a video editing software like Filmora is an effortless task that can be completed in just a couple of minutes. However, it is better to complete the entire video editing process before you upload a video to your YouTube channel because YouTube Studio and other online video editing platforms still offer only a limited amount of video editing tools. Which method of trimming YouTube videos do you like using the most? Leave a comment and share your opinions with us.
Richard Bennett
Richard Bennett is a writer and a lover of all things video.
Follow @Richard Bennett
- Title: [New] How to Convert YouTube to MP3 Without Compromising Security - 3 Tips for 2024
- Author: Jeffrey
- Created at : 2024-08-20 16:35:50
- Updated at : 2024-08-21 16:35:50
- Link: https://eaxpv-info.techidaily.com/new-how-to-convert-youtube-to-mp3-without-compromising-security-3-tips-for-2024/
- License: This work is licensed under CC BY-NC-SA 4.0.