![[New] How To Turn Your Google Meet Into a YouTube Live Event for 2024](https://thmb.techidaily.com/1155b908ebc8fe078487b3227b97ba044636fc4713be9d07ea00e7f8a9937936.jpeg)
[New] How To Turn Your Google Meet Into a YouTube Live Event for 2024

How To Turn Your Google Meet Into a YouTube Live Event
Google Meet helps people to connect virtually with each other in a well-protected environment. If you have physical restrictions, Google Meet can provide an enhanced ecosystem to collaborate with your team members. With high video and audio quality, it can prevent you from any sort of disturbance. If you want to connect with a larger audience during your Google Meet sessions, you can go for live streaming.
This article will address how to conduct Google Meet live stream through the platform of YouTube. To learn more, continue reading this guide.
- Available Google Workspace Edition
- Approval of YouTube Channel for Live
- Connect your YouTube Channel to Google Meet
- How to Live Stream from Google Meet to YouTube
- Bonus Tip: Easily Record your Google Meet Live Stream
Part 1: Three Things to Check Before Starting Your Live
Before increasing your audience from Google Meet live stream on YouTube, make sure to check the below prerequisites.
1. Available Google Workspace Edition
For Google Meet YouTube live, there are some requirements. The reason is that not every ordinary user of Google Meet can go for YouTube live streaming. To do so, you should buy any of the following pricing plans:
| Google Workspace Pricing Plan | Price |
|---|---|
| Enterprise Starter | Approx. $10/User/Month |
| Enterprise Standard | Approx. $20/User/Month |
| Enterprise Plus | Approx. $30/User/Month |
| Education Plus | Approx. $5/Student/Month |
| Teaching and Learning Upgrade | Approx. $4/License/Month |
| Workspace Individual Subscriber | Approx. $9.9/Month |
| Google One Subscribers with 2 TB or More Storage Space | Approx. $10/Month |
![]()
Note: To know the exact pricing plans of Google Workspace, you have to contact Google Support.
2. Approval of YouTube Channel for Live
To conduct live streaming, you must receive approval from the YouTube channel. For this, you must access your channel’s YouTube Studio to perform the account verification. Now to activate and enable live streaming on your YouTube account, check the following steps:
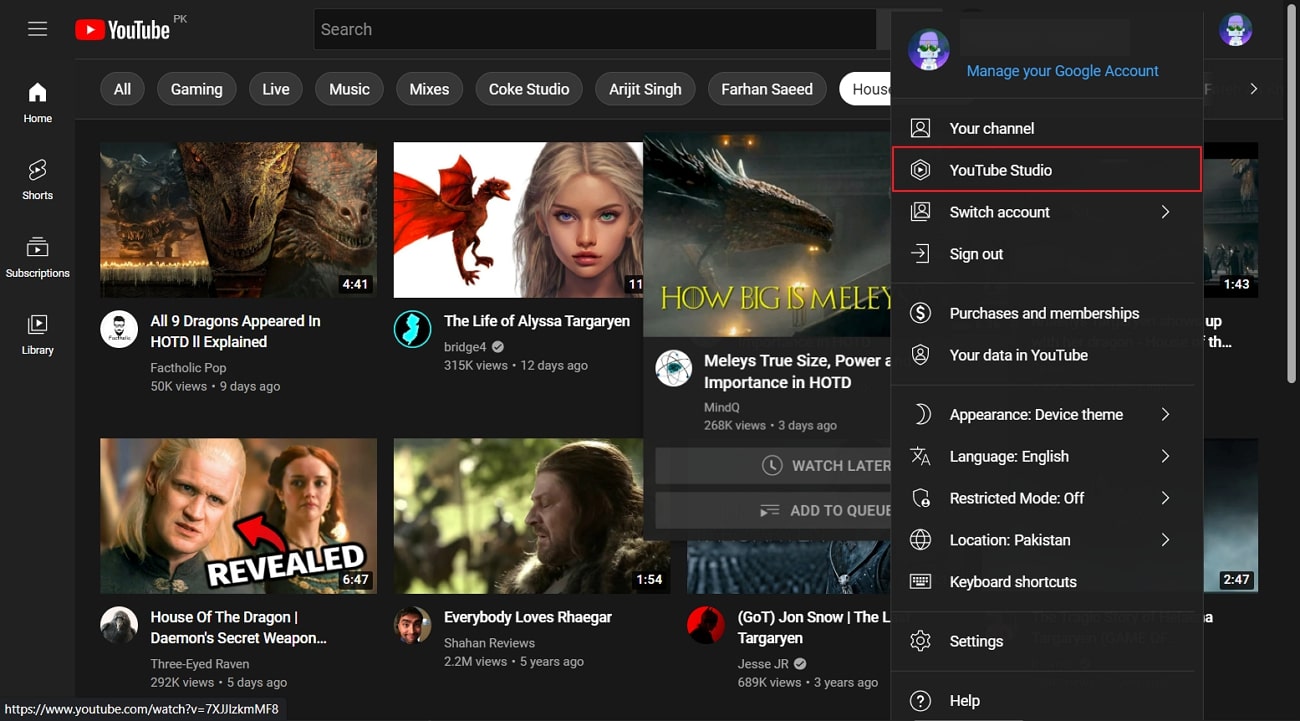
Step1 Open your YouTube account and click on the “Profile” icon given at the top-right corner. After opening the Profile menu, click on the “YouTube Studio” option.
Step2 A new window will be displayed on your screen. From the left panel, select “Content” among other options. Under the section called “Live,” locate the “Get Started” option. Afterward, tap on the “Request” option and perform the verification steps for enabling live streaming. After 24 hours, you would get approval for live streaming on YouTube. Hence, you would be able to live stream Google Meet meetings through your YouTube channel.

3. Connect your YouTube Channel to Google Meet
Once you get approval for live streaming, you can connect the YouTube channel to your Google Meet account. If the Host Management option is disabled, anyone within the Google Meet session can start live streaming. Conversely, only hosts or co-hosts can begin live streaming if this option is activated. Moreover, the individual who is starting the live stream from Google Meet will get connected to his YouTube channel.
Furthermore, you should use the same email address to enter the Google Meet that is connected to your YouTube account. By using the same email address, you can ensure smooth live streaming of Google Meet sessions to your YouTube channel. Also, you can only use laptops or desktops for initiating live streaming. The reason is that the Google Meet live stream on YouTube is not currently available on mobile devices.
Part 2: How to Live Stream from Google Meet to YouTube
Once you have fulfilled all the requirements, you can start a live stream from Google Meet to YouTube. Check the following steps to execute the process:
Step1 To allow Google Meet sessions to live stream on YouTube, the Google Workspace admin must adjust some settings. To begin, log in to the “Admin Console” on the Workspace administrator account. Now go to “Apps” and access the “Google Workspace” option.
Step2 Afterward, click “Google Meet” and tap on the “Stream” option. Once done, click on the “Pencil” icon to open the Settings menu. Now enable the options “Let People Steam Their Meetings” and “Let People Use YouTube to Stream Meetings.” Once done with the changes, click on the “Save” button.
Step3 Make sure that the Google account attached to your YouTube channel is capable of live streaming. Once done, go to your YouTube channel and tap on the “Create” button. Afterward, hit the “Live” button.
Step4 Now enter your Google Meet session and click on the “Activities” option. From the Activities menu, select “Live Streaming.” Now a small menu will open for live-streaming settings. You can create a new event and add an event title. Make sure to choose the privacy options and desired language. Afterward, click on the “Start Streaming” option.
Step5 A small pop-up will appear that will tell you to remind your participants about live streaming. After reminding, click on the “Start” button. You can see the red “Live” button that will indicate to you the ongoing live-streaming session. Once you have concluded the live streaming by clicking on the “Stop Streaming” button, you can check the video analytics by visiting your YouTube channel.
Bonus Tip: Easily Record your Google Meet Live Stream
Do you want to save your Google Meet live-stream session? The best tool through which you can save your essential live-streaming sessions is Wondershare Filmora Screen Recorder . By using this efficient screen recorder, you can access your saved live streaming session and revise the important points discussed in it.
The screen recorder of Filmora is capable of capturing webcam and screen recording simultaneously. You can select a customized recording area through this tool. For example, you can choose a full screen, a specific window, or a customized area. Furthermore, this screen recording tool can also capture your microphone and system’s sounds in high quality. At the same time, as a powerful video editor, you can edit your videos with various advanced features of Filmora to bring them to the next level. Click the video below to learn more about Filmora’s new features.
Steps to Record Live Streaming Using Filmora Screen Recorder
Are you ready to capture your live-streaming session on Google Meet? Here are the simple and accurate steps to begin the process:
Step1 Open the Screen Recorder
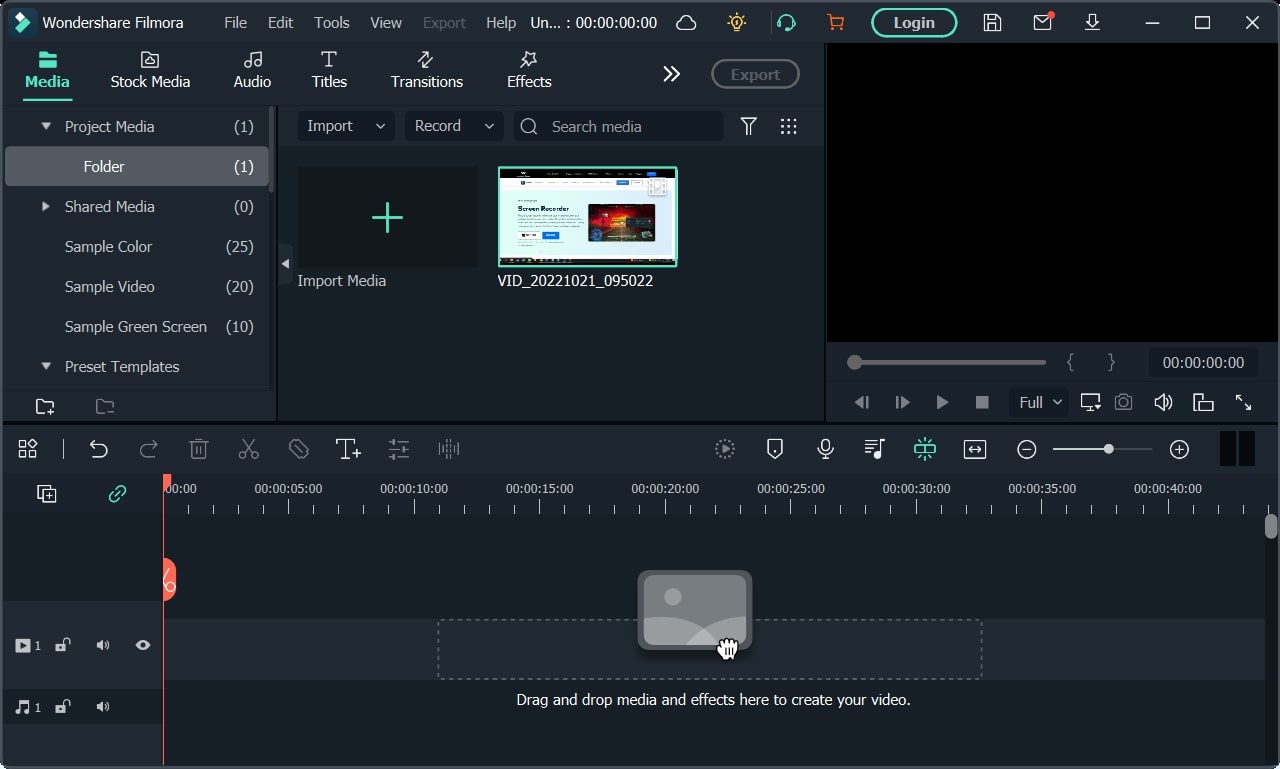
Download Wondershare Filmora and open its interface. Click the “Screen Recorder” option given on the main homepage. By doing so, a screen recorder window will open. Here, you can select screen recording modes such as full-screen, target window, or custom. Also, make sure to choose your system’s audio and microphone to proceed.

Step2 Adjust Settings and Start Recording
From Settings, you can also select the quality, frame rate, and color of mouse clicks. Once you have adjusted all the settings properly, hit the “REC” button.

Step3 End the Recording
After the countdown, the screen recording will begin. To stop the recording, you can press the F9 button from your keyboard. After the recording ends, the file will be dropped into the media library of Filmora.
Conclusion
Google Meet is a reliable environment to connect and collaborate with people. To increase your reach and target audience, you can conduct Google Meet live streaming on YouTube. This article has discussed a detailed way through which you can live stream your Google Meet session on your YouTube channel.
To save and access your live streaming sessions later, you can try the screen recorder of Wondershare Filmora . This screen recorder can capture screen and respective audio in high quality.
Free Download For Win 7 or later(64-bit)
Free Download For macOS 10.14 or later
Part 1: Three Things to Check Before Starting Your Live
Before increasing your audience from Google Meet live stream on YouTube, make sure to check the below prerequisites.
1. Available Google Workspace Edition
For Google Meet YouTube live, there are some requirements. The reason is that not every ordinary user of Google Meet can go for YouTube live streaming. To do so, you should buy any of the following pricing plans:
| Google Workspace Pricing Plan | Price |
|---|---|
| Enterprise Starter | Approx. $10/User/Month |
| Enterprise Standard | Approx. $20/User/Month |
| Enterprise Plus | Approx. $30/User/Month |
| Education Plus | Approx. $5/Student/Month |
| Teaching and Learning Upgrade | Approx. $4/License/Month |
| Workspace Individual Subscriber | Approx. $9.9/Month |
| Google One Subscribers with 2 TB or More Storage Space | Approx. $10/Month |
![]()
Note: To know the exact pricing plans of Google Workspace, you have to contact Google Support.
2. Approval of YouTube Channel for Live
To conduct live streaming, you must receive approval from the YouTube channel. For this, you must access your channel’s YouTube Studio to perform the account verification. Now to activate and enable live streaming on your YouTube account, check the following steps:
Step1 Open your YouTube account and click on the “Profile” icon given at the top-right corner. After opening the Profile menu, click on the “YouTube Studio” option.

Step2 A new window will be displayed on your screen. From the left panel, select “Content” among other options. Under the section called “Live,” locate the “Get Started” option. Afterward, tap on the “Request” option and perform the verification steps for enabling live streaming. After 24 hours, you would get approval for live streaming on YouTube. Hence, you would be able to live stream Google Meet meetings through your YouTube channel.

3. Connect your YouTube Channel to Google Meet
Once you get approval for live streaming, you can connect the YouTube channel to your Google Meet account. If the Host Management option is disabled, anyone within the Google Meet session can start live streaming. Conversely, only hosts or co-hosts can begin live streaming if this option is activated. Moreover, the individual who is starting the live stream from Google Meet will get connected to his YouTube channel.
Furthermore, you should use the same email address to enter the Google Meet that is connected to your YouTube account. By using the same email address, you can ensure smooth live streaming of Google Meet sessions to your YouTube channel. Also, you can only use laptops or desktops for initiating live streaming. The reason is that the Google Meet live stream on YouTube is not currently available on mobile devices.
Part 2: How to Live Stream from Google Meet to YouTube
Once you have fulfilled all the requirements, you can start a live stream from Google Meet to YouTube. Check the following steps to execute the process:
Step1 To allow Google Meet sessions to live stream on YouTube, the Google Workspace admin must adjust some settings. To begin, log in to the “Admin Console” on the Workspace administrator account. Now go to “Apps” and access the “Google Workspace” option.
Step2 Afterward, click “Google Meet” and tap on the “Stream” option. Once done, click on the “Pencil” icon to open the Settings menu. Now enable the options “Let People Steam Their Meetings” and “Let People Use YouTube to Stream Meetings.” Once done with the changes, click on the “Save” button.
Step3 Make sure that the Google account attached to your YouTube channel is capable of live streaming. Once done, go to your YouTube channel and tap on the “Create” button. Afterward, hit the “Live” button.
Step4 Now enter your Google Meet session and click on the “Activities” option. From the Activities menu, select “Live Streaming.” Now a small menu will open for live-streaming settings. You can create a new event and add an event title. Make sure to choose the privacy options and desired language. Afterward, click on the “Start Streaming” option.
Step5 A small pop-up will appear that will tell you to remind your participants about live streaming. After reminding, click on the “Start” button. You can see the red “Live” button that will indicate to you the ongoing live-streaming session. Once you have concluded the live streaming by clicking on the “Stop Streaming” button, you can check the video analytics by visiting your YouTube channel.
Bonus Tip: Easily Record your Google Meet Live Stream
Do you want to save your Google Meet live-stream session? The best tool through which you can save your essential live-streaming sessions is Wondershare Filmora Screen Recorder . By using this efficient screen recorder, you can access your saved live streaming session and revise the important points discussed in it.
The screen recorder of Filmora is capable of capturing webcam and screen recording simultaneously. You can select a customized recording area through this tool. For example, you can choose a full screen, a specific window, or a customized area. Furthermore, this screen recording tool can also capture your microphone and system’s sounds in high quality. At the same time, as a powerful video editor, you can edit your videos with various advanced features of Filmora to bring them to the next level. Click the video below to learn more about Filmora’s new features.
Steps to Record Live Streaming Using Filmora Screen Recorder
Are you ready to capture your live-streaming session on Google Meet? Here are the simple and accurate steps to begin the process:
Step1 Open the Screen Recorder
Download Wondershare Filmora and open its interface. Click the “Screen Recorder” option given on the main homepage. By doing so, a screen recorder window will open. Here, you can select screen recording modes such as full-screen, target window, or custom. Also, make sure to choose your system’s audio and microphone to proceed.

Step2 Adjust Settings and Start Recording
From Settings, you can also select the quality, frame rate, and color of mouse clicks. Once you have adjusted all the settings properly, hit the “REC” button.

Step3 End the Recording
After the countdown, the screen recording will begin. To stop the recording, you can press the F9 button from your keyboard. After the recording ends, the file will be dropped into the media library of Filmora.
 ## ConclusionGoogle Meet is a reliable environment to connect and collaborate with people. To increase your reach and target audience, you can conduct Google Meet live streaming on YouTube. This article has discussed a detailed way through which you can live stream your Google Meet session on your YouTube channel.
To save and access your live streaming sessions later, you can try the screen recorder of Wondershare Filmora . This screen recorder can capture screen and respective audio in high quality.
Free Download For Win 7 or later(64-bit)
Free Download For macOS 10.14 or later
Precision in Perspective: Mastery of Youtube Video Degrees
How to Rotate YouTube Videos by Any Angle

Richard Bennett
Mar 27, 2024• Proven solutions
YouTube is compatible to all devices such as smartphones, tablets and computers. However, when the screen is too small, so does the video, which makes the watching experience full of inconvenience.
Sometimes, you may need to rotate the video left/right 90 degrees or 180 degrees. To rotate the YouTube video when you watching it, you can move your devices in order for you to get the perfect angle and make your watching fun and smooth.
Yet, did you know that you could possibly rotate YouTube videos either downloaded or before uploading, to the angle you are comfortable watching? Here is how.
- Method 1: Using YouTube Video Editor to Rotate Videos After Uploading
- Method 2: Rotate YouTube Videos by Advanced YouTube Video Editor Alternatives
Method 1: Using YouTube Video Editor to Rotate Videos [Not available after 2017]
Note: After updating in 2017 September, you cannot rotate a video on YouTube Enhancement. If you need to rotate a video, you should rotate the video before uploading it to YouTube.
YouTube has a built-in video editor where you can rotate YouTube video. Here are the ways on how you can successfully rotate a YouTube video online.
- Log in to your YouTube account.
- Click the dropdown located beside your profile’s thumbnail that can be found in your dashboard.
- Once you have successfully clicked the dropdown menu, you can now search for the video that you want to rotate.
- When you have already found the video, you can now click the Edit button that can easily be found under the thumbnail of the video.
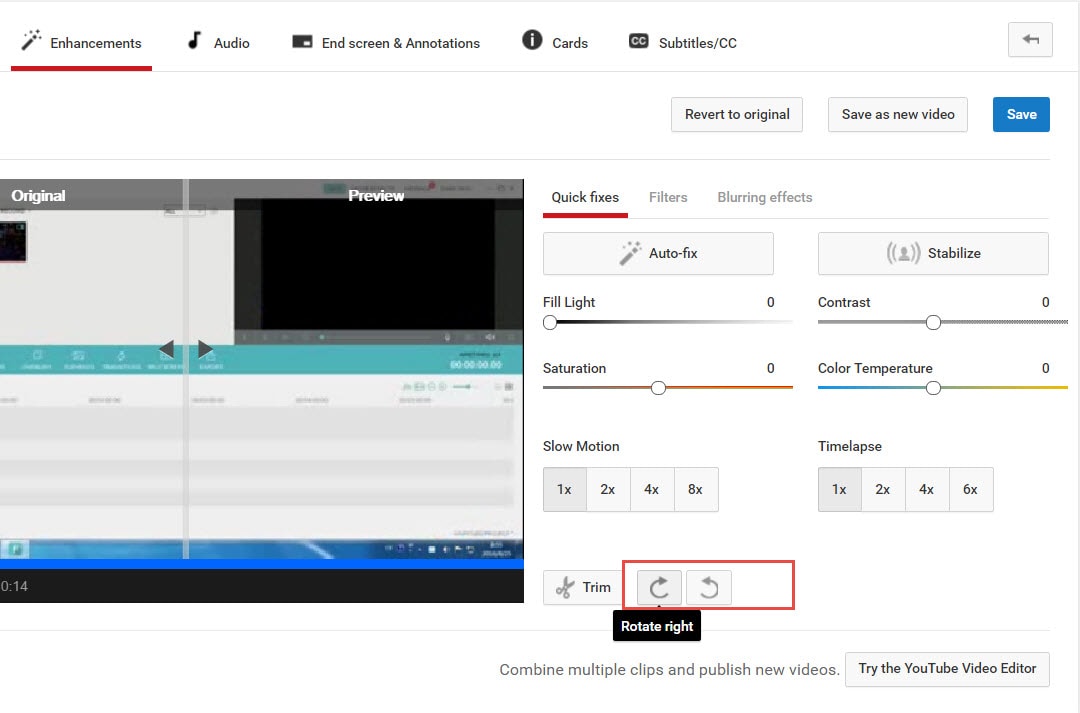
- In the Edit section, choose the Enhancements tab.
- You can find in the lower right part of the video preview the arrows for rotate right and rotate left.
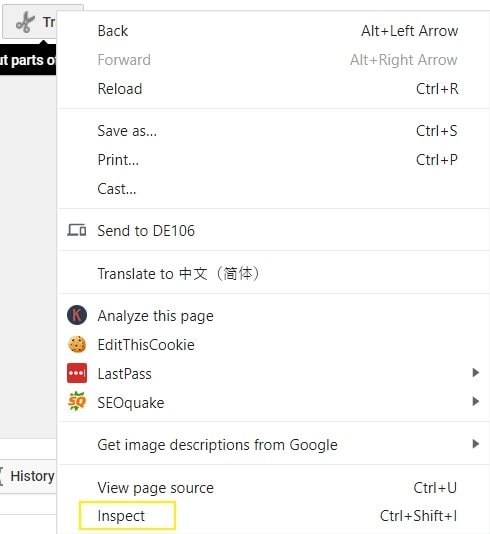
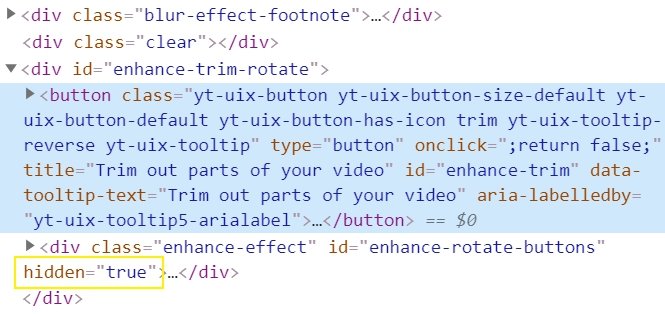
- [Not Recommended] There is a hacky way to show Rotate button on 2021. Right click on the Trim button and click inspect in the pop-up menu. A DevTools window will open with HTML codes of the Trim button highlighted as you can see it in the below image. Find enhance-rotate-buttons on the html codes, and delete the hiddden=”true”, then press the Enter button.
- Then, after choosing, you have successfully rotated the video.
Check this video tutorial to know how to rotate/flip YouTube video with YouTube Video Editor
Cons of YouTube Video Editor
However, using YouTube Video Editor is not the best way to rotate or flip a YouTube video.
- Obviously, one of its disadvantages is that the features are very basic. You can’t use more advanced functions for better edition.
- In addition, since you are doing it online, you need to keep on refreshing the page whenever you are making some changes in your video, which eats a lot of time.
- Another disadvantage of YouTube Video Editor is that you have to get access to internet, or you can’t edit the videos. But it’s headache when you forget to save your work or the internet crashes.
Method 2: Easier Ways to Rotate YouTube Videos by Any Angle
It is recommended to rotate the video before uploading to YouTube. But when you have downloaded a YouTube video, you can also change the rotation by making use of software made for video editing.
Som of the most popular video editors include Wondershare Filmora , Windows Movie Maker, Sony Vegas Movie Studio and Adobe Premiere. These softwares are perfect for editing your videos either you want to enhance it or change the rotation.
1. Wondershare Filmora: Best Video Editor for Beginners and Semi-Pros
Wondershare Filmora video editor is one of the best video editor for PC and perfect for YouTube beginners and semi-pros. You can use on both Windows and Mac you would want to rotate or edit videos to make it look interesting.
It not only allows you to cut, crop, rotate, reverse videos, but also offers your advanced features like PIP, Green Screen, or audio mixing. What’s more, you can find lots of effects for Fashion, gaming, education, tutorial, sports, etc.
### How to Rotate YouTube Videos with Filmora Video Editor?- Import the video.

- To rotate the video, double click it on the timeline.
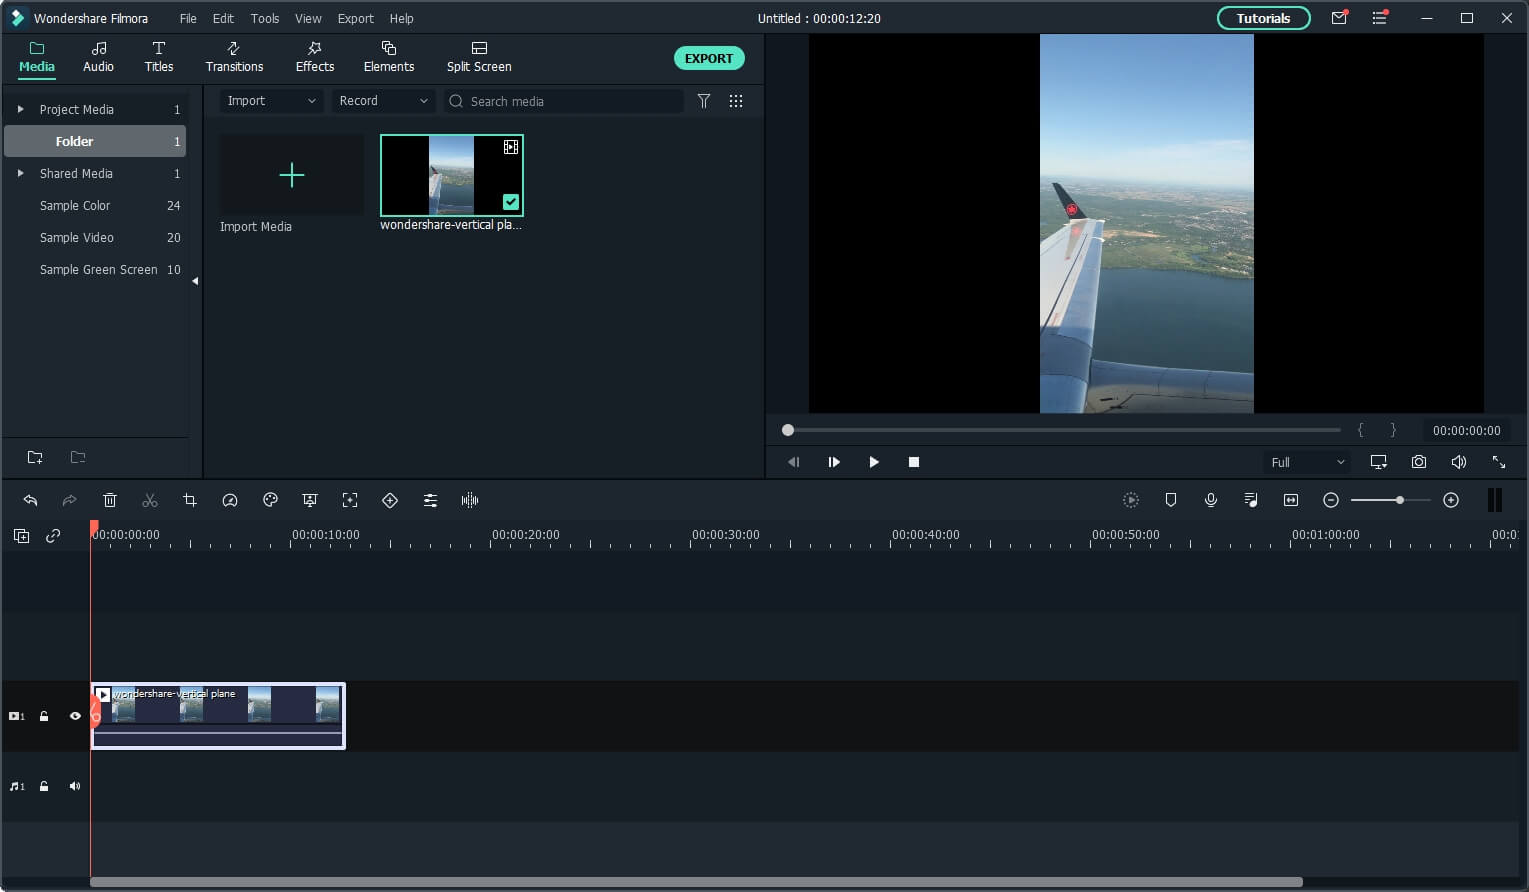
- The editing panel will appear and you will be able to see the rotation options.
- There are four buttons. You can rotate the videos in 90 degrees, 180 degrees and 270 degrees.

- Export the video that you have rotated.
2. Windows Movie Maker
For windows users who have Windows Movie Maker already installed on the computer, you can rotate the YouTube video with it with ease for Free. Besides rotating, you can edit the YouTube video with more features in Windows Movie Maker, such as combine several clips into one video, mirror and flip video, and reverse videos. For the detailed information, check our guide of How to Edit YouTube videos in Windows Movie Maker.
The steps of rotating a video in Windows Movie Maker is easy:
- Import the video.
- Click the video then select the rotate button that is found at the toolbar.

- Save the video after rotating on the right angle.
3. Sony Vegas Movie Studio
Sony Vegas Movie Studio is video editing software made for PC. Before it is knows as Sonic Foundry VideoFactory and Sony Screenblast Movie Studio.
- Click the square box that can be found on the video, which is situated at its end.
- The pan pop up will appear and you will be able to see the slider bar.
- At the slider bar, you can see the options rotation, position and key frame inter.
- Under the rotation section, you can enter the angle that you want to rotate the video then hit enter once you have entered the word angle.
4. Adobe Premiere: Best video editing software for professionals to rotate YouTube videos
Adobe Premier is video editing software that is time-line based and is included in the Adobe Creative Cloud.
- Launch Adobe Premiere.
- Start or open a project.
- Import the video.
- Drag the video to the timeline.
- Then, access Effects Control Lab.
- Find the option for rotation, which is located under the Motion option.
- Rotate the video to your desired angle.
For the detailed information, check How to Rotate videos in Premiere?
Have You Known How to Rotate a YouTube Video?
Whether you are watching YouTube videos online or you have downloaded it, you can feasibly rotate the videos on the angle that you want and it will be successful if you know how to do it. If you feel it helpful, share with your friends.

Richard Bennett
Richard Bennett is a writer and a lover of all things video.
Follow @Richard Bennett
- Title: [New] How To Turn Your Google Meet Into a YouTube Live Event for 2024
- Author: Jeffrey
- Created at : 2024-08-20 15:28:45
- Updated at : 2024-08-21 15:28:45
- Link: https://eaxpv-info.techidaily.com/new-how-to-turn-your-google-meet-into-a-youtube-live-event-for-2024/
- License: This work is licensed under CC BY-NC-SA 4.0.


