
!["[New] In 2024, Find Your Way to YouTube Studio A Comprehensive Overview"](https://thmb.techidaily.com/05c8c6fd73c6fec22a2f538188954b893a706bcf3ee5edf935baeb75dd083d47.jpg)
"[New] In 2024, Find Your Way to YouTube Studio A Comprehensive Overview"
Find Your Way to YouTube Studio: A Comprehensive Overview
Where Is Youtube Video Manager? [All You Need to Know]

Richard Bennett
Mar 27, 2024• Proven solutions
If you are a YouTuber and uploads video to your channel then you must need to see the statistics and analytics of your uploads. Sometimes you might want to alter some of the settings in the video that you already have uploaded.
So if you are looking for ways how to manage your videos and your YouTube overall then look no further. The solution lies in the YouTube studio. This is where all your video and their settings can be managed whether using a desktop PC or any smartphone.
So if you are wondering the sole purpose of YouTube studio and how to manage your productions using video manager then stay with us!
You will Learn :
- How YouTube Studio Can Manage Your Uploads?
- What Does A Video Manager Do?
- How to Find Video Manager on YouTube?
- How To Access Video Manager On YouTube Using A Desktop PC?
- How To Access YouTube Manager In YouTube Using Mobile Phones?
- How to Access YouTube Manager on YouTube Using An iPad?
Best Video Editing Software for YouTubers
Making a video with Filmora is simple, as this movie maker enables its users to import virtually any type of footage in just a couple of clicks.
There are one hundred tracks available so you can combine audio and video files effortlessly or add visual effects to them.
Filmora also offers full support for 4K videos,fgxcsd which means that you can use it to edit footage captured with GoPro and other action cameras.
In addition to huge effects and transitions libraries, the Filmora also features a rich selection of royalty-free music and audio effects that you can use to create soundtracks for all of your videos.
Filmora is free to download now. And due to its small Installation package, it’s easy and quick to install.


How YouTube Studio Can Manage Your Uploads?
The primary purpose of the YouTube studio is to manage your YouTube channel overall.
Accessing YouTube studio will let you see the statistics regarding how many people have viewed your videos, replies of any of the comment you made on your videos, and much more. This is where you can access one of the most significant options of Video Manger where you can completely customize the video setting accordingly any time after the uploading of your YouTube video.
What Does A Video Manager Do?
In the YouTube studio option, you will find another great tab of a video manager which will let you edit your productions, add, edit or delete annotation or even caption and perform zillions of similar related options to personalize and manage your video accordingly even after your video has been uploaded.
This gives one a huge margin to change the initial settings of the uploaded video if they came across any error or lacking in the video.
But you may wonder how to actually access the video manager in your YouTube channel to avail such a vast variety of options to customize your video setting and making it into a masterpiece to gain views to a greater extent by viewing, analyzing and improvising the analytics of your productions.
How to Find Video Manager on YouTube?
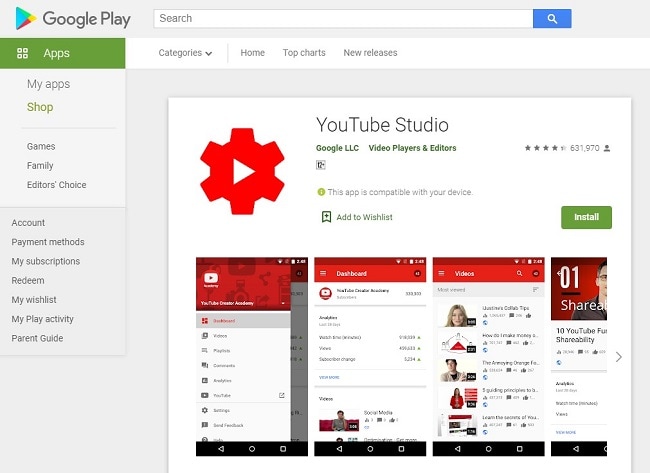
You can go access video manager on your desktop application of YouTube. Although you might need to download YouTube studio if you are looking for a video manager YouTube app. YouTube studio has abundant options in it, including a video manager. So once you download this application in your smartphone, be it iPhone or Android, you can have complete access to all the management features under the video manager option.
Read More to Get : How to Reverse Search a Video >>
How To Access Video Manager On YouTube Using A Desktop PC?
If you need to modify and organize your productions from a single place or just need customization in a particular video to adjust its setting then you can do it with a single click.
Video manager gives you full liberty to tweak the settings of your uploads, making use of tools for video optimization or making bulk update alterations.
So, without further ado, let’s dig into the step by step guide to how to get to YouTube video manager using desktop PC.
Step 1: Sign in to your YouTube account by entering your correct credentials.
Step 2: You will be redirected to the homepage of your YouTube channel.
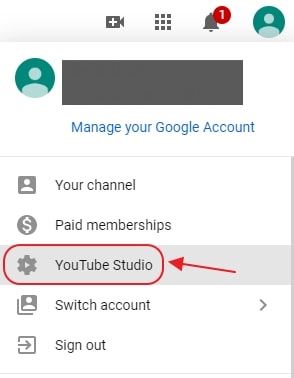
Step 3: At the top right corner of your YouTube main page, there will be your channel profile icon having a circular shape.

Step 4: Click on that icon.
Step 5: You will be served with abundant options in the dropdown, but you need to click on the YouTube studio (beta) option.
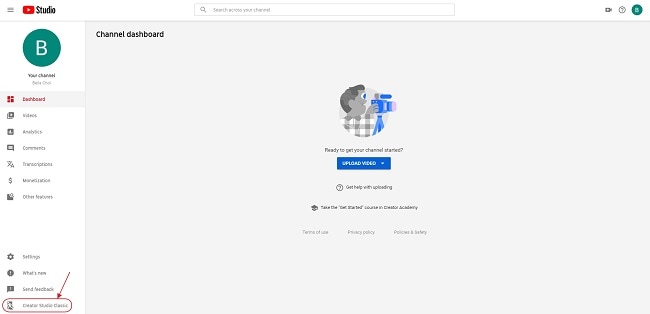
Step 6: This will redirect you to your channel’s dashboard where you will be facilitated with multiple options related to your video uploads, a complete and wholesome package to organize, monitor, improvise and manage your videos in general.
Step 7: At the left pane of the dashboard, you will see Creator Studio Classic at the bottom.
Step 8: Click on Creator Studio Classic.
Step 9: This will redirect you to creator studio. At the left on the window will be a bar full of multiple options where you will see the video manager option right there.
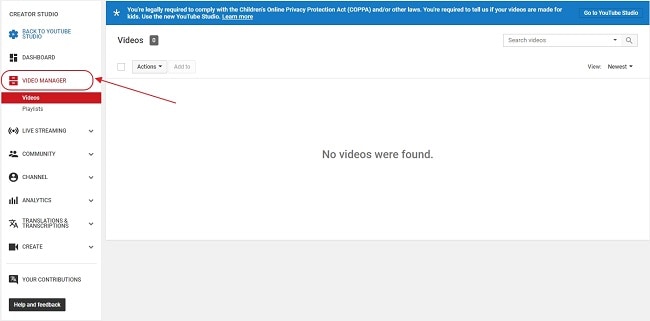
Step 10: Click on the video manager to manage.
Step 11: This will open a drop-down which gives you two options. One of managing your videos and others to organize your playlist or make any modifications as per your likeliness.
Voila! You are here in video manager, having full liberty to make any alteration to the metadata of your YouTube uploads. You are now a single click away to change the video title, its stale or non-captivating caption, adjust comment setting and literally everything right according to your choice.
How To Access YouTube Manager In YouTube Using Mobile Phones?
If you are used to operating your YouTube channel through smartphones like iPhone or any android phone or manage your account activities using a tablet then the process to manage your account remains quite the same.
You don’t need to stress out is you are using a mobile application of YouTube. You can still have complete authority to manage your videos using YouTube video manager mobile, YouTube studio applications.
YouTube studio application is an official tool dedicated to content creator introduced by Google for YouTube. This gives immense ease for the mobile users, either android or iPhone, to manage their videos and update the metadata of their upload by merely using this one application.
All thanks to Google to launch such an amazing and wholesome product, considering the ample number of content creators who use mobile phones to create and manage their productions.
YouTube Studio Application Link for iOS
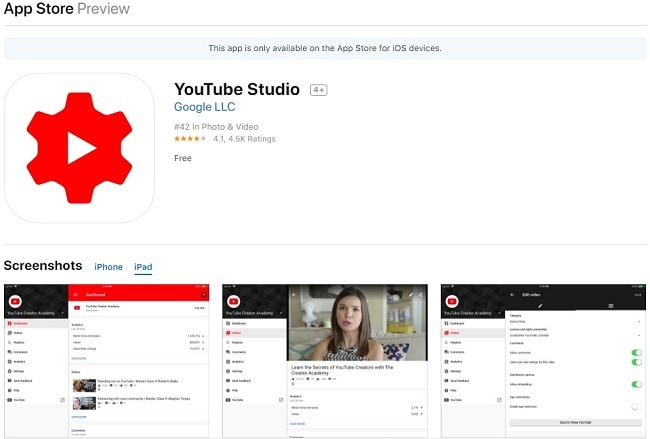
You can download this video manager YouTube application, named as YouTube studio, on your iPhone by clicking the link given here . You can download this YouTube video manager iPhone application on apple store which is absolutely free of cost.
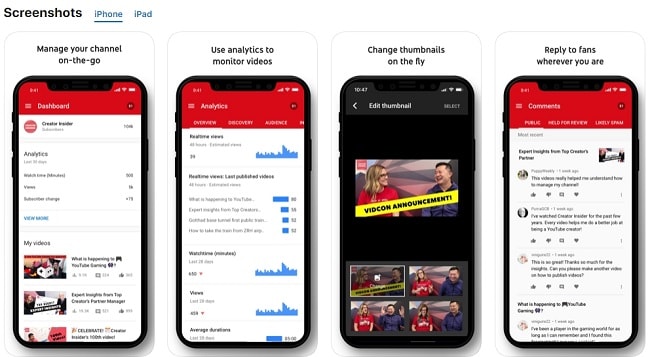
Downloading this tool will make the managing process of your YouTube channel quite easier and faster. Numerous list of options ranging from monitoring latest stats, create or update your productions’ thumbnail images to changing profile picture, reply to your comments, get notifications or organize your playlist on the go and stay connected from literally anywhere.
Features:
- Organize playlist
- Respond to the comments and also moderate them
- Get notified about important events and activities on your channel
- Update video settings like personalizing thumbnail pictures, adding a description, updating titles and monetization.
- Create and modify your profile images.
- Seek for help content using voice
How To Access YouTube Manager In YouTube Using Android?
Similar to the approach we used in for iPhone users, you can download YouTube studio application on google store by clicking on the link given here .
This application is available free on the internet.
If you are an android user and looking for an application that can manage your YouTube channel with an abundance of options, then The official application developed by Google, YouTube Studio is the answer to your question “how to get to YouTube video manager”. It is a powerful tool to give you all the controls to manage and efficiently organize your YouTube channel with great ease and speed.
Features:
- Filter and get an update with the response on the comments
- Monitor video performance and channel activity using user-friendly analytics
- Manage and organize playlist
- Update video settings like schedule dates, personalizing thumbnail pictures, adding description, updating titles and monetization settings.
How to Access YouTube Manager on YouTube Using An iPad?
You can enjoy all the same features as facilitated in the YouTube Studio app for iOS and Android users. All you need is to download this application by clicking on the link given here .
You may find this tool a little overwhelming at the fresh start. There are multiple options given to the users and given full control and independence to manage the video settings as per your requirement for improvisation purposes.
This may take some time to get yourself familiar with this tool. The more you explore deep into it, the more quickly you will get hold onto it.
Worry not! These experiments won’t do any harm to productions, but only make you expertise in a while.
To learn the fundamentals of YouTube Studio application and video manager, you can refer to this site .
Conclusion
The use of YouTube had outgrown to an extent that it has now become a professional career for many which once used to a merely an entertainment platform and get nothing in return for creating content.
But now with the shift of trend, YouTube is taken seriously as a professional domain to earn through the productions or spread awareness and joy to others through one’s creative content. For your content to make an impact, your channel needs thorough management and organization to view your content’s quality by seeing the stats and manage accordingly.
This is now possible to achieve all this within the snap of fingers with great ease offered by this great tool, Video Manager. With this, you can edit and customize your video’s metadata and improvise your video settings to elevate your channel to the next level.
Richard Bennett
Richard Bennett is a writer and a lover of all things video.
Follow @Richard Bennett
Unveiling the Secrets of Successful High-Res Videos on YouTube
Create High-Quality Video - Wondershare Filmora
An easy and powerful YouTube video editor
Numerous video and audio effects to choose from
Detailed tutorials provided by the official channel
Many people have a strong desire to make videos. Whether you make videos for a living or as a pastime, it doesn’t matter. When you make a fantastic film that you’re pleased with, you want to show it off to your friends and family. YouTube, the most popular site for sharing videos on various themes, is one of the most incredible places to start.
YouTube is fantastic for sharing videos, but it can be harsh on artists due to the high bar for content and video quality. If you want to succeed as a YouTuber, you must create videos that are informative and high-resolution. This is critical since your viewers may wish to watch your movies on a computer screen or a 4K smart TV.
If you’ve decided to make videos in 4K resolution, you’ll find information on recommended encoding settings, how to upload a video to YouTube, potential problems, and more below.
In this article
01 What Is The Distinction Between Various Resolutions?
02 Why Would You Want To Upload A 4k Video?
03 What Is The Best Way To Upload A 4k Video To Youtube?
04 Tips On How To Make Sure The Video You’re Uploading Is Of High Quality
What Is The Distinction Between Various Resolutions?
The number of pixels on a screen is referred to as resolution. Low resolution indicates fewer pixels and typically less space, whereas high resolution means more pixels and generally greater space and detail. You probably have a poor resolution if you’re using a standard laptop or an old screen.
When watching a video on a larger screen, the resolution significantly impacts your viewing experience. Whether it’s a live stream or an on-demand movie, the correct resolution is crucial to reaching a wider audience, and this is where iPhones and iPads appear to have an advantage. Let’s take a closer look at each of these resolution types and their associated pixel sizes.
1. SD RESOLUTION (STANDARD DEFINITION)
Previously, resolutions were separated into SD (Standard Definition) and HD (High Definition) categories. SD was defined as a video with a resolution of less than 720p. However, as television and computer monitor display resolutions improved over time, a video was less likely to be shot in Standard Definition.
The following are the most common standard video resolutions:
- 640 × 360 pixels (or 360p)
- 640 × 480 pixels (or 480p)
2. RESOLUTION: 720P HD (HIGH DEFINITION)
The lowest video resolution is 720p, which is commonly referred to as ‘HD.’ 720p (1280 x 720 pixels) is a resolution recognized for modest web content, even though most videos require at least 1080p. Because most computer monitors are now in HD, the recommended practice for web and streaming is to choose a resolution higher than 720p.
The resolution of HD videos is usually: 1280 x 720 pixels (or 720p)
3. 1080P FULL HD RESOLUTION
1080p resolutions, also known as ‘Full HD,’ have become the industry standard for a clear HD video that doesn’t take up a lot of storage space. It’s also worth noting that this is the standard screen resolution for all smartphones.
The resolution of full HD videos is usually: 1920 x 1080 pixels (or 1080p)
4. 2K RESOLUTION WITH QHD (QUAD HIGH DEFINITION)
Quad HD resolution, or QHD for short, is widely found on high-end smartphones and gaming monitors. The resolution of 1440p is four times that of HD Ready (or 720p HD). Many high-end smartphones have a Quad HD+ resolution (296 x 1440 pixels), which is ideal for 1440p. Another common screen resolution is 2K, which allows for larger displays and reframing without sacrificing quality or image editing.
The resolution of QHD and 2K videos is:
- 2560 x 1440 pixels in QHD (or 1440p)
- 2048 x 1080 pixels in 2K (or 1080p)
5. 4K (OR UHD/ULTRA-HIGH-DEFINITION) RESOLUTION
This sort of resolution, often known as 4Kor UHD (Ultra High Definition), has a pixel size of 3840 x 2160 pixels. It has a similar appearance to 2K, but it provides video artists more room to edit and zoom in. For vivid color, graphics, or dramatic viewing, both 2K and 4K resolutions are available. Unless you wish to tweak colors or trim in closer, there aren’t enough visible distinctions between 2K and 4K. So, it matters when you want to change a certain detail, but it doesn’t matter when someone else is looking at it.
The resolution of 4K videos is: 3840 x 2160 (or 2160p / simply 4K) is a resolution of 3840 x 2160 pixels.
Why Would You Want To Upload A 4k Video?
YouTube is the second-largest social media site, with approximately 1.9 billion monthly active users. YouTube is where you want to be to access this large audience and promote your brand, with one billion hours of video watched every day on the platform.
However, for your target audience to watch your videos, you must ensure excellent video quality. Poorly shot or edited films may alienate your viewers, especially when there are billions of other videos to choose from on the site.
- 4k is the most satisfactory resolution for uploading to YouTube. Although not every viewer can watch videos in 4k, it ensures that your visitors get the best possible experience.
- Traditional Full HD (1920 x 1080) TVs feature four times as many pixels as 4K TVs. Because of the higher pixel density, the picture quality of 4K TVs is more colorful and detailed, even on TV displays of the same size. This distinction is most noticeable on large-screen televisions.
- Even if you recorded in 1080p and upscaled to 4K, you should post in 4K to YouTube for the finest image quality. Recording in 1080p, editing in 1080p, exporting in 4k, and YouTube viewing is sharper in 1080p.
- With 4K, you get stunning visuals with a resolution of 38402160, which is four times that of Full-HD. That’s why visuals appear crisp and lifelike, even on large-screen TVs rather than pixelated. Down-converted 4K to Full-HD photographs have superior quality and resolution than images shot in Full-HD from the start.
What Is The Best Way To Upload A 4k Video To Youtube?
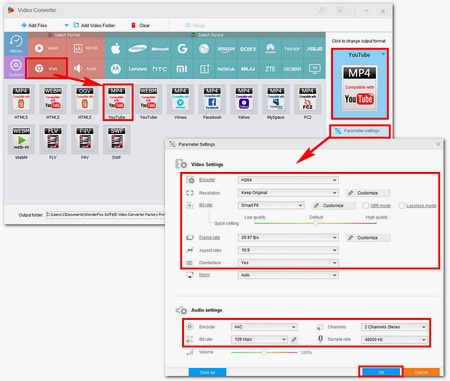
The YouTube upload process is not complicated, but it does need several steps. You can finally post your video once it has been prepared and converted to MP4 format.
Follow the steps below to post your video to YouTube:
1. Go to YouTube.com in your browser.
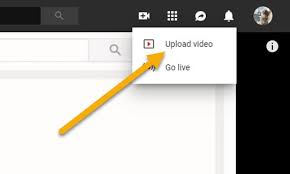
2. Log in to your account and click the “Create” symbol, which looks like a camera with a plus sign, in the right corner of the menu bar.
3. Select “Upload video” from the drop-down menu.
4. Drag and drop your video file into the upload box, or select your file from the “Select File” menu and click “Open.”
5. Make a note of the title and description while YouTube is processing your video.

6. Select a video thumbnail from the options or upload your own and select your “Audience” from the drop-down menu. To manage age restriction settings.
7. Select “More Options” to add searchable keywords to your video, manage subtitles and comments, and more.
8. Select if you want to add promotions to your video by clicking “Next.”
9. Finally, click “Next” and wait for the video to be processed entirely before publishing it.
10. You can also automatically set it to publish at a later date.
Tips On How To Make Sure The Video You’re Uploading Is Of High Quality
The following are five tips for amateur and top newbie YouTubers who want to improve their videos.
1. Cut Your Video Into Clips And Organize It
While it may appear to be the simplest solution to perform an entire video at once, this might make the process tedious or even damage your video if you are interrupted or make a speech error. Smaller video segments are easier to edit and blend into a single, well-formatted video.
2. Youtube Video Export
You can also modify your videos in various formats to your heart’s content before exporting them to YouTube and publishing them. Although uploading and exporting may take some time, the quality of your video will significantly increase, and the time and work you put in will be evident.
3. Change Up Your Shots
Rather than keeping your camera fixed, try varied angles while shooting. This may not work for all of your videos, but it is critical to keep your viewers engaged while they watch them, especially if you want them to stay until the finish and come back for more. Unless you’re talking about anything incredibly essential, sitting and listening to someone talk for more than 10 minutes without the camera moving will quickly become dull or old.
4. Transitions And Effects
When editing a video with numerous parts, the use of effects and transitions can considerably impact the overall quality of the video. Filmora is far more sophisticated than Windows Movie Maker and iMovie on Mac. It also allows you to create a professional-looking YouTube video with hundreds of presets such as filters, overlays, components, transitions, and blending several layers of effects and audio to enhance your YouTube tale.
Wondershare Filmii is one of the greatest choices for Windows for beginners who wish to create video footage with templates automatically. Smart video templates, trendy filters and overlays, fun stickers and motion components, and, most importantly, advanced editing capabilities are all available.
For Win 7 or later (64-bit)
For macOS 10.12 or later
Conclusion
● This is pretty much everything we’ve gathered to assist you in uploading 4K videos to YouTube. Do not become worried. Your 4K video will be in low resolution when you first publish it. This is due to YouTube’s high-resolution processing requiring time. It could take a few hours for your video to be available in 4K mode.
● The duration, format, frame rate, and resolution of your video all affect the processing time for high-definition videos. If you don’t want your video to be seen unless it has a high-quality option, upload it as unlisted and then publish it once 4K resolution is available.
Many people have a strong desire to make videos. Whether you make videos for a living or as a pastime, it doesn’t matter. When you make a fantastic film that you’re pleased with, you want to show it off to your friends and family. YouTube, the most popular site for sharing videos on various themes, is one of the most incredible places to start.
YouTube is fantastic for sharing videos, but it can be harsh on artists due to the high bar for content and video quality. If you want to succeed as a YouTuber, you must create videos that are informative and high-resolution. This is critical since your viewers may wish to watch your movies on a computer screen or a 4K smart TV.
If you’ve decided to make videos in 4K resolution, you’ll find information on recommended encoding settings, how to upload a video to YouTube, potential problems, and more below.
In this article
01 What Is The Distinction Between Various Resolutions?
02 Why Would You Want To Upload A 4k Video?
03 What Is The Best Way To Upload A 4k Video To Youtube?
04 Tips On How To Make Sure The Video You’re Uploading Is Of High Quality
What Is The Distinction Between Various Resolutions?
The number of pixels on a screen is referred to as resolution. Low resolution indicates fewer pixels and typically less space, whereas high resolution means more pixels and generally greater space and detail. You probably have a poor resolution if you’re using a standard laptop or an old screen.
When watching a video on a larger screen, the resolution significantly impacts your viewing experience. Whether it’s a live stream or an on-demand movie, the correct resolution is crucial to reaching a wider audience, and this is where iPhones and iPads appear to have an advantage. Let’s take a closer look at each of these resolution types and their associated pixel sizes.
1. SD RESOLUTION (STANDARD DEFINITION)
Previously, resolutions were separated into SD (Standard Definition) and HD (High Definition) categories. SD was defined as a video with a resolution of less than 720p. However, as television and computer monitor display resolutions improved over time, a video was less likely to be shot in Standard Definition.
The following are the most common standard video resolutions:
- 640 × 360 pixels (or 360p)
- 640 × 480 pixels (or 480p)
2. RESOLUTION: 720P HD (HIGH DEFINITION)
The lowest video resolution is 720p, which is commonly referred to as ‘HD.’ 720p (1280 x 720 pixels) is a resolution recognized for modest web content, even though most videos require at least 1080p. Because most computer monitors are now in HD, the recommended practice for web and streaming is to choose a resolution higher than 720p.
The resolution of HD videos is usually: 1280 x 720 pixels (or 720p)
3. 1080P FULL HD RESOLUTION
1080p resolutions, also known as ‘Full HD,’ have become the industry standard for a clear HD video that doesn’t take up a lot of storage space. It’s also worth noting that this is the standard screen resolution for all smartphones.
The resolution of full HD videos is usually: 1920 x 1080 pixels (or 1080p)
4. 2K RESOLUTION WITH QHD (QUAD HIGH DEFINITION)
Quad HD resolution, or QHD for short, is widely found on high-end smartphones and gaming monitors. The resolution of 1440p is four times that of HD Ready (or 720p HD). Many high-end smartphones have a Quad HD+ resolution (296 x 1440 pixels), which is ideal for 1440p. Another common screen resolution is 2K, which allows for larger displays and reframing without sacrificing quality or image editing.
The resolution of QHD and 2K videos is:
- 2560 x 1440 pixels in QHD (or 1440p)
- 2048 x 1080 pixels in 2K (or 1080p)
5. 4K (OR UHD/ULTRA-HIGH-DEFINITION) RESOLUTION
This sort of resolution, often known as 4Kor UHD (Ultra High Definition), has a pixel size of 3840 x 2160 pixels. It has a similar appearance to 2K, but it provides video artists more room to edit and zoom in. For vivid color, graphics, or dramatic viewing, both 2K and 4K resolutions are available. Unless you wish to tweak colors or trim in closer, there aren’t enough visible distinctions between 2K and 4K. So, it matters when you want to change a certain detail, but it doesn’t matter when someone else is looking at it.
The resolution of 4K videos is: 3840 x 2160 (or 2160p / simply 4K) is a resolution of 3840 x 2160 pixels.
Why Would You Want To Upload A 4k Video?
YouTube is the second-largest social media site, with approximately 1.9 billion monthly active users. YouTube is where you want to be to access this large audience and promote your brand, with one billion hours of video watched every day on the platform.
However, for your target audience to watch your videos, you must ensure excellent video quality. Poorly shot or edited films may alienate your viewers, especially when there are billions of other videos to choose from on the site.
- 4k is the most satisfactory resolution for uploading to YouTube. Although not every viewer can watch videos in 4k, it ensures that your visitors get the best possible experience.
- Traditional Full HD (1920 x 1080) TVs feature four times as many pixels as 4K TVs. Because of the higher pixel density, the picture quality of 4K TVs is more colorful and detailed, even on TV displays of the same size. This distinction is most noticeable on large-screen televisions.
- Even if you recorded in 1080p and upscaled to 4K, you should post in 4K to YouTube for the finest image quality. Recording in 1080p, editing in 1080p, exporting in 4k, and YouTube viewing is sharper in 1080p.
- With 4K, you get stunning visuals with a resolution of 38402160, which is four times that of Full-HD. That’s why visuals appear crisp and lifelike, even on large-screen TVs rather than pixelated. Down-converted 4K to Full-HD photographs have superior quality and resolution than images shot in Full-HD from the start.
What Is The Best Way To Upload A 4k Video To Youtube?
The YouTube upload process is not complicated, but it does need several steps. You can finally post your video once it has been prepared and converted to MP4 format.
Follow the steps below to post your video to YouTube:
1. Go to YouTube.com in your browser.
2. Log in to your account and click the “Create” symbol, which looks like a camera with a plus sign, in the right corner of the menu bar.
3. Select “Upload video” from the drop-down menu.
4. Drag and drop your video file into the upload box, or select your file from the “Select File” menu and click “Open.”
5. Make a note of the title and description while YouTube is processing your video.
6. Select a video thumbnail from the options or upload your own and select your “Audience” from the drop-down menu. To manage age restriction settings.
7. Select “More Options” to add searchable keywords to your video, manage subtitles and comments, and more.
8. Select if you want to add promotions to your video by clicking “Next.”
9. Finally, click “Next” and wait for the video to be processed entirely before publishing it.
10. You can also automatically set it to publish at a later date.
Tips On How To Make Sure The Video You’re Uploading Is Of High Quality
The following are five tips for amateur and top newbie YouTubers who want to improve their videos.
1. Cut Your Video Into Clips And Organize It
While it may appear to be the simplest solution to perform an entire video at once, this might make the process tedious or even damage your video if you are interrupted or make a speech error. Smaller video segments are easier to edit and blend into a single, well-formatted video.
2. Youtube Video Export
You can also modify your videos in various formats to your heart’s content before exporting them to YouTube and publishing them. Although uploading and exporting may take some time, the quality of your video will significantly increase, and the time and work you put in will be evident.
3. Change Up Your Shots
Rather than keeping your camera fixed, try varied angles while shooting. This may not work for all of your videos, but it is critical to keep your viewers engaged while they watch them, especially if you want them to stay until the finish and come back for more. Unless you’re talking about anything incredibly essential, sitting and listening to someone talk for more than 10 minutes without the camera moving will quickly become dull or old.
4. Transitions And Effects
When editing a video with numerous parts, the use of effects and transitions can considerably impact the overall quality of the video. Filmora is far more sophisticated than Windows Movie Maker and iMovie on Mac. It also allows you to create a professional-looking YouTube video with hundreds of presets such as filters, overlays, components, transitions, and blending several layers of effects and audio to enhance your YouTube tale.
Wondershare Filmii is one of the greatest choices for Windows for beginners who wish to create video footage with templates automatically. Smart video templates, trendy filters and overlays, fun stickers and motion components, and, most importantly, advanced editing capabilities are all available.
For Win 7 or later (64-bit)
For macOS 10.12 or later
Conclusion
● This is pretty much everything we’ve gathered to assist you in uploading 4K videos to YouTube. Do not become worried. Your 4K video will be in low resolution when you first publish it. This is due to YouTube’s high-resolution processing requiring time. It could take a few hours for your video to be available in 4K mode.
● The duration, format, frame rate, and resolution of your video all affect the processing time for high-definition videos. If you don’t want your video to be seen unless it has a high-quality option, upload it as unlisted and then publish it once 4K resolution is available.
Also read:
- [New] In 2024, Film Assembly Station
- [Updated] In 2024, How to Make Fortnite Thumbnail for Free and Easy
- [Updated] In 2024, Guidelines to Affirm Your YouTube Status
- [New] 2024 Approved First Steps in the Digital Dollar - YouTube Earning Hacks
- [New] Grandview Media Mastering the Art of Selecting a CMS for 2024
- [New] In 2024, How to Recover Hidden Shorts' Thumbnails in Videos
- [Updated] In 2024, Harmonizing Tracks in YouTube Music
- [Updated] In 2024, Going Pro with GS Effects Exclusive Free Lessons From 4 Premier Video Channels
- [New] Future of Online Gaming Earnings for 2024
- 2024 Approved Gaming Galaxy's Wackiest Titles - TikTok Edition
- [Updated] In 2024, Elevate Video Clarity with Expert Tips for YouTube Editors
- 2024 Approved Colorful Compositions in a Click Photoshop's Guide
- Pro Monitor Snapshot Software W10 for 2024
- In 2024, Build a Loyal Audience on Facebook Using Effective Growth Methods
- How to get the dragon scale and evolution-enabled pokemon On Meizu 21? | Dr.fone
- How Can I Use a Fake GPS Without Mock Location On Huawei Nova Y91? | Dr.fone
- The Best iSpoofer Alternative to Try On Vivo Y78+ | Dr.fone
- How to recover deleted photos from Android Gallery after format on Nokia C300
- Updated 2024 Approved Victory Vibrations Locating Dynamic Cheer Noises
- Title: "[New] In 2024, Find Your Way to YouTube Studio A Comprehensive Overview"
- Author: Jeffrey
- Created at : 2024-06-06 14:22:04
- Updated at : 2024-06-07 14:22:04
- Link: https://eaxpv-info.techidaily.com/new-in-2024-find-your-way-to-youtube-studio-a-comprehensive-overview/
- License: This work is licensed under CC BY-NC-SA 4.0.
