![[New] In 2024, How To Turn Your Google Meet Into a YouTube Live Event](https://thmb.techidaily.com/264f7e50d992f10f22f440e035402650c9e912cde2fed4f7c2aee477f6b93402.jpg)
[New] In 2024, How To Turn Your Google Meet Into a YouTube Live Event
How To Turn Your Google Meet Into a YouTube Live Event
Google Meet helps people to connect virtually with each other in a well-protected environment. If you have physical restrictions, Google Meet can provide an enhanced ecosystem to collaborate with your team members. With high video and audio quality, it can prevent you from any sort of disturbance. If you want to connect with a larger audience during your Google Meet sessions, you can go for live streaming.
This article will address how to conduct Google Meet live stream through the platform of YouTube. To learn more, continue reading this guide.
- Available Google Workspace Edition
- Approval of YouTube Channel for Live
- Connect your YouTube Channel to Google Meet
- How to Live Stream from Google Meet to YouTube
- Bonus Tip: Easily Record your Google Meet Live Stream
Part 1: Three Things to Check Before Starting Your Live
Before increasing your audience from Google Meet live stream on YouTube, make sure to check the below prerequisites.
1. Available Google Workspace Edition
For Google Meet YouTube live, there are some requirements. The reason is that not every ordinary user of Google Meet can go for YouTube live streaming. To do so, you should buy any of the following pricing plans:
| Google Workspace Pricing Plan | Price |
|---|---|
| Enterprise Starter | Approx. $10/User/Month |
| Enterprise Standard | Approx. $20/User/Month |
| Enterprise Plus | Approx. $30/User/Month |
| Education Plus | Approx. $5/Student/Month |
| Teaching and Learning Upgrade | Approx. $4/License/Month |
| Workspace Individual Subscriber | Approx. $9.9/Month |
| Google One Subscribers with 2 TB or More Storage Space | Approx. $10/Month |
![]()
Note: To know the exact pricing plans of Google Workspace, you have to contact Google Support.
2. Approval of YouTube Channel for Live
To conduct live streaming, you must receive approval from the YouTube channel. For this, you must access your channel’s YouTube Studio to perform the account verification. Now to activate and enable live streaming on your YouTube account, check the following steps:
Step1 Open your YouTube account and click on the “Profile” icon given at the top-right corner. After opening the Profile menu, click on the “YouTube Studio” option.

Step2 A new window will be displayed on your screen. From the left panel, select “Content” among other options. Under the section called “Live,” locate the “Get Started” option. Afterward, tap on the “Request” option and perform the verification steps for enabling live streaming. After 24 hours, you would get approval for live streaming on YouTube. Hence, you would be able to live stream Google Meet meetings through your YouTube channel.

3. Connect your YouTube Channel to Google Meet
Once you get approval for live streaming, you can connect the YouTube channel to your Google Meet account. If the Host Management option is disabled, anyone within the Google Meet session can start live streaming. Conversely, only hosts or co-hosts can begin live streaming if this option is activated. Moreover, the individual who is starting the live stream from Google Meet will get connected to his YouTube channel.
Furthermore, you should use the same email address to enter the Google Meet that is connected to your YouTube account. By using the same email address, you can ensure smooth live streaming of Google Meet sessions to your YouTube channel. Also, you can only use laptops or desktops for initiating live streaming. The reason is that the Google Meet live stream on YouTube is not currently available on mobile devices.
Part 2: How to Live Stream from Google Meet to YouTube
Once you have fulfilled all the requirements, you can start a live stream from Google Meet to YouTube. Check the following steps to execute the process:
Step1 To allow Google Meet sessions to live stream on YouTube, the Google Workspace admin must adjust some settings. To begin, log in to the “Admin Console” on the Workspace administrator account. Now go to “Apps” and access the “Google Workspace” option.
Step2 Afterward, click “Google Meet” and tap on the “Stream” option. Once done, click on the “Pencil” icon to open the Settings menu. Now enable the options “Let People Steam Their Meetings” and “Let People Use YouTube to Stream Meetings.” Once done with the changes, click on the “Save” button.
Step3 Make sure that the Google account attached to your YouTube channel is capable of live streaming. Once done, go to your YouTube channel and tap on the “Create” button. Afterward, hit the “Live” button.
Step4 Now enter your Google Meet session and click on the “Activities” option. From the Activities menu, select “Live Streaming.” Now a small menu will open for live-streaming settings. You can create a new event and add an event title. Make sure to choose the privacy options and desired language. Afterward, click on the “Start Streaming” option.
Step5 A small pop-up will appear that will tell you to remind your participants about live streaming. After reminding, click on the “Start” button. You can see the red “Live” button that will indicate to you the ongoing live-streaming session. Once you have concluded the live streaming by clicking on the “Stop Streaming” button, you can check the video analytics by visiting your YouTube channel.
Bonus Tip: Easily Record your Google Meet Live Stream
Do you want to save your Google Meet live-stream session? The best tool through which you can save your essential live-streaming sessions is Wondershare Filmora Screen Recorder . By using this efficient screen recorder, you can access your saved live streaming session and revise the important points discussed in it.
The screen recorder of Filmora is capable of capturing webcam and screen recording simultaneously. You can select a customized recording area through this tool. For example, you can choose a full screen, a specific window, or a customized area. Furthermore, this screen recording tool can also capture your microphone and system’s sounds in high quality. At the same time, as a powerful video editor, you can edit your videos with various advanced features of Filmora to bring them to the next level. Click the video below to learn more about Filmora’s new features.
Steps to Record Live Streaming Using Filmora Screen Recorder
Are you ready to capture your live-streaming session on Google Meet? Here are the simple and accurate steps to begin the process:
Step1 Open the Screen Recorder
Download Wondershare Filmora and open its interface. Click the “Screen Recorder” option given on the main homepage. By doing so, a screen recorder window will open. Here, you can select screen recording modes such as full-screen, target window, or custom. Also, make sure to choose your system’s audio and microphone to proceed.

Step2 Adjust Settings and Start Recording
From Settings, you can also select the quality, frame rate, and color of mouse clicks. Once you have adjusted all the settings properly, hit the “REC” button.

Step3 End the Recording
After the countdown, the screen recording will begin. To stop the recording, you can press the F9 button from your keyboard. After the recording ends, the file will be dropped into the media library of Filmora.

Conclusion
Google Meet is a reliable environment to connect and collaborate with people. To increase your reach and target audience, you can conduct Google Meet live streaming on YouTube. This article has discussed a detailed way through which you can live stream your Google Meet session on your YouTube channel.
To save and access your live streaming sessions later, you can try the screen recorder of Wondershare Filmora . This screen recorder can capture screen and respective audio in high quality.
Free Download For Win 7 or later(64-bit)
Free Download For macOS 10.14 or later
Part 1: Three Things to Check Before Starting Your Live
Before increasing your audience from Google Meet live stream on YouTube, make sure to check the below prerequisites.
1. Available Google Workspace Edition
For Google Meet YouTube live, there are some requirements. The reason is that not every ordinary user of Google Meet can go for YouTube live streaming. To do so, you should buy any of the following pricing plans:
| Google Workspace Pricing Plan | Price |
|---|---|
| Enterprise Starter | Approx. $10/User/Month |
| Enterprise Standard | Approx. $20/User/Month |
| Enterprise Plus | Approx. $30/User/Month |
| Education Plus | Approx. $5/Student/Month |
| Teaching and Learning Upgrade | Approx. $4/License/Month |
| Workspace Individual Subscriber | Approx. $9.9/Month |
| Google One Subscribers with 2 TB or More Storage Space | Approx. $10/Month |
![]()
Note: To know the exact pricing plans of Google Workspace, you have to contact Google Support.
2. Approval of YouTube Channel for Live
To conduct live streaming, you must receive approval from the YouTube channel. For this, you must access your channel’s YouTube Studio to perform the account verification. Now to activate and enable live streaming on your YouTube account, check the following steps:
Step1 Open your YouTube account and click on the “Profile” icon given at the top-right corner. After opening the Profile menu, click on the “YouTube Studio” option.
Step2 A new window will be displayed on your screen. From the left panel, select “Content” among other options. Under the section called “Live,” locate the “Get Started” option. Afterward, tap on the “Request” option and perform the verification steps for enabling live streaming. After 24 hours, you would get approval for live streaming on YouTube. Hence, you would be able to live stream Google Meet meetings through your YouTube channel.
3. Connect your YouTube Channel to Google Meet
Once you get approval for live streaming, you can connect the YouTube channel to your Google Meet account. If the Host Management option is disabled, anyone within the Google Meet session can start live streaming. Conversely, only hosts or co-hosts can begin live streaming if this option is activated. Moreover, the individual who is starting the live stream from Google Meet will get connected to his YouTube channel.
Furthermore, you should use the same email address to enter the Google Meet that is connected to your YouTube account. By using the same email address, you can ensure smooth live streaming of Google Meet sessions to your YouTube channel. Also, you can only use laptops or desktops for initiating live streaming. The reason is that the Google Meet live stream on YouTube is not currently available on mobile devices.
Part 2: How to Live Stream from Google Meet to YouTube
Once you have fulfilled all the requirements, you can start a live stream from Google Meet to YouTube. Check the following steps to execute the process:
Step1 To allow Google Meet sessions to live stream on YouTube, the Google Workspace admin must adjust some settings. To begin, log in to the “Admin Console” on the Workspace administrator account. Now go to “Apps” and access the “Google Workspace” option.
Step2 Afterward, click “Google Meet” and tap on the “Stream” option. Once done, click on the “Pencil” icon to open the Settings menu. Now enable the options “Let People Steam Their Meetings” and “Let People Use YouTube to Stream Meetings.” Once done with the changes, click on the “Save” button.
Step3 Make sure that the Google account attached to your YouTube channel is capable of live streaming. Once done, go to your YouTube channel and tap on the “Create” button. Afterward, hit the “Live” button.
Step4 Now enter your Google Meet session and click on the “Activities” option. From the Activities menu, select “Live Streaming.” Now a small menu will open for live-streaming settings. You can create a new event and add an event title. Make sure to choose the privacy options and desired language. Afterward, click on the “Start Streaming” option.
Step5 A small pop-up will appear that will tell you to remind your participants about live streaming. After reminding, click on the “Start” button. You can see the red “Live” button that will indicate to you the ongoing live-streaming session. Once you have concluded the live streaming by clicking on the “Stop Streaming” button, you can check the video analytics by visiting your YouTube channel.
Bonus Tip: Easily Record your Google Meet Live Stream
Do you want to save your Google Meet live-stream session? The best tool through which you can save your essential live-streaming sessions is Wondershare Filmora Screen Recorder . By using this efficient screen recorder, you can access your saved live streaming session and revise the important points discussed in it.
The screen recorder of Filmora is capable of capturing webcam and screen recording simultaneously. You can select a customized recording area through this tool. For example, you can choose a full screen, a specific window, or a customized area. Furthermore, this screen recording tool can also capture your microphone and system’s sounds in high quality. At the same time, as a powerful video editor, you can edit your videos with various advanced features of Filmora to bring them to the next level. Click the video below to learn more about Filmora’s new features.
Steps to Record Live Streaming Using Filmora Screen Recorder
Are you ready to capture your live-streaming session on Google Meet? Here are the simple and accurate steps to begin the process:
Step1 Open the Screen Recorder
Download Wondershare Filmora and open its interface. Click the “Screen Recorder” option given on the main homepage. By doing so, a screen recorder window will open. Here, you can select screen recording modes such as full-screen, target window, or custom. Also, make sure to choose your system’s audio and microphone to proceed.
Step2 Adjust Settings and Start Recording
From Settings, you can also select the quality, frame rate, and color of mouse clicks. Once you have adjusted all the settings properly, hit the “REC” button.
Step3 End the Recording
After the countdown, the screen recording will begin. To stop the recording, you can press the F9 button from your keyboard. After the recording ends, the file will be dropped into the media library of Filmora.
Conclusion
Google Meet is a reliable environment to connect and collaborate with people. To increase your reach and target audience, you can conduct Google Meet live streaming on YouTube. This article has discussed a detailed way through which you can live stream your Google Meet session on your YouTube channel.
To save and access your live streaming sessions later, you can try the screen recorder of Wondershare Filmora . This screen recorder can capture screen and respective audio in high quality.
Free Download For Win 7 or later(64-bit)
Free Download For macOS 10.14 or later
The Enigma of ‘Unlisted’: Deciphering Hidden YouTube Footage
Complete Guide: What Does Unlisted Mean on YouTube

Richard Bennett
Mar 27, 2024• Proven solutions
Whether personal or professional purposes, YouTube is a great platform for sharing videos but, there are times, when you don’t wish to share it with each and everyone across the globe. The YouTube unlisted meaning is a video which can be viewed only by the users having the link to it. At the back of your mind, you may be wondering how safe an unlisted video is. Let’s learn in detail what does unlisted mean on YouTube.
- Part 1: What is Unlisted Video on YouTube
- Part 2: How to Make YouTube Videos Unlisted
- Part 3: How to Share Unlisted Video
Wondershare Filmora video editor is one of the most widely used video editing software for YouTubers, it makes the video editing simplified with the pre-programmed effects and templates. You can download the free trial version to check.


Part 1: What Does Unlisted Video Mean on YouTube
The YouTube unlisted meaning is that your video will neither come up in the search results nor on your channel. Only the users who have the link to the video can view it. The link can be shared with anyone and everyone, even with the users who do not have a YouTube account. Many people don’t know the difference between private and unlisted YouTube videos . In order to understand what does unlisted mean on YouTube in a detailed way, let’s dive deeper into it and know the difference between public videos, unlisted videos, and private videos.
1. What is Unlisted YouTube Video
Between private and public, you can find the unlisted videos. What does unlisted mean on YouTube? An unlisted video does not appear in the search results, suggestions or video tab. If you unlist a new video, your subscribers won’t receive any notification informing about it. You can share an unlisted video with the people you wish to share and the users having a link to the video can see it. It can also be viewed by the friend of friends if they share the link with their friends.
The unlisted videos are treated like public videos by YouTube. This means that you cannot use the copyright audio or video and it will be reviewed by the YouTube team if other users flag it as inappropriate content within a timeframe of 24-hours .
What Unlisted YouTube Videos Can Do
The unlisted videos can be shared with family and friends. If you are conducting a webinar and wish to share the video with only the registered users, an unlisted video can be used. You may also use the unlisted video for giving access to the people who embedded it while cleaning the YouTube page. For getting feedback from closed groups for market research or to share online resume link for job applications, the unlisted videos can be of great help.
Takeaway: Unlisted videos are a great way to share personal videos with just your family and friends, or to get feedback from people you trust on videos before you decide whether to make them public.
2. What is Private YouTube Video
The videos that do not appear in the recommendations, search options in YouTube or in your tab are the private videos. When you select the private setting for a video, the subscribers don’t get a notification. The private videos can be seen only by the uploader and the mentioned Google accounts. It is not available for friends of friends which mean if you share a private video with a friend, only that person can see it. If your friend shares it with someone, it won’t be visible to others. If anyone wishes to view a private video, the person has to request permission to view to the uploader.

What Private Youtube Videos Can Do
By using private YouTube videos, the internal company information can be kept confidential, the family videos can be shared safely with the people you wish to, and also store your personal data without worrying about being hacked by the strangers. By choosing the private setting, you may upload and schedule the date and time when a video can be made public on YouTube. It helps in saving storage space on your phone.
Takeaway: A private YouTube video is only available to YouTube users that you invite to view it.
3. What are Public Youtube Videos
The Public setting in the YouTube video is a default setting which allows everyone to see the video you post. When you want your video to appear in the search engine results and want more and more viewers and traffic on your video, you can keep the Public default setting on.
What Public YouTube Videos Can Do
Do you wish to grow your brand awareness? Select the Public default setting as it is the best way to do it. You may use the Public setting in any of these situations below:
- Having a video sharing business like explainer videos, product reviews, commercials, etc. with customers or prospective viewers
- Targeting at earning money through YouTube videos
- Looking forward to the growing personal brand by a YouTuber
- Looking for more and more subscribers on YouTube
But, you must remember that once you post the video, it will be available for everyone throughout the world on YouTube. Even if you decide to change the settings or delete the video, later on, you will be subjected to judgment, professionally and personally. While posting a video with Public setting, you must have an answer to questions like-
- Shall the senior or your boss see this video?
- Can your job prospect hamper with this video?
- Does the video contain harassing or offensive content?
- Can your friends ridicule you after seeing the video content?
If all the questions are answered in YES… then it is better to think hard and long before uploading the video content with Public setting on YouTube. You may upload the content with unlisted or private settings.
Takeaway: If you make a video public, anyone will be able to find and watch it. When uploading a video using default settings through YouTube, it will always default to being a public video.
Below is a brief comparison table about the differences among YouTube Unlisted, Private and Public video settings.
| Feature | Unlisted | Private | Public |
|---|---|---|---|
| Can I share video URL to friends? | Yes | No | Yes |
| Can I add video to YouTube channel? | Yes | No | Yes |
| Can I shows up video in YouTube platform? | No | No | Yes |
| Can I post video on my channel? | No | No | Yes |
| Can I leave a comment? | Yes | No | Yes |
| Can I see it in landing page? | Yes | No | Yes |
| Do People need an account to watch it? | No | No | Yes |
Part 2: How to Make an Unlisted YouTube Video
Follow the below-mentioned steps to make an unlisted YouTube video -
- Log in to your YouTube channel
- In the top right corner, click the add video button
- Find the drop-down menu and choose Upload Video
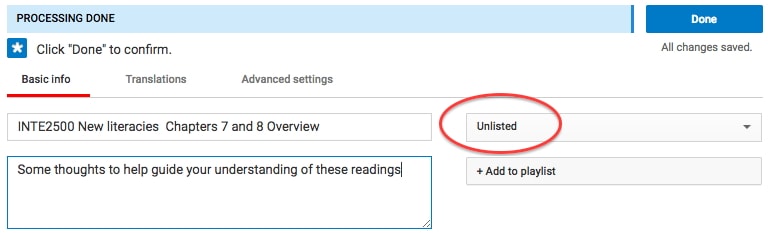
- Select the setting by clicking on Public and a drop-down menu appears to unlisted
- Search the instruction select files to upload your video
- When you start uploading your video, a message box appears, Click Public on the right side corner and select unlisted from the drop-down menu
- Once you have selected unlisted, click Done in the top right corner and your video is published
Part 3: How to Share Your Unlisted Video
If you wish to share the unlisted video , just share the published video link with anyone you wish to share. A Google account is not required to see the video. So, if the person you shared the link with is not logged in to his Google account, still the video can be viewed. The people who have the link to your video can also share and re-share the link in a number of ways. It can be shared on the social media or just forwarded amongst their friends. But, if you don’t want your friends to re-share it, change the settings to Private.
You can see a message showing “this video is unlisted” on YouTube when you want to share someone else’s unlisted video on social platforms. Think before you consider sharing an unlisted video.
Conclusion
Now, that you clearly know what does unlisted mean on YouTube, consider the option while uploading a video. It helps in retaining the privacy of your video.
Richard Bennett
Richard Bennett is a writer and a lover of all things video.
Follow @Richard Bennett
Also read:
- [New] 2024 Approved Fresh Inspirations for Streaming Topics
- [New] From Live Stream to High Fidelity Choosing Budget-Friendly WAV Tools for 2024
- [New] Orchestrate an Engaging Statement with Tunes
- [Updated] 2024 Approved Beyond Boxes Crafting Memorable Receiving Moments
- [Updated] 2024 Approved From Script to Splendor Animating Effects Unbound
- [Updated] 2024 Approved Watch 9 Free Full Length Christmas Movies On YouTube
- [Updated] How To Retrieve Your Voice on YouTube (Comments) for 2024
- [Updated] In 2024, Global Viewer Count Triumphs Play Button Honors
- Become a Color Grading Pro Utilizing LUTs Within Adobe's Suite
- Can AI Chatbot Guide You Through Survival Scenarios?
- Effortless Video Conversion with WinX DVD Ripper Pro on Mac: Copy, Convert & Transfer DVDs to iOS Devices
- How To Restore Cellular Function On Your Apple Watch
- How to Track WhatsApp Messages on Apple iPhone 12 mini Without Them Knowing? | Dr.fone
- Recover Deleted iPhone Content on a Mac: Photo, Video, and Contact Retrieval Software Solution
- Solved! The Ultimate Fixes for When Windows 10 Audio Sliders Just Won't Work
- Title: [New] In 2024, How To Turn Your Google Meet Into a YouTube Live Event
- Author: Jeffrey
- Created at : 2025-02-01 17:31:17
- Updated at : 2025-02-07 16:40:32
- Link: https://eaxpv-info.techidaily.com/new-in-2024-how-to-turn-your-google-meet-into-a-youtube-live-event/
- License: This work is licensed under CC BY-NC-SA 4.0.