![[New] YouTube SEO Guide for Beginners Who Want More Views for 2024](https://www.lifewire.com/thmb/hndfovaQV_DsrmQv5Imdq0HljaE=/300x200/filters:no_upscale():max_bytes(150000):strip_icc()/nintendo-switch-vs-nintendo-switch-lite-01-61592395e9e44fc78403c7e99105de84.jpg)
[New] YouTube SEO Guide for Beginners Who Want More Views for 2024
YouTube SEO Guide for Beginners Who Want More Views
The 12-step YouTube SEO Guide for Beginners Who Want More Views


Shanoon Cox
Oct 26, 2023• Proven solutions
The joy of creating on YouTube is often dampened by the disappointment of underperforming videos. You have published your content and it’s not getting the views you had hoped.
Well, let’s change that!
In this guide, I’m going to walk you through YouTube SEO from the very start to the very end.
Nothing complicated. No paid programs or expensive apps needed. We are going back to basics and get your videos discovered.
Ready?
Let’s Go!
Part 1: Research Your Topic and Competitors
Come up with a video idea . Can’t come up with one? Let me help. I heard you can make a mean scrambled egg, why don’t you show the world how you do it?
Excellent! Let’s go with that idea.
Wait, don’t go making the video yet. First, we have to do some research. We need to know what videos already exist out there.
Step 1: Find Related Videos
Do a quick search on YouTube to see what videos already exist on your topic.

Uh oh… your video will be competing against celebrities like Gordon Ramsay and Jamie Oliver.
Okay, don’t panic! There is a fantastic quote, credited to bestselling author, Jon Acuff , that goes:

While researching your competition, you will feel overwhelmed, but remember, you are at the beginning, and Gordon Ramsay and Jamie Oliver are not even at their middle, they are way passed the finish line. You still have a long journey to go, so don’t get discouraged, get inspired!
Watch those videos and understand what they are all about.
Understand that people watch YouTube for 3 key reasons:
- To be entertained
- To learn something new
- To be inspired
A video that can hit all 3 marks is going to be positioned for success. Don’t fret too much about the competition, as long as your content is good, you will see improvement.
So if you think this scrambled egg idea can hit those 3 marks, then I encourage you to go to the next step. If you don’t, let’s regroup and brainstorm some more YouTube video ideas .
Step 2: Find Keywords
Now that we’ve decided that we are sticking with the video idea, we are ready to do some keyword research. Keywords are the words and phrases people type in the YouTube search bar to discover videos.
Come up with as many relevant keywords as you can. Start by entering a keyword into the YouTube search bar. This will tell you what are the most popular searches associated with that keyword:
Once you have an idea of what people are searching for related to your topic, you’ll want to find more relevant keywords. I like to use the free app, Ubersuggest to do that.

This app gives you a whole list of long-tail keywords, which are 3-4-word phrases which is specific to what your video is about.
Some you will use to dig deeper in and other you will deem irrelevant to your videos. A good way of determining the value of a keyword is by the stats the application shows.
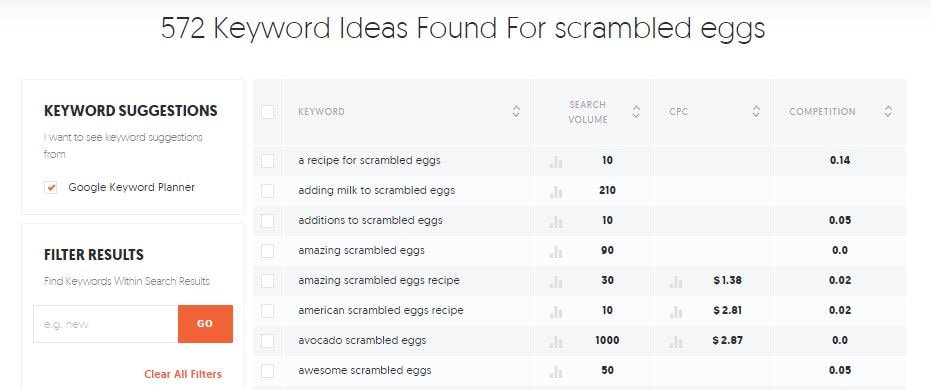
How to Read Keyword Suggestions
Once you have a list of keywords, you will see some numbers on the right-hand side. Here is what each one is about:
- Search volume is the number used to identify the popularity of the keyword. The higher the number the more people are searching for it.
- CPC is the value accredited by YouTube, determining how much advertisers are paying to target audiences who search for that keyword and click on the link.
- Competition is the number used to qualify how many other content are using that keyword.
The two categories that matter most to us right now is Search Volume and Competition. We want keywords with high search volume and low competition rate.
In the example above, you can see that the keyword “avocado scrambled eggs” has a Search Volume of 1,000 and a competition rate of 0.0. This is a good keyword to target, if you can incorporate an avocado to your dish… which of course you can!
Step 3: Write Title
I know you might want to deal with the Title, Description, and Tags after you’ve filmed and edited your video. But if you want to apply a YouTube SEO-focused strategy, then these should be addressed before you even pick up a camera as it can greatly dictate the content you end up creating.
A good YouTube title sparks curiosity, evokes emotional reaction, and promises value to your viewers.
Of course you can title your video simply: Making Scrambled Eggs
But does it spark curiosity? Not really… most people can make scrambled eggs.
Does it evoke any emotion? Maybe hunger… but even then, not really…
Finally, does it promise value? Well, assuming that most people can at least crack an egg into a pan, then hardly.
Your scrambled egg is special! Your video is special! We need to evoke that in the title — and as long as you are not writing any clickbait and deliver on what the title suggest, you can do this.
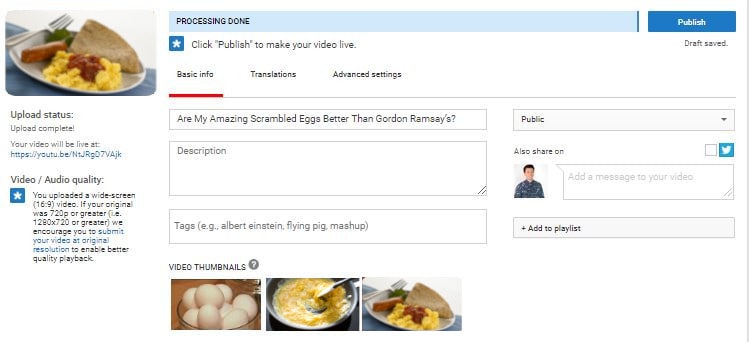
So, how about this: Are My Amazing Scrambled Eggs Better Than Gordon Ramsay’s?
Hmmm… Well, is it? We know that the Gordon Ramsay’s video has almost 30M views. Many people have already tried cooking it, I’m sure. There is only one way to find out, by encouraging others to try it over Gordon’s.
You don’t need to go for a somewhat contentious title like this, but that’s the idea, you want something that gets people curious, make them feel a certain way, and in the end, make them better for having watched your video.
See how a good title can guide the rest of your video?
Step 4: Write Description
You aren’t going to be writing the description for the viewers necessarily, you are going to be writing it for YouTube’s algorithms. The better YouTube understands what your video is about, the better they can show it to people searching for it.
This means you need to include the keywords you were researching at the beginning of your description, as YouTube will be using them to identify the content of your video. 1 or 2 keywords that best represent your video is enough. Don’t stuff the title with too many keywords or you’ll risk sounding like a robot.
But also use the description for practical uses too, if you have additional information such as supportive links, outline of the video’s content, a list of materials, step-by-step guide, or a recipe that you think your human viewers will find useful, you should input that in the description as well.
Step 5: Write Tags
Thank goodness we did the keyword research in Step 2, because coming up with tags is not as easy as it looks.
Pull 15 keywords from the list and keep it somewhere safe.
Note: The keywords you used in the title should be found in your tags, and since they are the most important ones, you should place them first.
Organize your keywords in the tag as such:
Have the specific keywords at the top, followed by more general keywords, and then branded ones:
Specific: How to make scrambled eggs
General: Scrambled eggs
Branded: Gordon Ramsay scrambled eggs
Part 2: Make The Best Darn Video Possible
It doesn’t matter how relevant your keywords are or how epic your title is, if you video sucks (i.e. your viewers click in and leave right away), YouTube will not show it in search.
Even if you haven’t created any videos yet, you can follow these next steps to ensure you are following the best practices to structure your video.
Step 6: Plan and Film the Hook
The first few seconds is where the largest percentage of your earned viewership will drop off. Odds are 20% of your viewers won’t even get past the first 10 seconds .
What you need is a hook, an intro that ensures this video is what they want to watch and let’s them know what they can expect.
Step 7: Film B-Roll
One static camera shot of you talking or cooking or giving a tutorial can cause your viewers to lose attention.
In order to keep your viewers interest, you will need b-roll, or supplemental footage you can cut to give you video more life.
While jump cuts (cuts made on a sequential clip of the same subject or in the same camera position) are fine, having additional footage to cut to will make your video feel more fluid.
So when you are filming your scrambled egg video, make sure you get some footage of you cracking the egg, scrambling it, and serving it on the plate.
Step 8: Encourage Viewers to Engage in Video
Liking, disliking, subscribing, and commenting on your video will all help your performance indirectly.
While YouTube wouldn’t rank your video higher simply because you have more likes subscribers, or comments, engagement from viewers help your video get discovered. If you get a like or comment from a YouTuber with a lot of subscribers, your video may be visible to those who are following that YouTuber for a while.
The best way to get engagement from your audience is to encourage them to like and subscribe or ask them a question or start a dialogue.
For example, in this scrambled egg video you are making, at the end you can ask, “So what do you think, is this better than Gordon Ramsay?”
Who knows, who will respond.
Step 9: Design a Thumbnail
You could have made a brilliant video, but if you have a poor quality thumbnail that is unattractive, then the overall performance of your video will suffer — and good SEO can only do so much after that.
Your viewers will absolutely judge your video by its cover so it’s important to put some thought into it and not solely rely on the three random thumbnail choices that YouTube picks for you.

Take a look at your competition. If they all look the same, do something different. Add text or a human face (preferably yours) to evoke emotion, as viewers are more likely to click into a video if they see an expressive image.
Don’t want to pay money for a photo editing software such as Photoshop?
You can use an online service called Canva or download GIMP , an open-source photo editor much like Photoshop, but far less powerful. These will help you get the job done as you are starting out.
Want to know more thumbnail maker? Check our picks of the best free YouTube thumbnail makers .
Part 3: Publishing With Attention to Optimization
Well done finishing the video! You are almost there… but not there yet.

Come on, keep going!
Step 10: Fill Out Your Videos Assets
The video is done, the thumbnail is designed, and you have all your title, description, and tags ready to go. This step is easy, upload the video, and fill out the assets, and give yourself a pat on the back.
Step 11: Add Transcripts
In addition to making your content accessible for people who don’t want to or can’t listen to the audio in your video, adding subtitles and closed captions will help YouTube understand the spoken content in your video.
While YouTube does have an automatic subtitle generator, it’s not reliable enough to be used for identifying the keywords you use in your video.
You can choose to write out the whole transcript of your video yourself, but if you are press on time, which of course you are, you can simply go and edit the automatic transcript already available in your video. By the way, you can also use some automatic transcription software.
Step 12: Add Video to Playlist
Finally the last thing you need to do for your video is to add it to a playlist. Even though it might be the first video in the playlist, it helps YouTube identify your video if you organize it in a playlist. As you accumulate more content, having videos in playlists makes content easier to find and keeps relevant videos together.
When viewers searches, having your videos in playlists increases the chance of it being discovered.
So if your first video is about scrambled eggs, maybe you next video can be about the awesome butter toasts.
I guess, you are on your way to making a pretty badass breakfast playlist. I personally can’t wait to see it!
If you treat SEO as an afterthought, only after your video is created, you are not using it to its full potential. If you follow these 12 steps during the course of your production, you will find that SEO doesn’t simply help your video perform at the end, but contributes in all the other phases of creating your video as well.
Besides considering YouTube SEO, you should make a good YouTube video as well. Filmora is a powerful video editing software that features lots of templates and effects. Get the free trial version below and have a try today.


Do you have any questions about SEO? Please leave us a comment below.
Shanoon Cox
Shanoon Cox is a writer and a lover of all things video.
Follow @Shanoon Cox
Innovative Thumbnail Techniques to Boost Your YouTube Visibility
How to Make Killer YouTube Channel Art

Richard Bennett
Mar 27, 2024• Proven solutions
Call it channel art, call it a cover, banner or whatever you like, the fact remains that YouTube channel art is one of the key elements of any successful YouTube channel. Your viewers arrive at your channel to see your videos, but it is the channel art that can market your brand and products to them.
As much as creating great videos with personality can sell your YouTube channel, the way your channel looks and feels is equally important. Take a brief look around any popular YouTuber’s channel and you’ll see that they’ve invested time and thought into creating beautiful, eye-catching channel art for it.
If you’re still in the dark about how to create YouTube channel art; we’re here to help. Here’s what you need to know.
Quick Jump Menu
- What is YouTube channel art [5 Elements Should Be Included]
- YouTube Channel Art Dimensions & Size [Mobile/Tablet/Desktop/TV]
- Why should you care about channel art
- Tips for making channel art
- Tools you need to create killer YouTube channel art
- Download YouTube Channel Art Templates for Free
- YouTube Channel Art Dimensions Cheatsheet [Infographic]
The Filmora team has made a video tutorial about how to master YouTube Channel Art, watch it before digging in. Remember to download the free Filmora Trial version to have a try.
Download Mac Version ](https://tools.techidaily.com/wondershare/filmora/download/ )
Part 1: What is YouTube channel art?
YouTube channel art includes thumbnails, banners, watermarks, and icons. Thumbnails will help viewers decide to watch your videos, and a personalized banner will tell people who you are and what your vlog is about. Watermarks both label your work as yours and protect it from theft. Your icon is the avatar you will use to communicate with your subscribers. You can totally change the look and feel of the page and the changes will carry forwards for the page display on all platforms. However, the elements might look slightly different on desktops, mobile devices, and TV screens.
1. Banner
A banner sits at the top of your channel, welcoming viewers to your videos and promoting your brand. Having your brand front and center here is a great plan, as it gives people confidence in who they are watching, as well as raising your brand profile on the platform.
Size: 2560x1440px recommended. Cannot be smaller than 2048x1152px.
Safe Area for All Devices: 1546x423px
File Size: 6MB or smaller
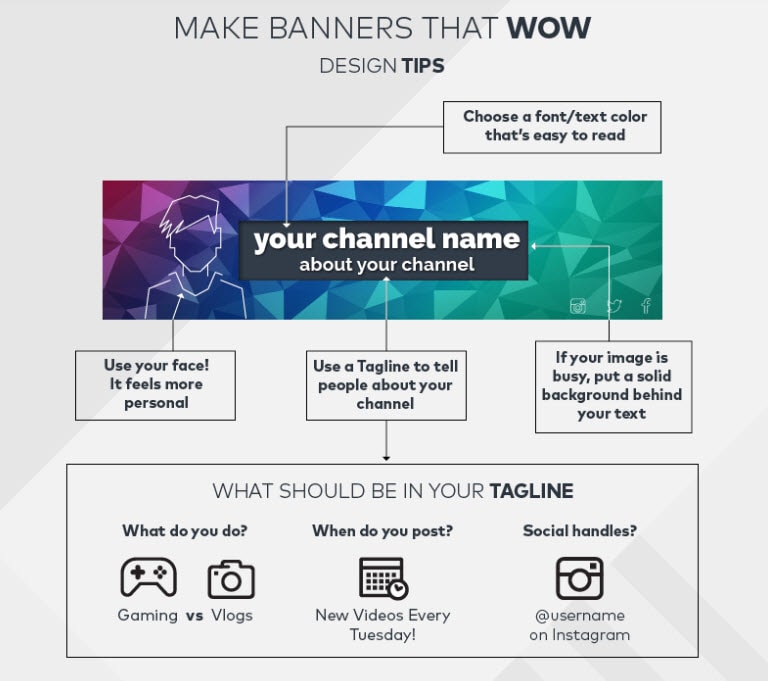
Do:
- Make sure all your text is in the safe area
- Include channel information like what kinds of videos you make and your upload days
- Add social media links
Don’t:
- Use a font or font color that’s hard to read at a glance
- Put a busy background or photo directly behind your text (put a solid background in-between)
How to Upload a YouTube Banner / Channel Art
Go to My Channel and select Add channel art near the top of the screen (if this is the first time), or hover over your existing channel art to make the edit icon show up.
2. Watermark
Watermarking your videos, banner and other content you produce can help protect your hard work. Sharing should be encouraged on YouTube, but you should absolutely get the credit for your content. A watermark ensures your brand is being acknowledged whenever someone hits the share button.
3. Thumbnail
Developing unique thumbnails can really encourage more video views. Rather than just using a still from your actual video, you can create unique art to accompany each upload, describing what’s within the video and motivating people to watch.
Size: 1289x720px recommended. Width cannot be less than 640px.
File Size: 2MB or smaller
Format: .JPG, .GIF (no moving GIFS), .BMP, .PNG
Do:
- Use colors that stand out
- Have a consistent format (all your thumbnails should have the same basic layout)
- Include your face (or a character’s face, if you’re a gamer)
- Show viewers what your video is about
Don’t:
- Include anything sexually suggestive or violent.
- Write more than 3 words or use a small font
How to Upload a YouTube Thumbnail
In the screen right after you’ve uploaded a video (in your Creator Studio), select Custom thumbnail under Video thumbnails after you upload a video.
OR
Select Edit next to your video in the Video Manager/Creator Studio. In the preview screen, click Custom thumbnail.
4. Icon or logo
If you’re building a brand on YouTube, you should absolutely have a recognizable logo or, at least, an icon that is unique to you. This way you’ll start to be recognized whenever people stumble across your footage, even if it’s on another platform such as Facebook.
Size: 800x800px recommended. Can be square or round, but must render to 98x98px.
Format: JPG, GIF (no animated GIFs), BMP, PNG
Do:
- Use a close up of your face (if you want a custom URL: only channels that use photos as icons qualify)
- Use a simple logo (if that’s more on-brand for you)
Don’t:
- Use a full-body picture (it won’t look good shrunk down)
- Use a picture of a celebrity or an image that falls under someone else’s copyright
How to Upload a YouTube Profile Picture / Icon
Go to My Channel, hover over your existing channel icon, and click the edit icon (looks like a pencil). Then, click Edit.
5. Channel art links
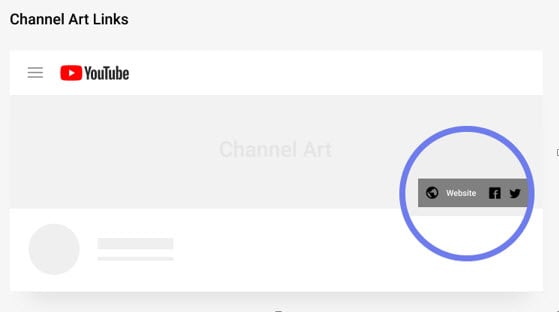
Adding links to your YouTube channel is a no-brainer. After all, if people love your channel, why not get them engaged on your social networks and website too? Adding links is easy in the Creator Studio, and you can choose to have links overlaid on your channel art too.
6. YouTube Intros
Ideal Length: under 10 seconds is alright. Under 5 seconds is better.
Placement: within the first 30 seconds of your video.
Do:
- Use music
- Include colors and images that match your personal brand
- Include the name of your channel
Don’t:
- Make it longer than 10 seconds
How to Add a YouTube Intro
Add your intro before you upload using your video editing software. It’s best to create it in a separate project and export it as a clip you can re-use in all your videos. Click here to download some free intros
7. YouTube End Screens
Length: 5-20 seconds
Placement: the last 5-20 seconds of your video
Your video must be at least 25 seconds in order to add an end screen.
Do:
- Link to at least 1 video or playlist
- Prompt viewers to subscribe
- Include social icons and handles so people can find you
Don’t:
- Overcrowd the screen with options (it makes people less likely to click anything)
Part 2: YouTube Channel Art Dimensions & Image Size Checklist
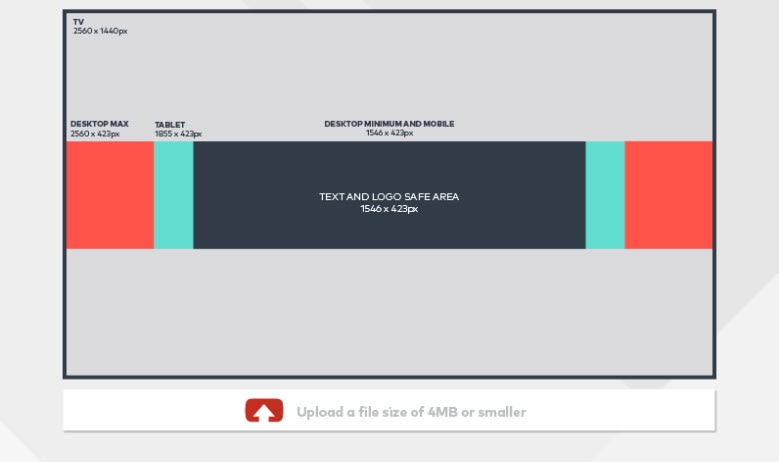
Getting the sizing of your channel art right is crucial. If you don’t plan this from the start, then all the effort you put into designing your channel art will be wasted, as it will either not display properly or will just look terrible. YouTube has provided these guidelines for channel art designs:
- The file size must not exceed 6MB
- The image should ideally be 2560 x 1440 pixels
- The minimum image size is 2048 x 1152 pixels
- The maximum width is 2560 x 423 pixels
The ideal dimensions for different devices are listed below:
- Mobile:1546px * 423px
- Tablet :1855px * 423px
- Desktop:2560px * 423px
- TV:2560px * 1440px
You see, YouTube channel art 2560*1440 px is ideal for TV devices. If you’re not sure about the width and height of the channel art image, you can download the Channel Art Templates from YouTube Official Site to check.
Keeping in mind people will access your channel on a variety of screen sizes, you’re going to need to design channel art that fits within these proportions and displays correctly no matter how it’s viewed. Use the ‘safe area’ displayed on YouTube to ensure your logo and branding is correct on every screen size.
Part 3: Why should you care about channel art?
If you’re wondering if you should really be bothered about channel art, the answer is you absolutely should. Channel art is all about branding, and in today’s cluttered web world, having a strong, recognizable brand is crucial. Rather than simply having a place to upload some videos, your YouTube channel can become a powerful marketing tool for promoting your brand and values.
According to research, we are a highly visual species. 65 percent of people learn better visually, and when you’re thinking about retaining information, 90 percent of what we store in our brains is visual information. By presenting your viewers with visual content, you’re helping them take it in, retain it better and remember you for the future.
Part 4: Tips for Making Channel Art
1. Tips for Making Thumbnails
A thumbnail is an image that represents your video in YouTube’s search results. There are things you can do with your thumbnail that will make it more likely to get clicked on. Always upload your own thumbnail rather than relying on the one YouTube automatically chooses, and make sure the thumbnail you use is related to the content of your video.
One of the most important things to remember is that thumbnails are small. It is better if there is not a lot going on in them because details will be hard to see. If there is any text in your thumbnail make sure it is huge so that people can still read it once it has been shrunken down.
If you are making a thumbnail for a vlog entry then choose a shot that has you in it, particularly one where you are not too far away from the camera. It is also a good idea if the thumbnails for your vlog entries all look similar so it is easy for people browsing to recognize which videos are yours.
2. Tips for Making Watermarks
Watermarks work best when they are small and transparent so they do not distract viewers from your videos. If your watermark is colored, there should not be more than one or two colors. Unlike the full version of your logo, you do not want your watermark to be overly eye-catching.
3. Tips for Making Icons
Watermarks work best when they are small and transparent so they do not distract viewers from your videos. If your watermark is colored, there should not be more than one or two colors. Unlike the full version of your logo, you do not want your watermark to be overly eye-catching.
Part 5: Best Free & Paid YouTube Channel Art Maker [2021 List]
Fortunately, you don’t need to be a renowned artist or graphic designer to get some swish YouTube art ready for your channel. With some of the easy-to-use, powerful tools that are available out there, you can make some beautiful, professional-looking channel art in no time at all. Here are six of our favorite tools for creating amazing youtube channel art:
1. Photoshop
Produced by Adobe, Photoshop has been leading the way in professional design software for many years. When it comes to creating logos, banners, editing photos and more, nothing really comes close to the power of this software. While the professional version of Photoshop can set you back several hundreds of dollars, Photoshop Elements is much more affordable at around the $100 mark, and has enough functionality to do most things you’d need for your channel art.
New from Adobe is Adobe Spark Post, a free-to-use web and iOS app which has been specifically designed to help you create beautiful channel art. Although it can only provide basic channel art without much in the way of editing tools, if you’re new to graphic design and want a free, user-friendly way to create your art, this could be worth considering.
2. Wondershare PixStudio

Wondershare PixStudio is an all-in-one and powerful online graphic design maker for everyone. This online platform provides a wonderful creative design solution for you. Just through drag and drop templates, and then use photos/text/elements to design. After the simple and fast design, One-Click to download your creations, and share to your Facebook, Instagram Story, and YouTube Thumbnails, etc. immediately.
This online platform empowers anyone to create a beautiful design within a few steps. No professional skills required! By simply dragging and dropping the creative elements and templates, you are capable to release your imagination and convert it to stunning artwork.
3. Fotor
For a good, user-friendly way to create professional-looking YouTube channel art, Fotor is a pretty solid choice. Using a simple drag and drop interface, users can create a unique channel banner using preset designs or even uploading their own artwork.
The developers of Fotor have built in a bespoke banner maker, preset to the exact size required for YouTube channel art. This makes it easier than ever to ensure you develop excellent channel art which will display correctly on any device. Editing is limited, so advanced designers will probably find it all a bit too simplistic, but for the man on the street, this is a perfect choice.
4. Canva
Canva really stands out from the competition for the number of customizable design elements present on the website. From shapes to backgrounds, images to text, there are thousands of awesome, professional-looking elements to choose from to create your unique channel art.
Similar to Fotor, those who know what they’re doing in the design field will find it lacking in functionality, and there’s an irritating glitch where you can’t stretch more than one image to the ends of the canvas. Watch out for premium design elements too, as lots require payment, although usually not more than a dollar or two.
5. PicMonkey
For a good middle ground between expensive but powerful Photoshop and free but limited options like Canva and Fotor, PicMonkey is a great solution. It has plenty of design functionality, from working with layers to performing tasks like blending, and you can free draw and erase parts of your image too.
We found PicMonkey capable of pretty much everything you’d need to create a professional YouTube banner, and it’s a fair bit more user friendly than Photoshop too. It’s not free, but at a cost of $7.99 per month, it’s pretty affordable for what you get.
6. Snappa
Another web-based freemium service, Snappa has the added advantage of coming pre-loaded with all the dimensions of popular social channel’s banners, profile images and more, including YouTube. That means you can work on your channel art directly, seeing clearly which parts will be displayed on what devices.
The drawback to this particular platform is the sheer volume of stock images already on the site. There are some nice ones, but due to the lack of organization you need to scroll through quite a few mediocre options to find them. There’s also a fairly ungenerous limit on how many items you can create and save without upgrading, but the pro version is fairly affordable at just $10 a month.
There are many other services out there to help you create your YouTube channel art and what’s best for you will depend on the type of channel art you’re looking to create, as well as your own abilities with graphic design. Try some of the free versions before you jump in and pay for things, as some are actually really rather good.

Part 6: YouTube Channel Art Templates Free Download
If you don’t know how to make youtube channel art, don’t be worry, because in the following part, I’ll share with you some free youtube channel art templates. The Filmora team has a community and forum for YouTube creators and it has designed some stunning YouTube Channel Art templates for different genres channels such as gaming, beauty, travel, comedy and education. Click here to download 50 free YouTube Banners, JPG & PhotoShop files. Examples:


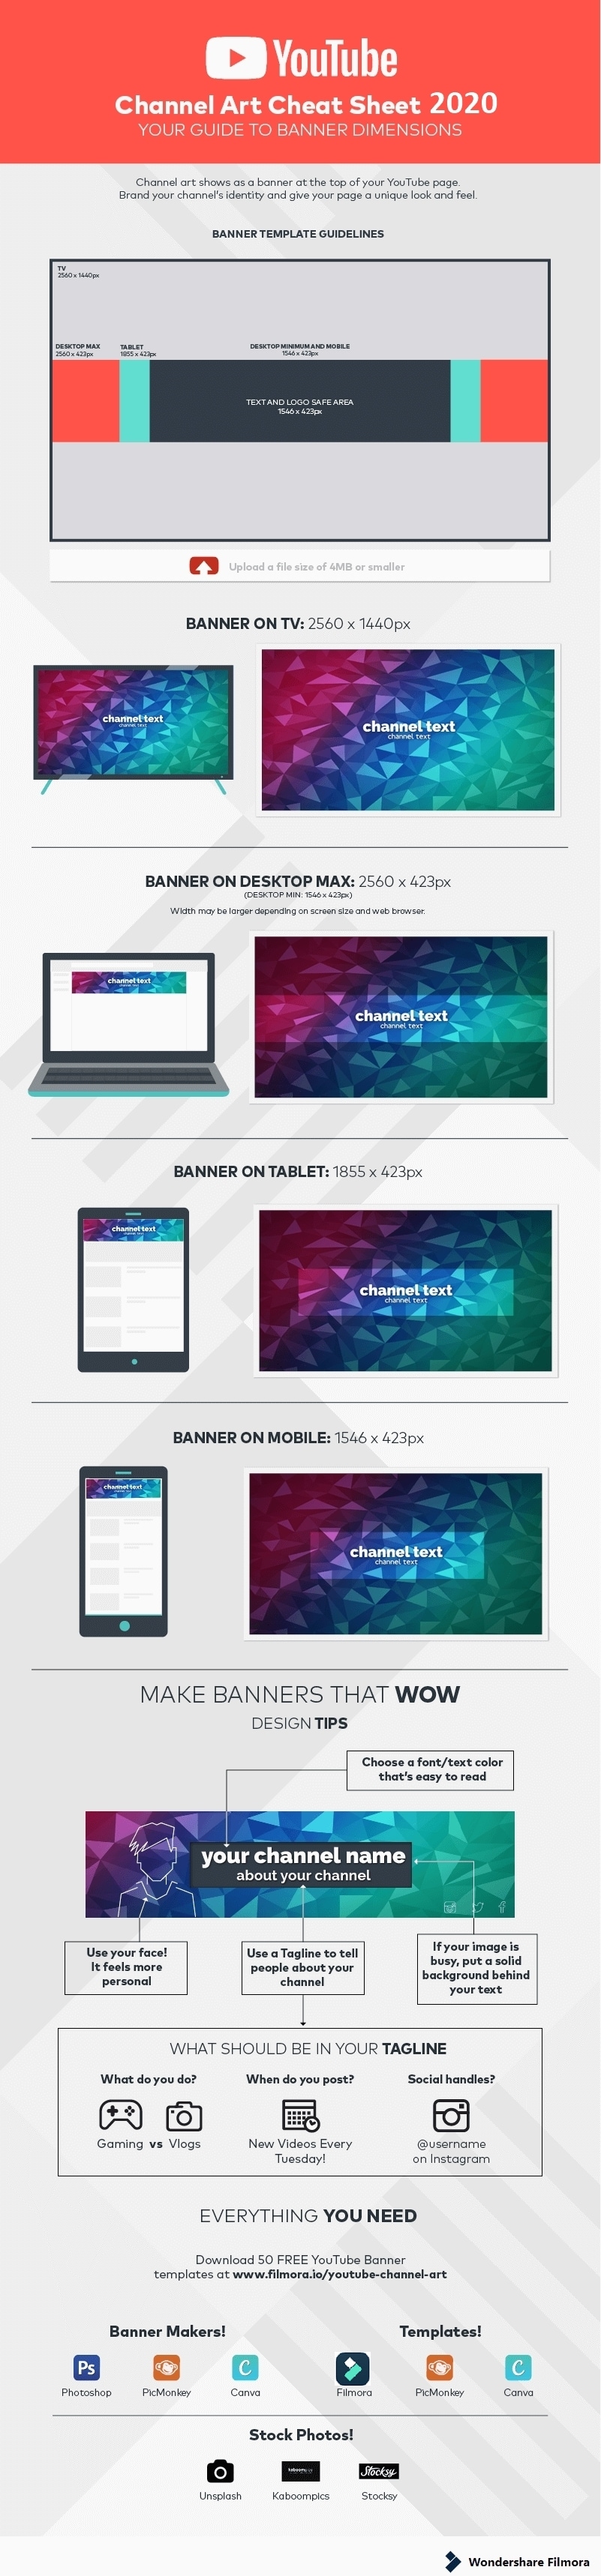
Part 7: YouTube Channel Art Dimensions Cheatsheet [Infographic]
Usually, a viewer won’t visit your channel page and see your channel art until after they’ve watched one of your videos. The reason they’ve clicked to see your channel is that they want to learn more about you – do you have more videos like the one they just watched? Do you post a lot? Are you worth subscribing to?
If a viewer who is on the fence about subscribing to you arrives on your channel page and sees that you haven’t bothered uploading channel art, or that you’re using something that looks sloppy, odds are they won’t subscribe. This ‘Channel Art Cheat Sheet’ will help ensure you aren’t losing potential subscribers.
Recommended Video Editing Software for YouTube
The best video editor for YouTubers - Wondershare Filmora , not only allows you to cut, crop, rotate, reverse videos, but also offers your advanced features like PIP, Green Screen, or audio mixing. What’s more, you can find lots of effects on Fashion, gaming, education, tutorial, sports, etc. Check this article to know more.
Download Mac Version ](https://tools.techidaily.com/wondershare/filmora/download/ )
Richard Bennett
Richard Bennett is a writer and a lover of all things video.
Follow @Richard Bennett
- Title: [New] YouTube SEO Guide for Beginners Who Want More Views for 2024
- Author: Jeffrey
- Created at : 2024-08-20 14:07:42
- Updated at : 2024-08-21 14:07:42
- Link: https://eaxpv-info.techidaily.com/new-youtube-seo-guide-for-beginners-who-want-more-views-for-2024/
- License: This work is licensed under CC BY-NC-SA 4.0.