![[Updated] 2024 Approved Film Assembly Station](https://www.lifewire.com/thmb/y76bYzyJbgKxvbEJs-YJEbw1Vfk=/540x405/filters:no_upscale():max_bytes(150000):strip_icc()/PS5-Slim-Wide-fe2f63e3b1cf443a81fed71f109aacd0.jpg)
"[Updated] 2024 Approved Film Assembly Station"
Film Assembly Station
In today’s world where businesses are going digital, it is very important to think of how you are going to get your products in front of many customers as possible without having to spend a fortune. That’s where YouTube Clip Maker comes in. It is an effective way for making YouTube videos that you can use for your business advertisements.
If you are a budding YouTuber or just looking at starting to make YouTube videos, you should consider among your editing tools a YouTube Clip Maker. It is an application that has all the tools necessary for you to edit videos in a fast and convenient way and enables you to upload the completed videos to YouTube. It is a simple tool with a friendly-to-use interface for editing videos, it should be a must-have for all users.
Part 1. Best YouTube Clip Maker Filmora
Filmora is a feature-rich audio and video editor that helps beginners with the editing of their audio and video files. The designers did their job with the armature editors in mind. It gives them a simple and easy-to-use layout that makes the work less complicated. Filmora has a built-in feature that lets you record your music and voice and also trim, merge, and cut a split your mp3 files.
Besides all the wonderful features, Filmora lets you make adjustments to speed, pitch, and volume, this makes you improve the clarity of your audio file. The app can be used to customize ringtones and specialized sound effects for your presentation.


For Win 7 or later (64-bit)
For macOS 10.12 or later
Steps on How to Use Filmora
This is an app that is best suited to those starting in video editing and requires the use of an easy-to-use app that can as well deliver quality work. Filmora is an application that was made with the armature editors in mind and is one they should consider while looking for a program to work with. It features some of the essential tools one would require and it is easy to learn how to navigate through it.
Installation Steps
- Click the icon in the center of the Media Library to add files directly.
- Go File > Import Media > Import Media Files.
- Drag and drop to the ‘media library’ directly.
When importing a media file and Filmora asks you to create a proxy file to speed up the editing process. Select “Yes” to have a fast video editing experience.
You can also import video clips using your Touch Bar controls if your computer has Touch Bar.
Record a media file
Apart from the videos shot by your digital devices, you can also directly import media files by recording video from your webcam, screen recording your computer, and a voice-over recording.
Computer screen recording:
Click the “Record” option, and choose “Record PC Screen” to get the built-in Wondershare Screen Recorder. Hit the red button to get started. To finish recording click on F9
Record videos from webcam:
Also, click the “Record” option, and choose “Record from Webcam”. In the recording pop-up window, select the red button, it will start the recording process and is also the button to choose when you want to stop recording. You will then select OK to save the recorded video clip.
Record voice-over:
Choose “Record a voiceover” on the Record menu. It would be better to connect a microphone to your Mac for a better result. Hit the Record button, and it leaves you 3 seconds to get ready.
All media files recorded are automatically saved in the “Media Library”, in case of further editing, you can drag them to the timeline.
Part 2. How to Make YouTube Clip Online
The application lets you trim your YouTube videos without having to have an account. It provides you with a quick way to either cut the beginning or end of a YouTube video. YouTube Trimmer will let you trim the video in a couple of seconds with just a few clicks. To use the app, you just need to copy and paste the earl and you are on your way to editing. You don’t have to be worried about downloading or installing the application for you to use it.
Steps on How to Use YouTube Trimmer
Step 1:
Import
Copy the YouTube link that you want to work on and paste it into the field indicated on the application.
Step 2:
Trim and Edit
You can drag the video at the edges to trim it. You can also move the playhead with your mouse and manually make cuts by clicking on the cut button.
Step 3:
Export
Once you are done editing and happy with the outcome, select the Export button to start rendering the video. Here you can choose to publish it on YouTube or save it for other uses.
Part 3. YouTube Clip Maker for Android and iPhone
KineMaster
It is a simple-to-use application that lets you create professional-quality videos in very short minutes. It enables you to edit pre-made videos or lets you make fresh ones by combining your video with several visual and sound effects. After you are done with the editing, you can save your video or share it out there.
Steps on How to Use Kinemater
Step 1:Create
It lets you import videos, audio, and images from your device. After which you can cut, rearrange, and transition between your images and videos using the KineMaster’s video layering support. This is highly dependent on your computer’s hardware capabilities.
Step 2:Edit
Adjust your video’s appearance parameters by blending color modes, adding light and sound effects, overlaying graphics, and text, or rather directly drawing on the video by using the handwriting layers.
Step 3:Share
You can export your project up to 4k and 60fps. The app saves directly to your camera’s roll besides letting you share to social media.
Part 4: Related FAQs
**How to Make a Clip from a YouTube Video ?
First, sign in to YouTube and start playing a video. Under the video click on the Clip, this will create a clip box after which you will select the part of the video that you want to clip. Give the clip a title then click share after which you will be prompted to choose an option for sharing.
**How to Clip Parts of a YouTube Video ?
Start by sign-in and opening YouTube then proceed by watching a video. If clips are available, you will see a clips icon in the bar at the bottom of the video. Click on the clip icon and select that part of the video you are interested in, give the clip a title, and select Share Clip. Choose whether you want to share the clip or save it for later use.
**What YouTubers Use to Get Clips ?
YouTubers use several video editors for their work. Some of the most popular editors are iMovie, Final Cut Pro X, and Premier Pro CC. These YouTube editing apps vary in technicalities of use and features whereby you will find that some are easy to use and have varying features. Some of the editors are free while others require payments for one to use.
For macOS 10.12 or later
Steps on How to Use Filmora
This is an app that is best suited to those starting in video editing and requires the use of an easy-to-use app that can as well deliver quality work. Filmora is an application that was made with the armature editors in mind and is one they should consider while looking for a program to work with. It features some of the essential tools one would require and it is easy to learn how to navigate through it.
Installation Steps
- Click the icon in the center of the Media Library to add files directly.
- Go File > Import Media > Import Media Files.
- Drag and drop to the ‘media library’ directly.
When importing a media file and Filmora asks you to create a proxy file to speed up the editing process. Select “Yes” to have a fast video editing experience.
You can also import video clips using your Touch Bar controls if your computer has Touch Bar.
Record a media file
Apart from the videos shot by your digital devices, you can also directly import media files by recording video from your webcam, screen recording your computer, and a voice-over recording.
Computer screen recording:
Click the “Record” option, and choose “Record PC Screen” to get the built-in Wondershare Screen Recorder. Hit the red button to get started. To finish recording click on F9
Record videos from webcam:
Also, click the “Record” option, and choose “Record from Webcam”. In the recording pop-up window, select the red button, it will start the recording process and is also the button to choose when you want to stop recording. You will then select OK to save the recorded video clip.
Record voice-over:
Choose “Record a voiceover” on the Record menu. It would be better to connect a microphone to your Mac for a better result. Hit the Record button, and it leaves you 3 seconds to get ready.
All media files recorded are automatically saved in the “Media Library”, in case of further editing, you can drag them to the timeline.
Part 2. How to Make YouTube Clip Online
The application lets you trim your YouTube videos without having to have an account. It provides you with a quick way to either cut the beginning or end of a YouTube video. YouTube Trimmer will let you trim the video in a couple of seconds with just a few clicks. To use the app, you just need to copy and paste the earl and you are on your way to editing. You don’t have to be worried about downloading or installing the application for you to use it.
Steps on How to Use YouTube Trimmer
Step 1:
Import
Copy the YouTube link that you want to work on and paste it into the field indicated on the application.
Step 2:
Trim and Edit
You can drag the video at the edges to trim it. You can also move the playhead with your mouse and manually make cuts by clicking on the cut button.
Step 3:
Export
Once you are done editing and happy with the outcome, select the Export button to start rendering the video. Here you can choose to publish it on YouTube or save it for other uses.
Part 3. YouTube Clip Maker for Android and iPhone
KineMaster
It is a simple-to-use application that lets you create professional-quality videos in very short minutes. It enables you to edit pre-made videos or lets you make fresh ones by combining your video with several visual and sound effects. After you are done with the editing, you can save your video or share it out there.
Steps on How to Use Kinemater
Step 1:Create
It lets you import videos, audio, and images from your device. After which you can cut, rearrange, and transition between your images and videos using the KineMaster’s video layering support. This is highly dependent on your computer’s hardware capabilities.
Step 2:Edit
Adjust your video’s appearance parameters by blending color modes, adding light and sound effects, overlaying graphics, and text, or rather directly drawing on the video by using the handwriting layers.
Step 3:Share
You can export your project up to 4k and 60fps. The app saves directly to your camera’s roll besides letting you share to social media.
Part 4: Related FAQs
**How to Make a Clip from a YouTube Video ?
First, sign in to YouTube and start playing a video. Under the video click on the Clip, this will create a clip box after which you will select the part of the video that you want to clip. Give the clip a title then click share after which you will be prompted to choose an option for sharing.
**How to Clip Parts of a YouTube Video ?
Start by sign-in and opening YouTube then proceed by watching a video. If clips are available, you will see a clips icon in the bar at the bottom of the video. Click on the clip icon and select that part of the video you are interested in, give the clip a title, and select Share Clip. Choose whether you want to share the clip or save it for later use.
**What YouTubers Use to Get Clips ?
YouTubers use several video editors for their work. Some of the most popular editors are iMovie, Final Cut Pro X, and Premier Pro CC. These YouTube editing apps vary in technicalities of use and features whereby you will find that some are easy to use and have varying features. Some of the editors are free while others require payments for one to use.
YouTube Gold Strategies for Financial Flourishing
How To Make Money on YouTube

Richard Bennett
Mar 27, 2024• Proven solutions
Not many YouTubers begin making videos with the aim to get rich. For most, it’s a way to scratch a creative itch, to enjoy being in front of an audience and as an outlet for their talents and opinions. However, the potential to make money on YouTube is huge, and eventually any busy channel is going to start asking itself, how do YouTubers make money?
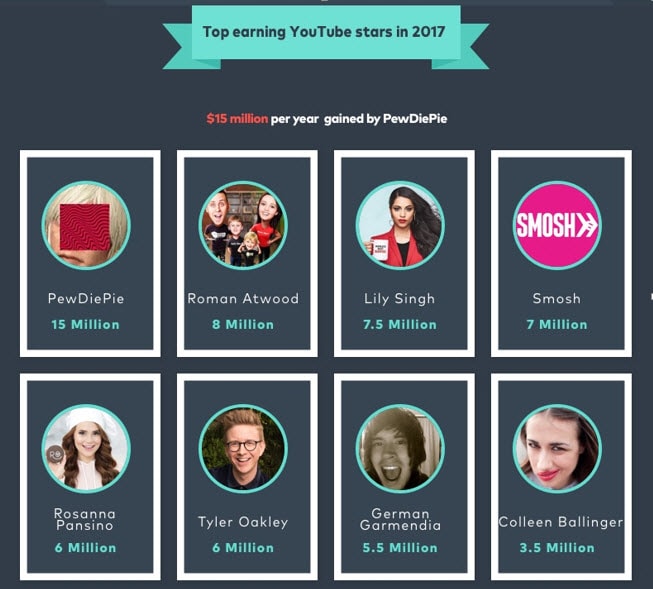
This subject is less about ‘if’ you can make money and more about how to make money on YouTube. It’s been proven time and again that the potential is there, with popular stars like Lily Singh and Roman Atwood generating around $8 million a year. And, of course, everyone’s heard of PewDiePie and his whopping $15 million income.
You don’t need to have a following of millions to earn money on YouTube though; even small channels have a variety of methods available to them to start making their hard work pay. If you’d like to learn how to make money on YouTube, we’re going to look at eight ways of generating an income via your videos. Let’s get started.
How to make money on YouTube
We’ve discovered that making money on YouTube can be split into two main categories; making money through advertising or making money without ads involved. We’ve split our article into these two categories to make it easier for you to see what your options are.
Make money on YouTube with ads
By far the easiest way to start earning money on YouTube is to monetize your channel using ads. Until relatively recently, anyone could enable monetization on their YouTube channel and start earning for every watch of their video. But that all changed in January this year, when Google announced they would be raising the standards required to have ads shown on your channel.
Now, you need to be part of the YouTube Partner Program (YPP), which means you need to have met certain minimum criteria before you can start benefitting from ads. These include:
- Having 4,000 or more watch hours
- Securing 1,000 or more subscribers in the last 12 months
This means that, before you can even consider being a part of the YPP, you’ll need to knuckle down and grow your subscribers. There’s lots of helpful tips out there on increasing subscriber numbers, but it all boils down to creating excellent content. As they say, ‘if you build it, they will come’, so work on creating new and exciting content for your channel to get where you need to be.
Should you join YouTube partner or not?
Meeting the minimum requirements of the YPP is crucial to starting to host ads, but even when you’ve hit the 1k subscribers and 4k hours viewed, should you be monetizing your channel right away? Put it this way; in order to make any money from ads, you’re going to need a lot of views and loyal subscribers, which means your focus needs to be firmly on creating content rather than complying with advertising rules.
Sometimes it’s actually better to hold off for a while when you’re early on in your YouTube journey. This will mean that, rather than being distracted by the question of how to earn money from YouTube, your energy is targeted at what matters most, which is building up a library of awesome videos instead.
How to Join the YouTube Partner Platform?
1. Go to your Account Settings and, under Channel, select Status and features.
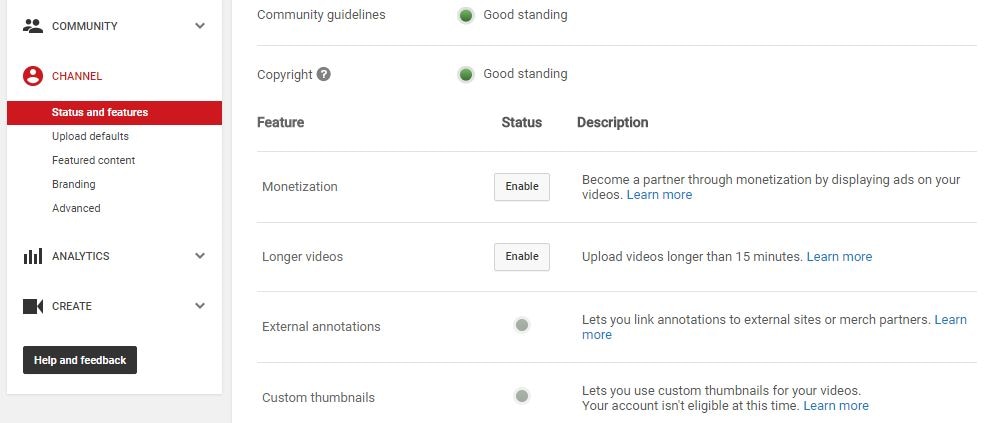
2. Click on Enable next to Monetization.
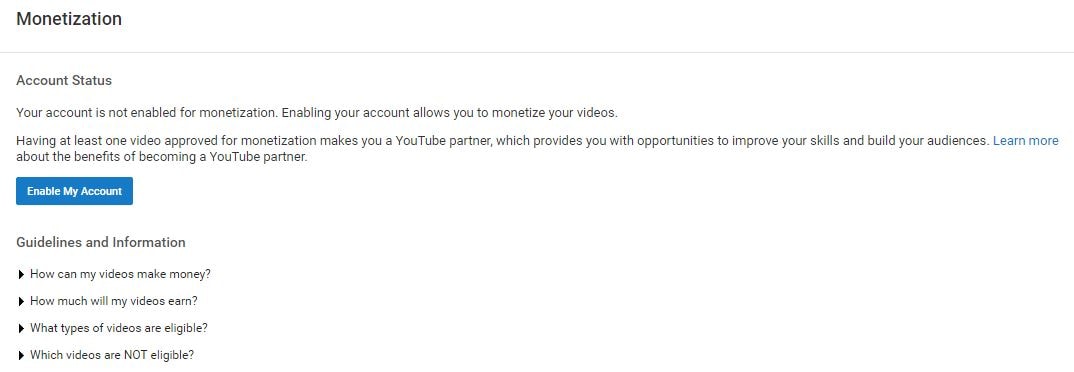
3. In the next screen, click the blue Enable my Account button.
4. The YouTube Partner Program Terms will pop up. Compared to a lot of the “Terms” you are asked to read and agree to when signing up for things online the Partner Terms are fairly short and readable.
5. After reading the terms there are three boxes you will need to check to proceed. The first is to confirm that you read the Terms. The second box is a promise not to click on the ads in your own videos to try to create profits artificially.
The third box requires you to promise not monetize content that you do not own. The most extreme version of this would be stealing somebody else’s video and trying to monetize it on your channel. However, using a song or sound effect in your video you do not have the rights to also counts. There are a lot of places you can get free music to use in your monetized videos, and YouTube’s own Audio Library is one of them.
6. After you have checked all the boxes and moved on you will see a pop up explaining how to monetize your individual videos.
Your channel is now monetized, but you will not be able to earn money until you have linked your channel to your AdSense account.
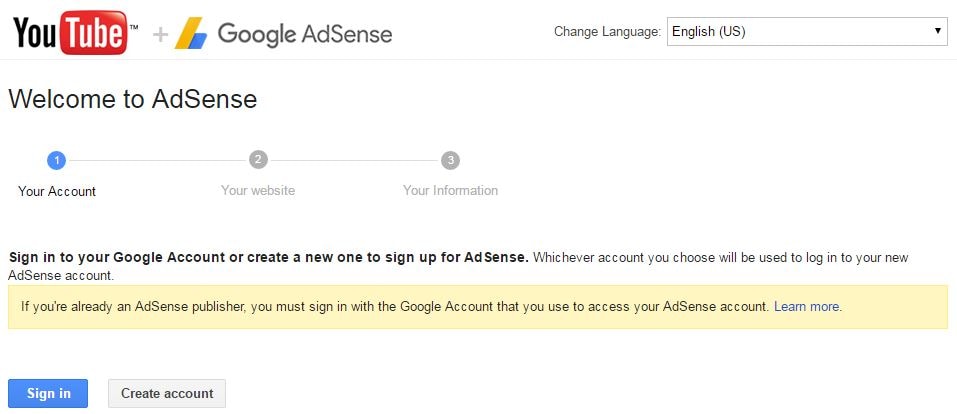
7. There will be a reminder to link your channel and your AdSense account in the next screen. Click on the Link my account button. Or, go to Google.com/adsense and click Sign Up Now. Either method will take you to the Welcome to AdSense page.
8. Click Sign In to sign in to your Google account, which is the same as your YouTube account.
9. After you have signed in it will show you your channel url next to My website and give you a chance to change your language. Click Continue.
10. The last step is to fill out all your contact information before you submit your application. Your approval should come within two days.
11. Go to your Video Manager and check the boxes next to all the videos you want to enable ads for.
12. Click on Actions and then select Monetize.
13. In the window that pops up you will be given a chance to choose what kinds of ads you want to allow in your videos. You must also specify here if you have included paid product placement in your video.
14. Wait for the review process to finish and ads to start appearing in your videos. If you are using any licensed, royalty free, content (like a music track) then YouTube may ask you to prove you have the rights to it.
How much you can get from Ads
The ad revenue generated on YouTube is split between Google and you. You’ll get 55 per cent and Google / YouTube will take the remaining 45 per cent. This means that, if an advertiser spends $200 on your channel, you could be earning $110 directly. You’ll earn both for ‘impressions’, which is the number of views the ad received, and ‘click throughs’, which is when someone clicks on the ad for more information.
Be aware that, in order to get paid, your audience will need to have viewed at least 30 seconds of the ad, or to have clicked through to the advertiser. As a rule, around 15 per cent of viewers will convert into ad revenue, so you can start to calculate just how much your video could be worth.
To give you an example, if you enjoy daily video views in the region of 3,000 views per day and achieve click through / view rates of the average 15 per cent, you’d be earning $0.85 - $1.40 per day or $25 - $43 a month for that one video. If you could increase your views to 5,000 per day, your monthly earnings would rise to $41 - $70 per month.
When working out how to make money on YouTube, keep in mind that every single video has the potential to earn you money. Although one video might only make a dollar a day, imagine when you’ve got 10 videos performing to the same standard, or 100. As you build up your library of content, you have the potential to earn exponentially more as time goes on.
Want to know how much you can get from Ads? Check this YouTube Money Calculator
How to optimize your video to attract advertisers
There is, understandably, a good deal of competition for hosting advertisements on YouTube. In order to get more and better brands advertising in your space, you’ll need to make sure you’ve done all that you can to make your channel attractive to them.
- Target a specific demographic
Your advertisers want to place their products in front of a very specific audience, so the more embedded in your niche your videos are, the more likely you are to attract investment. If you try to be all things to all people, advertisers are going to see that you’re a risky prospect and will move on to a channel that’s more targeted.
To check demographics, YouTube has everything already there for you. In the YouTube Studio, you’ll find the exact demographics of your audience profile, including age, country of origin and gender. You can see how appealing your videos are to the people you are targeting by checking the spread of representation here.
- Pay attention to your video metadata
YouTube metadata is an often-overlooked element of content that is actually incredibly important, both for advertising revenue and for views in general. What we mean when we talk about metadata is your tags, title and description of your video, all of which should make use of high traffic keywords that you’ve researched as being relevant.
YouTube’s own keyword suggestion tool can be a great place to start finding those golden keywords that will get you noticed. Advertisers often use your metadata to locate videos that their customers are watching, so SEO is crucial here. Not only that, but when viewers are looking for new videos to watch, the SEO of your metadata will define where in the search results you fall, so putting some time and energy into this can get you more views too.
- Avoid dodgy video content
There are some types of content which are just not a good idea for YouTube. In fact, the platform could exclude you from advertising altogether if your content is found to contain any of the following:
- Sexually suggestive content: This includes making jokes based around sexual topics, as well as partial nudity of anyone in the video.
- Violence: This ranges from topics of extremism to videos of people sustaining serious injuries, as well as threats and suggestions of violence.
- Inappropriate language: Even the most popular YouTubers have started bleeping out their profanities, so avoid vulgar language or anything that could be construed as being threatening.
- Drugs: Promotion of the use, sale or abuse of drugs and other controlled substances is forbidden.
- Sensitive subjects: This includes references to wars, race crimes, natural disasters, political conflicts, even if you don’t show images of the situation itself.
When you’re considering how do YouTubers make money, you should recognize that those who make the most money avoid creating content that breaches any of these rules. YouTube does notify you if it feels your video is in breach of ‘advertiser friendly’ policies, and you’ll have the chance to contest the ban, but if you steer clear of dodgy content in the first place you shouldn’t run into any issues.
Make money on YouTube without ads
Of course, life is not all about ads, and with YouTube continuing to tighten its criteria around advertising it can be a good idea not to have all your eggs in one basket. Add to this the huge viewership you’re going to need in order to make serious money, it’s worth investigating other methods of making money on YouTube. Here are some of the best ideas.
- Work with brands
Influencer marketing is big business right now, and brands all over the world are investing in individuals who have secured the loyalty and trust of their target demographic. Sponsored videos might feature product placement, promoting a product from your sponsor, or you may be asked to produce a particular piece of content to support their campaign. Check out influencer marketplaces like Famebit, Grapevine Logic and Crowdtap to see what’s available to you. If you want to make work with brands, you can check out InflueNex , a powerful influencer marketing platform, which will help you to build good relationship with brands.
- Selling products or merchandise
Selling ‘merch’ is a great way to discover how to earn money from YouTube. T-shirts, tote bags, mugs, hats…whatever fits with you and your brand can become an amazing source of revenue for your business. Not only does this increase your exposure as a brand by putting it out there into the non-YouTube world, it also gives your fans a way to literally buy into what you’re doing.
- Affiliate marketing
Affiliate marketing doesn’t have to be hard work or complicated. Registering with big sales platforms such as Amazon is often as simple as filling out a couple of forms. Once registered, you can use your own special links to hook your viewers up with a product that you would recommend, and you’ll get a proportion of the final sale value. It’s not only Amazon who offer affiliate programs; most major brands will offer some kind of sales commission, so if you’re in a niche that calls for specialist products to promote, do contact brands directly to find out what they can offer.
- Crowdfund
If you’ve got an amazingly creative idea but lack of funds is stopping you from putting it into action, crowdfunding could be the way to go. Crowdfunded projects can use the money they make to buy better production equipment, hire people to work on the project, pay for props, anything really. A good way to get started with crowdfunding a particular idea is to create a ‘trailer’ or sneak peek that gives people a better idea of what you want to do. Make sure it gets them so excited that they can’t help but donate to your cause!
- Renting out your video
You have the ability to rent out individual videos for cold, hard cash, just like a pay per view service. The options for this are in the Creator Studio, where you can set the amount you want to rent it out for as well as creating an enticing trailer to encourage people to buy. Choose to either sell your video permanently, letting the person view it whenever they like, or rent for a limited time, usually 24 to 72 hours.
- License your content to the media
If you’re lucky enough to make a video that goes viral, you can make serious bucks by licensing it to the wider media. From online news sites to TV shows, there are loads of other content creators out there willing to pay good money to use your amazing clip, and may will reach out to you directly with offers. You can also proactively offer your content for sale via sites like Juken Media, where others can find it and purchase it directly.
Now you know how to earn money from YouTube, what are you going to try? Let us know how you get on and which ways make money for you!
Richard Bennett
Richard Bennett is a writer and a lover of all things video.
Follow @Richard Bennett
- Title: [Updated] 2024 Approved Film Assembly Station
- Author: Jeffrey
- Created at : 2024-08-02 11:00:07
- Updated at : 2024-08-03 11:00:07
- Link: https://eaxpv-info.techidaily.com/updated-2024-approved-film-assembly-station/
- License: This work is licensed under CC BY-NC-SA 4.0.