![[Updated] 2024 Approved Hidden Treasures on YouTube Understanding 'Unlisted' Footage](https://thmb.techidaily.com/eda53d482272507886f33101cf7c17fbcff2ff9c0e3000602465b544e6ae7c53.jpg)
"[Updated] 2024 Approved Hidden Treasures on YouTube Understanding 'Unlisted' Footage"
Hidden Treasures on YouTube: Understanding ‘Unlisted’ Footage
Complete Guide: What Does Unlisted Mean on YouTube

Richard Bennett
Mar 27, 2024• Proven solutions
Whether personal or professional purposes, YouTube is a great platform for sharing videos but, there are times, when you don’t wish to share it with each and everyone across the globe. The YouTube unlisted meaning is a video which can be viewed only by the users having the link to it. At the back of your mind, you may be wondering how safe an unlisted video is. Let’s learn in detail what does unlisted mean on YouTube.
- Part 1: What is Unlisted Video on YouTube
- Part 2: How to Make YouTube Videos Unlisted
- Part 3: How to Share Unlisted Video
Wondershare Filmora video editor is one of the most widely used video editing software for YouTubers, it makes the video editing simplified with the pre-programmed effects and templates. You can download the free trial version to check.


## Part 1: What Does Unlisted Video Mean on YouTube
The YouTube unlisted meaning is that your video will neither come up in the search results nor on your channel. Only the users who have the link to the video can view it. The link can be shared with anyone and everyone, even with the users who do not have a YouTube account. Many people don’t know the difference between private and unlisted YouTube videos . In order to understand what does unlisted mean on YouTube in a detailed way, let’s dive deeper into it and know the difference between public videos, unlisted videos, and private videos.
1. What is Unlisted YouTube Video
Between private and public, you can find the unlisted videos. What does unlisted mean on YouTube? An unlisted video does not appear in the search results, suggestions or video tab. If you unlist a new video, your subscribers won’t receive any notification informing about it. You can share an unlisted video with the people you wish to share and the users having a link to the video can see it. It can also be viewed by the friend of friends if they share the link with their friends.
The unlisted videos are treated like public videos by YouTube. This means that you cannot use the copyright audio or video and it will be reviewed by the YouTube team if other users flag it as inappropriate content within a timeframe of 24-hours .
What Unlisted YouTube Videos Can Do
The unlisted videos can be shared with family and friends. If you are conducting a webinar and wish to share the video with only the registered users, an unlisted video can be used. You may also use the unlisted video for giving access to the people who embedded it while cleaning the YouTube page. For getting feedback from closed groups for market research or to share online resume link for job applications, the unlisted videos can be of great help.
Takeaway: Unlisted videos are a great way to share personal videos with just your family and friends, or to get feedback from people you trust on videos before you decide whether to make them public.
2. What is Private YouTube Video
The videos that do not appear in the recommendations, search options in YouTube or in your tab are the private videos. When you select the private setting for a video, the subscribers don’t get a notification. The private videos can be seen only by the uploader and the mentioned Google accounts. It is not available for friends of friends which mean if you share a private video with a friend, only that person can see it. If your friend shares it with someone, it won’t be visible to others. If anyone wishes to view a private video, the person has to request permission to view to the uploader.

What Private Youtube Videos Can Do
By using private YouTube videos, the internal company information can be kept confidential, the family videos can be shared safely with the people you wish to, and also store your personal data without worrying about being hacked by the strangers. By choosing the private setting, you may upload and schedule the date and time when a video can be made public on YouTube. It helps in saving storage space on your phone.
Takeaway: A private YouTube video is only available to YouTube users that you invite to view it.
3. What are Public Youtube Videos
The Public setting in the YouTube video is a default setting which allows everyone to see the video you post. When you want your video to appear in the search engine results and want more and more viewers and traffic on your video, you can keep the Public default setting on.
What Public YouTube Videos Can Do
Do you wish to grow your brand awareness? Select the Public default setting as it is the best way to do it. You may use the Public setting in any of these situations below:
- Having a video sharing business like explainer videos, product reviews, commercials, etc. with customers or prospective viewers
- Targeting at earning money through YouTube videos
- Looking forward to the growing personal brand by a YouTuber
- Looking for more and more subscribers on YouTube
But, you must remember that once you post the video, it will be available for everyone throughout the world on YouTube. Even if you decide to change the settings or delete the video, later on, you will be subjected to judgment, professionally and personally. While posting a video with Public setting, you must have an answer to questions like-
- Shall the senior or your boss see this video?
- Can your job prospect hamper with this video?
- Does the video contain harassing or offensive content?
- Can your friends ridicule you after seeing the video content?
If all the questions are answered in YES… then it is better to think hard and long before uploading the video content with Public setting on YouTube. You may upload the content with unlisted or private settings.
Takeaway: If you make a video public, anyone will be able to find and watch it. When uploading a video using default settings through YouTube, it will always default to being a public video.
Below is a brief comparison table about the differences among YouTube Unlisted, Private and Public video settings.
| Feature | Unlisted | Private | Public |
|---|---|---|---|
| Can I share video URL to friends? | Yes | No | Yes |
| Can I add video to YouTube channel? | Yes | No | Yes |
| Can I shows up video in YouTube platform? | No | No | Yes |
| Can I post video on my channel? | No | No | Yes |
| Can I leave a comment? | Yes | No | Yes |
| Can I see it in landing page? | Yes | No | Yes |
| Do People need an account to watch it? | No | No | Yes |
Part 2: How to Make an Unlisted YouTube Video
Follow the below-mentioned steps to make an unlisted YouTube video -
- Log in to your YouTube channel
- In the top right corner, click the add video button
- Find the drop-down menu and choose Upload Video
- Select the setting by clicking on Public and a drop-down menu appears to unlisted
- Search the instruction select files to upload your video
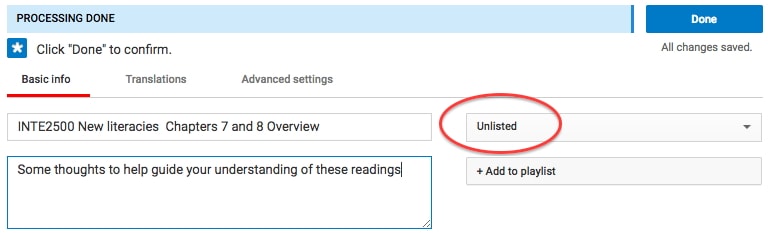
- When you start uploading your video, a message box appears, Click Public on the right side corner and select unlisted from the drop-down menu
- Once you have selected unlisted, click Done in the top right corner and your video is published
Part 3: How to Share Your Unlisted Video
If you wish to share the unlisted video , just share the published video link with anyone you wish to share. A Google account is not required to see the video. So, if the person you shared the link with is not logged in to his Google account, still the video can be viewed. The people who have the link to your video can also share and re-share the link in a number of ways. It can be shared on the social media or just forwarded amongst their friends. But, if you don’t want your friends to re-share it, change the settings to Private.
You can see a message showing “this video is unlisted” on YouTube when you want to share someone else’s unlisted video on social platforms. Think before you consider sharing an unlisted video.
Conclusion
Now, that you clearly know what does unlisted mean on YouTube, consider the option while uploading a video. It helps in retaining the privacy of your video.
Richard Bennett
Richard Bennett is a writer and a lover of all things video.
Follow @Richard Bennett
Converting YouTube Videos Into Engaging GIFs on Devices
How to Create GIFs from YouTube Videos

Shanoon Cox
Mar 27, 2024• Proven solutions
Who doesn’t love Gifs? They are one of the most entertaining means to communicate on the internet. But have you tried creating a GIF from YouTube videos? Generally, GIFs use humorous or relevant scenes from movies or shows to make them relatable to the situation. If you’re someone who wants to create GIFs from YouTube, this is for you.
The article below will show you how to create GIFs from YouTube videos on the desktop computers and mobile devices with some free online GIF makers and apps.
Part 1: How to Create GIFs from a YouTube Video on the Computer?
1. FreeGifMAKER.me
FreeGifMaker is a simple online tool that allows the creation of animated Gifs free of cost. A minimum of two pictures has to be uploaded out of ten. It’s super easy and takes a couple of minutes to make a GIF from a YouTube video.
Find out how to create GIFs using FreeGifMaker.me using these steps.
- Open the website on your desktop by typing http://freegifmaker.me/youtube-to-gif/
- Go to YouTube and copy the URL of the video you want to make a GIF. Paste it on the above-mentioned website.
- Click on “Load YouTube Video” below the URL space and wait for a few seconds while the tool checks the video source.
- After the YouTube video is loaded, finally enter the gif duration, start time and click on the “Make a GIF button” and it will redirect you to the result page.
2. VEED.IO
VEED is another easy way to make GIFs from YouTube videos. VEED allows you to copy a YouTube video link of your choice and paste it on VEED without any difficulty. VEED not only creates GIFs from YouTube videos but also gives few more facilities like trimming, adding text, cropping to the clip which helps in creating super-cool GIFs. VEED has both free and Pro versions and is a perfect browser software.
How to use VEED only in 3 steps, know about it below:
- First, you need to copy the link to the YouTube video of your choice and paste it into VEED. From there the software will start importing the video into its project editor and you can start creating the GIF from there.
- For the editing part, you need to trim the part of the video in which you want to make the GIF and crop the GIF. You can easily do that by choosing the canvas size menu available. After that, you can add text, font style, color, and size to your GIF.
- In the last step, you just have to download the GIF which you have made in VEED.
3. Kapwing
Kapwing is a great stage for creating GIFs as well as videos and images. Kapwing is one of the most used and liked online video editors available. It provides one single step for all the things to do while creating a GIF – upload, editing, and sharing the file.
To create unique GIFs with Kapwing, follow these easy steps.
- First, you need to open Kapwing video editor and copy the URL of the YouTube video of your choice and paste it on Kapwing to create your GIF from the video. Any video which is shorter than 30 minutes and less than 500 MB is supported by Kapwing.
- Once you have uploaded the video, you will find the video appearing in the timeline. The section of the video that you want to make the GIF of needs to be cut with the sliders which are available at the end. A GIF can be usually of any length but to maintain good resolution, it is always advised to not make the segment more than 10 seconds.
- You can preview the GIF you created after trimming the video which will allow you to see how the final output would be like. Other edits such as cropping, adding text, and experimenting with the speed can be done on Kapwing as well.
- In the last and final step, you just need to export the GIF which you will find in the dropdown arrow available just beside the red “Export Video” button. Then click on the dropdown button and choose the option “Export as GIF”.
After processing the GIF, you need to save it by downloading it.

4. File-converter-online.com
This online free video editor can convert videos into GIF without any watermark and the maximum length of the GIF from the video clip can be 20 seconds, which can be set by you as needed. It provides a simple and free GIF maker that again offers special effects as well such as setting up the speed of the video.
You can create your desirable GIF from YouTube video in 3 easy steps.
- First, provide the specific link of the YouTube video which you want to create the GIF of in the space given.
- Apply the start time of the video by sliding with the given slider and then set the desirable duration of the GIF which is available in the next “Duration (seconds)” by sliding the seconds.
- Next, you can choose the speed of the video which is optional, and then set the resolution from higher to lower as per your choice.
- The final step involves creating the GIF which you can do by clicking on the red button “Create GIF from the video” available below the resolution option and finally the downloading will start after a short waiting on the next page.
5. Clideo
Clideo is one of the most reliable video converters available online. It can create an animated GIF from YouTube videos without much complication.
You can make GIF on your own by following the 3 easy steps mentioned below.
- First, you need to copy your YouTube video that you want to create a GIF with. Come back on Clideo and you will find a dropdown menu beside “Choose file”, there paste the link that you have copied earlier in the URL space. You can also select Google Drive or Dropbox for the same.
- After pasting the URL, you have to choose the ‘infinity sign’ given on the right side which will create an endless GIF without sound. Click on the ‘loop’ button available just below the panel on the right side.
- After completing the steps, you can watch the preview of the GIF and go back to editing if you need to change anything. Else save the output on your PC or Mobile phone.
Part 2: How to Make a GIF from a YouTube Video on the Android and iPhone?
1. GIF Toaster – GIF Maker
Gif Toaster is one of the video editing apps which makes the work of creating Gif from YouTube video super-easy. It can convert photos, panoramas and, videos into GIFs easily. You just need to download the app to make GIFs of your own choice.

You need to follow a few simple steps to create GIFs on your own.
- It is accessible on the iOS App Store and the Google Play for free so you need to install GIF Toaster on your device. Once done, tap the “Make GIF” option available below, you can also click “Combine GIFs” to combine more than one video. After completing, scroll down the dropdown menu beside “Video>GIF” and select the video which you want to convert into GIF.
- Once the selection is done, you will be provided with various options like “Basic Option”, “Direction Option”, “Effect Option” where you can control the playback speed, range along with other options available. You also get the option to choose “Filters” for making the GIF.
- After selecting the options of your choice, you have to scroll back to the top again and press “Convert” to quickly convert the video into GIF.
- Once the GIF is ready, you will be able to see the final result and you just need to ‘Save’ the file.
Part 3: Bonus: How to Create GIFS from YouTube video on iPhone without installing any app?
It is now possible to convert YouTube videos into GIFs by using the 5SecondsApp available for iOS. To make this possible you just require few things in your iPhone – the device should be iOS 11 or more, YouTube in the browser or app, and the 5SecondsApp already available in the App store.
First, you need to find a video that is not more than 10 seconds then begin the screen recording on the iOS recording feature and go back to YouTube to play the video and record the portion you need. To make the GIF you have to launch the app and tap the plus option there. Later, trim the video as you see fit. After you’re done, crop the video with the help of the crop tool and finally save it.
Part 4: Why Should You Use GIFs?
1. GIFs don’t prevent web pages from loading quickly
GIFs which are animated becomes more popular for any website as it gives meaning compacted in a small video the website uses to boost its chances of getting more views. While GIF does not make a website much slow but for better performance, it can be converted into lossy optimizations which do not make a huge difference in front of the human eyes or it can also be converted into HTML5 videos which makes the GIF 95% smaller in size.
2. GIF is an integral part of communicating on social media
Using GIFs makes any communication bright and friendly. It delivers great messages through short animated videos and has become the spotlight for communication in the past few years. Almost everyone using social media is using GIF for communicating with their friends and family.
Final Thoughts
There are many apps and video editors available today available free of cost. You can easily make GIFs from your most-liked video on YouTube. It is smooth to create GIFs on your own with the help of these editors mentioned above. Each one of them is having a free version and easy to handle so do not forget to try them next time you are making a GIF from YouTube videos.
Shanoon Cox
Shanoon Cox is a writer and a lover of all things video.
Follow @Shanoon Cox
- Title: [Updated] 2024 Approved Hidden Treasures on YouTube Understanding 'Unlisted' Footage
- Author: Jeffrey
- Created at : 2024-08-20 14:21:04
- Updated at : 2024-08-21 14:21:04
- Link: https://eaxpv-info.techidaily.com/updated-2024-approved-hidden-treasures-on-youtube-understanding-unlisted-footage/
- License: This work is licensed under CC BY-NC-SA 4.0.