![[Updated] Flipping the Script Turning Online Games Into Channel Gold for 2024](https://thmb.techidaily.com/1b4d426689bd18514a96cb95968cc5a755b1ea7a22bc00e9feef5b8e8bfa78d1.jpg)
"[Updated] Flipping the Script Turning Online Games Into Channel Gold for 2024"
Flipping the Script: Turning Online Games Into Channel Gold
The Guide to Starting a Successful YouTube Gaming Channel


Richard Bennett
Oct 26, 2023• Proven solutions
Now is the best and easiest time in history for you to start a YouTube gaming channel. Yet a profitable channel? That’s another story. In this article, I am going to highlight the key elements you need to become the best YouTube gamer you can be.
Table of Content:
- Have a Greater Purpose
- Create an Identity
- Type of Gaming Videos
- Have a Budget
- Optimization Matter
- Be Cautious of Content Strike and Demonetization
Starting a gaming channel today will mean that you will be a small fish in a big ocean. The amount of content on YouTube is massive, and in order to stand out, you will need three intangibles:
- Patience
- Consistency
- Creativity
If you are willing to commit to this long term, then it’s the best time in history for you to start a YouTube gaming channel.
![]()

The All-in-One Screen Recorder & Video Editor
- Record desktop screen, voiceover, and webcam simultaneously
- Edit recorded clips quickly with a wide range of professional tools
- Built-in plentiful templates and effects
- Export to MP4, MOV, MKV, GIF and multiple formats
For Win 7 or later (64-bit)
For macOS 10.12 or later
 Secure Download
It’s the best time because you will have so many pioneers and successful creators to draw inspiration and knowledge from. You’ll be standing on the shoulders of giants like PewDiePie, Markiplier, Jacksepticeye, and CinnamonToastKen.
The trail has been blazed and you’re in the new frontier. Now, here’s what you need to know about starting a YouTube gaming channel.
1. Have a Greater Purpose
According to Tubular Insights , 15% of all content on YouTube is related to video games. That’s a lot.
Additionally, as of 2018, YouTube has a new monetization requirement. To enable monetization, you will need 1,000 subscribers and 4,000 hours of watch time in the last 12 months.
If you think you can make a few videos and start making money, I’m sorry, but I’ll have to disappoint you. YouTube is fun and a wonderful way to increase the social aspect of gaming and enhance your enjoyment. Approach it the same way you’ve approached gaming all along, as a fun way to spend your time.
Enjoy the journey… and what a journey it can be. Do it for the love of playing games and making videos, and not about getting subscribers or views. If you don’t change your attitude, it’s a grueling climb if all you want is to reach the finish line (which is nowhere in sight).
Why am I telling you this? Well, if you don’t have a greater purpose than simply growing subscribers and making money off YouTube, then you are going to get discouraged and give up. It’s not a get-rich-fast plan.
Here is how you find your greater purpose:
1. Give Value
You want to make good YouTube gaming content like those popular YouTubers that came before you.
But… what makes good YouTube content?
Simply put, good content should exhibit these factors:
Entertaining: Tell a story and sensationalize the emotions that come out of you when you play games.
Educational: Find hidden stages, new tricks, and talk about the lore and history that brought this game to life.
Inspiring: Encourage viewers to try new games and play along. Help people discover their next pastime and thank viewers for spending their time with you.
This is what gives your content value, and creating content with value should be your ultimate purpose. Making your viewers feel good is, in a way, better than money, no?
2. Make YouTube a Part of Your Daily/Weekly Ritual
YouTube should be a part of your regular schedule.
At first, it’ll be easy. Like anything new, your YouTube channel will have a novelty to it. It’s this exciting new project that you have.
But after the first month, that excitement will dampen. By the third month, it’ll become familiar. Here’s where you have to fight the urge to stop. This is where author, Seth Godin calls The Dip .
It’s now working. And like all work, you’ll have to schedule it into your daily life. You’ll have to prioritize YouTube above hanging out with friends, watching another movie, or playing video games without the strain of recording it and being entertaining/educating/inspiring.
However, if you are getting fulfillment from YouTube, you won’t stop even when the going gets hard. Like being a parent, it’s not always fun, but it should always be fulfilling.
Pro Tip: Mark when you are going to be working on YouTube in a calendar, so when someone asks you to hang out or go for dinner, you can check it and let them know you already have plans.
3. Have a Passion to Get Better At Every Step
There are many stages to producing a YouTube video, from pre-production to production to post-production. And within those stages are countless steps.
If YouTube is what you want to do, perhaps the greatest purpose you can have is improving on each of those skill sets along the way.
In the beginning, you will have a surplus of ideas, but once your initial stock of video ideas run dry, you will need to practice coming up with more ideas .
You’ll get better at recording your gameplay, at speaking on camera, at editing your footage, at optimizing your content, and at sharing your videos.
You will enjoy certain steps more than others, but if you are passionate, you will find comfort in striving to improve in each one, little by little.
Pro Tip:Focus on telling a great story . In every video, you should have an objective you want to accomplish. You want to beat a stage, you want to learn a new skill, etc. Once you nail that, all the other elements (screen recording, editing, and your commentary) will fall into place to guide your story from beginning to end.
2. Create an Identity
Your personality and your channel will need to go through a little branding exercise . You need to find what sets yourself apart from all the other gaming channels on the Internet. Ask yourself, and be honest with the answer: Why should anyone care about my channel?
1. Be Original
Take inspiration from other YouTubers and adjust it so that it’s unique. You cannot copy the ideas of popular YouTubers, because the public can see that. They can tell the difference between originality and imitation.
Being original doesn’t mean doing something that has never been done before.
Take a look at Jacksepticeye and Markiplier, both are popular YouTubers recognized for their colorful hair, mass use of profanity, and their Let’s Play style of gaming videos. But if you watch their videos, you can see that they are not copying each other but rather adjusting what has proven to be effective to suit their personality.
If something inspires you and you want to make an original version yourself, don’t think that you need to do something completely different, rather ask, how can I make that awesome thing better?
2. Focus on a Specific Aspect of Game
Odds are, you’ll end up playing the same game as other YouTubers. If you’re playing a popular game, then it’s going to be hard for you to establish an audience if your videos are broad.
Consider how your viewers will discover your videos. Are they going to find you through search? If so, what are they searching? There are many aspects to a video game: characters, glitches, stages, etc.
Find a specific aspect of the game to focus on.
Take YouTuber, NoughtPointFourLive, who instead of playing the game via a linear campaign, finds ridiculous situations, odd tricks, and easter eggs in Grand Theft Auto:
3. Hook Audience With Something Funny Or Interesting — And Lead Up To It
Every video you make should tell a story. It doesn’t matter if the storyline is the one in the video game or if it’s happening to you in real life. What matters is that you are aware of where the climax is.
The climax is what your story hinges on: it’s when Mario confronts Bowser.
This is what your audience is watching for. They want to know who wins.
To hook your audience right away, open with the most exciting part. The bit leading up to the climax. But don’t give away the ending. You want to hook them. Give a promise that this video is worth watching and that eventually, it will deliver.
Check out this example from YouTuber, Lachlan playing Fortnite and landing back at Spawn Island, an artillery-filled waiting area for players before the game starts.
This structure can be applied with humor as well as climatic events. If you open with something funny, it gets the viewer engaged immediately. They want to know what led up to that humorous moment.
Take a look at this example from YouTuber, Jelly. He does a great job at injecting humor into his first few seconds of video.
3. Type of Gaming Videos
There are no rules to making gaming videos. As long as it’s worth watching and you aren’t stealing content, that is all that matters. Nevertheless, there are a few standard types of gaming videos that have been established over the years.
1. Let’s Plays
Turn the game on and start playing. Let’s Plays give you a lot of freedom to explore the game and let your personality show in the commentary. You don’t need to play with a strategy, but do have a particular goal in mind (Finishing a level, for example).
Let’s Plays are more about watching you experience the game. A demographic of people watching Let’s Plays are those that don’t have the game themselves, but still want to experience it. Let them live vicariously through you.
2. Reviews
When you’re deciding whether or not to buy a new product where do you go to research? Google and YouTube. If you have a lot of interesting insights after playing a game, making reviews videos might just be your calling. There are many games on the market, and for consumers, it can get overwhelming. Reviews help others decide whether they should invest their money and their time into that specific game or continue searching.
3. Walkthrough
Unlike Let’s Plays and reviews, walkthrough videos are mapped out and structured to help the viewers pass the game while experiencing events, side quests, and characters they would otherwise have missed.
4. Reactions
Misery or excitement, when you genuinely react to an event in a game, the audience gets to experience it along your side. Give the moment a bit of lead up, let people know what you are expecting, and then surprise yourself. Reaction videos are great because they are spontaneous and a wonderful form of presenting your personality.
5. Skills
Video games are hard to master. But if you think you are proficient in an aspect of the game, show off your moves. Is there a particular trick that you can do? Is there a stage you can beat quickly? Are you able to take down your enemy with ease? Prove it.
4. Have a Budget
When you begin your YouTube gaming journey, you are going to see a lot of established YouTubers showing off their gear. It’s easy to get carried away with equipment, but we recommend setting a budget and staying within it to start.
What’s a good budget for YouTubers? Some might say you can do it for $600 and others say $3000. That’s a big range.
What you need to ask yourself is what do you currently have.
Are you starting with nothing? Or do you have some essentials? If you have a computer, which can play the game of your choice, you don’t need to spend $2000 on a new one. Look at what you currently have before buying new stuff.
Here is what you will need to get the best results:
- Microphone (Average cost: $100)
- Webcam (Average cost: $100)
- Editing Software (Average cost: $300)
- PC that can handle recording, editing, rendering, uploading, etc. (Average cost: $2,000)
If you are starting out, all you need is a computer with a capable CPU and GPU, a webcam, a microphone, and a free encoding software, such as OBS , and you will be able to stream.
Even PewDiePie started with a basic gaming setup.
I don’t recommend blowing your life savings on all the equipment you want. Don’t have a powerful computer? There are games such as Minecraft and Roblox that are less taxing to your computer, if you don’t have a powerful one.
There are ways to work around it, if you don’t currently have the funds. Being a YouTuber is all about being resourceful and creative.
You don’t need professional editing software, there are affordable ones such as Wondershare Filmora that have all the capabilities.
1. Many Games Are Free
Here’s the great thing about starting as a video game YouTuber, you don’t need to pay for any games. I’m not only talking about the crappy Flash games on the Internet, but massively popular games such as Fortnite and DOTA are also free to start playing as well.
If you’re strapped for cash. Start your channel playing free games and work your way towards more expensive games.
2. Some Software Are Free As Well
OBS: This streaming software allows you to capture your game in top quality and broadcast it directly to YouTube. It’s a simple setup , and it’s completely free.
Audacity: This audio recording and editing software is great if you want to improve the quality of your audio by removing background noise or combining clips.
GIMP: Probably the closest free product to Photoshop you can find. GIMP will help you perform basic image manipulation. It’s not as user friendly as Photoshop, but you can learn the fundamentals here as you save up for the Creative Cloud subscription plan.
5. Optimization Matters
Gaming is arguably the most popular genre on YouTube. So, how is your little video going to be discovered in this vast sea of gaming content?
The answer: with a good optimization strategy.
1. Tags and Title
When conceptualizing your next video, consider what your viewers are going to search to find it. This will help you focus your gameplay to meet the demand of this untapped (or more specific) audience.
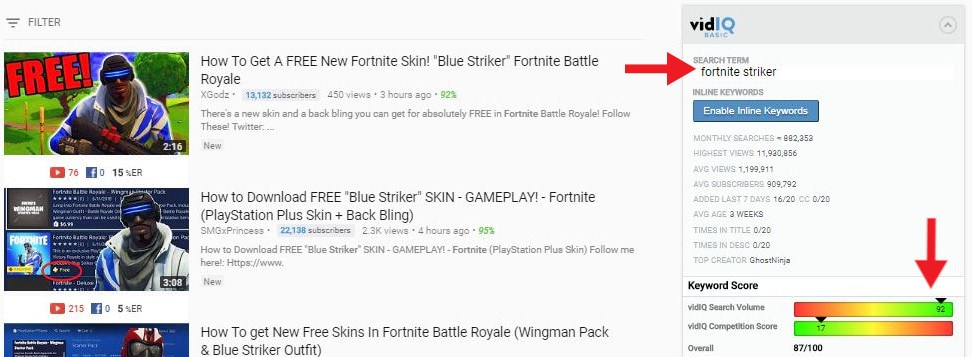
You can use a plugin called VidIQ to see the keyword score by simply searching for the content you think your viewers are interested in watching.
If you’re playing Fortnite, and your keyword is simply “Fortnite” you’re using a highly searched term, but the competition is very high as well. The odds of your ranking is incredibly tough as the overall keyword score is 61/100.

However, if you focus on a more specific aspect of the game to make a video around, such as a character, you can heighten your chance at being discovered.
Take the example below, where I added the keyword “Striker” to the search. Its overall keyword score is 87/100, that’s 26 points better in the keyword score, compared to just “Fortnite.”
This will help you identify the content you should be making and then use that keyword knowledge to write a good title and a list of 5-15 tags.
Few more tips to improving your titles include:
- Avoid uninspiring words like “Fun,” “Exciting,” or “Great.”
- Once you have a title do a quick search to see if it already exists. Common titles make it harder for yours to rank.
- Have the title relate to the game. If there are certain words or phrases that players are familiar with, go ahead and use it.
- Make it click-worthy by promising something unique, but don’t mislead viewers.
2. Create Awesome Thumbnails
It doesn’t matter how awesome your video is, if the thumbnail image is boring, nobody will want to click into it. And if nobody clicks into it, you won’t get any views. Simple.
What makes a good thumbnail image?
- Don’t use the random images YouTube picks for you
- Have an expressive picture of a human face (preferably of yours, because it’s your gaming channel and you’re the star)
Take a look at The Syndicate Project’s thumbnails and how it evokes an intensity that makes you want to click — or scream with excitement. Both good things.

- Don’t want to use your face? Create a character for yourself or to represent your channel. Or used the characters from the actual game.
Check out the colorful thumbnails from VanossGaming, where the owl is the mascot of their channel.

- Use readable text or emojis
If you don’t have Photoshop or don’t have strong design skills, check out Wondershare Pixstudio , a drag-and-drop design tool that makes creating thumbnails easy.
3. Engage with Other Gamers
Don’t forget that YouTube is a social media platform.
It’s all about being a part of a YouTube community, and while you can’t interact with every creator on the platform, you can find those within your niche or specific game and chat with them. Leave a comment if you like their video or have constructive feedback.
Additionally, viewer engagements such as likes and comments have shown to have an indirect effect on your video ranking. That is why you should encourage your viewers to “smash” the like button or join in a conversation by asking them a question in your video.
6. Be Cautious of Content Strike and Demonetization
1. Cause for Demonetization
The YouTube monetization landscape has changed a lot for creators in the past few years. The guidelines are always being adjusted to serve both creators and advertisers. If you’re thinking of making money from YouTube ads, you have to be aware that there are types of content that turn advertisers off, and YouTube knows it. Here are some reasons that YouTube will choose to demonetize your videos:
- Excessive or gratuitous violence
- Hateful content: promotes discrimination or disparages or humiliates and individual or group of people (race, ethnicity, nationality, religion, disability, age, veteran status, sexual orientation, gender identity, etc.)
- Inappropriate use of family entertainment characters
- Incendiary and demeaning content: disrespectful languages that shame or insult an individual or group
2. Avoiding Copyright Strike
Thanks to the fair use doctrine, you’re allowed to take video game content and make videos from it without acquiring permission from the people who made the game.
However, if you step across the fair use line, you can be penalized for violating copyright infringement.
If you get three strikes from YouTube in 90 days, your account and videos will be removed and you won’t be allowed to create a new channel.
Before you publish your video ask yourself these questions, if you answer yes to any of them then you have met fair use standards:
- Is your content creative or educational?
- Is there more original content than copyrighted content?
- Is your video benefiting the original content?
I recommend that you learn more about YouTube copyright , and how to build your content so that it doesn’t get flagged.
Beyond all that, it’s about playing games, having a good time, and meeting awesome people like yourself. Enjoy the journey and take pleasure in every little achievement, be it in the game or on YouTube.
Key Takeaways
- Don’t go into YouTube gaming for the money, but rather to improve your skills and other people’s lives.
- Find something special about your channel that people can’t find anywhere else.
- YouTube gaming can be as cheap and as expensive as you want, create a budget to stay within your limits.
- Understand optimization to improve your chances of viewers finding your content.
- Don’t be hateful or advertisers will avoid you, and don’t steal other people’s content without crediting the original creator.
- Give yourself a unique YouTube gaming channel name .
What’s stopping you from starting your YouTube gaming channel? Let us know in the comment box below!
Best Screen Recorder & Video Editor for Gamers
If you want to record the gameplay and edit it with some text and titles, or creative transitions and effects, I highly recommend you try Wondershare Filmora , which is easy to use yet powerful enough with its editing tools and effects templates. Download the free trial version and get started now.


Richard Bennett
Richard Bennett is a writer and a lover of all things video.
Follow @Richard Bennett
Pro Tips for Utilizing Green Screen Effects Professionally
The world of video-making owes much of its magic to small leaps of innovation. One of these leaps is the use of the chroma key background, which most people know by the more colloquial term—green screen.

Chroma key, also known as green screen or blue screen, is a cool hack for seamless visual storytelling, allowing content creators to replace backgrounds with any image or video they want. This technique is widely embraced in film, television, and online content, and has opened the door to limitless creative possibilities. Aside from its ability to maximize creativity, it is also cheap to employ and convenient to set up, which has made it a staple for everyone who works with visuals.
In this simple guide, we’ll delve into the fundamentals of the chroma key effect, how it is used for video making, and how to leverage that as you perfect your visual content.
YouTube Video Background Creating realistic video scenes at your will is easy to complete with Filmora green screen removal.
Create Video Backgrounds Create Video Backgrounds Learn Green Screen

How Does Chroma Key Work?

Chroma Keying is done by singling out a specific color (usually green or blue) from the foreground, removing it, and replacing it with a different background (for example, a sunset). This process typically follows a series of steps:
- Background Selection:
A solid, single-color background, often green or blue, that contrasts well with the subject must be used. The color chosen should not be present in the subject or any props in the camera field to avoid unintentional transparency.
- Color Keying:
This requires the use of specialized visual effects software to key out the chosen color. The green or blue background is designated as transparent, making everything of that color see-through. The software distinguishes between the keyed color and the subject, creating a mask for the transparent areas.
- Foreground Filming:
This involves filming the subject against the live chroma key background. During filming, the chosen background color (green or blue) won’t appear in the final result due to its transparency. The subject is captured as if separately from the isolated background.
- Post-Processing:
In post-production processing, the editor takes the keyed-out color and replaces it with the new background of their choice. This step creates the illusion that the subject is in a different setting or environment. The transparent areas become filled with the chosen background which, if done right, results in a cohesive and visually appealing composition.
Why Green?
Theoretically, the chroma key background can be any solid color. However, the most commonly used colors are studio blue and bright green, with the latter far more common.
The choice of background color depends on the specific requirements of the production and the colors present in the scenes being filmed.
Free Download For Win 7 or later(64-bit)
Free Download For macOS 10.14 or later
Contrast
The less similar your chosen background color is to natural skin tones, the easier to isolate and replace in your footage. Bright green provides a strong contrast to most human skin tones and is less likely to be present in costumes or natural surroundings, making it easier to isolate subjects during the color separation.
Luminance
The color green emits light with greater intensity than blue, allowing for far more effective isolation by cameras during filming. This also means that blue screens demand increased lighting for proper exposure compared to green. This situation may be less than ideal if you lack powerful lighting or you don’t have the big bucks for them.
Digital Sensors
Many digital cameras and sensors are more sensitive to green wavelengths, resulting in cleaner and more accurate color keying during post-processing. Modern technology has also evolved to optimize for a green background, making it a more practical choice for the chroma key effect.
Wardrobe and Set Design
Bright green occurs less naturally in costumes and set designs than other colors, making green the optimal choice for reducing the likelihood of color spill and keying issues. However, if you know your scene will have lots of green, it is probably best to film with a blue screen, so there’s less risk of color spill and less post-production work.
Setting up Your Own Chroma Key Studio
Setting up your chroma key is convenient and straightforward, but there are some key factors to consider while setting up to ensure maximal performance.
Choosing the Right Background Color
The first step in the chroma key setup is selecting the right background color to be keyed out. This choice determines your effective color separation and ensures a smooth keying process during editing. Choosing a chroma-key background color that contrasts distinctly with the subject’s colors is essential for effective color separation. This prevents unintentional transparency, color spill, and ensures a polished final result.
Lighting Considerations
Lighting is an important part of the chroma-keying process. Bold, uniform, and consistent lighting on both the subject and the background makes it easy to delineate one from the other fully. This minimizes shadows and variations in color, creating a smooth and seamless keying process. Multiple diffuse lights from different angles are often used to illuminate the green screen evenly.
Positioning/Camera
Proper subject and camera placement are necessary to ensure an even color-keying process during post-production. To prevent shadow interference, the green screen should be smooth, tense, and without wrinkles or shadows.
High-quality cameras are essential every time, especially for chroma keying. Images with better definition are easier to key, so camera quality significantly affects the outcome. Even if your camera isn’t the best, merely shooting well can ensure a clean color-keying process during editing, resulting in professional-looking visuals.
Recording Tips for Chroma Key
- Proper Lighting
Maintaining uniform and well-defined lighting during recording is essential for a successful chroma-keying process. This consistency ensures a seamless keying process during post-production.
- Keep Distance from the Green Screen
The optimal distance between the subject and the green screen minimizes color spill and allows for natural movements. Proper distance between subject and background allows for easier isolation of the background and much smoother post-editing. A recommended starting point for the issue is around 6 to 10 feet from the background.
- Subjects and Clothing
As mentioned before, the choice of costume for Selecting appropriate clothing that doesn’t match the chroma key color prevents transparency issues. Subjects also have to be positioned in such a way that there is minimal light interference and reflection. These contribute to a flawless chroma key outcome.
3 Basic Troubleshooting Strategies
- Color Spill
Sometimes, reflected light from your green background can be cast on your subject and may remain so when the background light is keyed out. This phenomenon is known as a color spill. It is usually because of uneven lighting or shooting around reflecting surfaces. Avoiding spill can differentiate between good and lousy chroma key aftereffects.
Human hair is one area where color spill can show up unsuspectingly. Due to the translucency of hair, it is common for some unintended light to seep through. This allows some background visibility, which you do not want with a chroma key. This is especially notable with lighter hair colors like blond hair.
There are ways to account for this. Many video-editing software have features such as spill suppression and screen matte adjustments that can enhance the final footage. Specialized plugins also go a long way in ensuring minimizing spill. Addressing spill correction tackles unwanted green artifacts and ensures a clean keying process.
- Poor Lighting
Suboptimal green screen lighting can lead to inconsistencies in keying and editing, undermining your product. One way to avoid this is to light the screen and subject separately. Another tip, although expensive, is using multiple diffuse light sources and trying to maintain even lighting across every square foot of your scene. Super bright or dark spots can ruin your output, so it’s worth the extra effort if you don’t want to deal with problematic post-production.
- Poorly Refined Edges
Chroma keying should leave your videos with crisp, defined, natural-looking edges. But post-production editing can make all the difference if it doesn’t come out to your taste. Softening and refining edges make a smoother transition between the foreground object and the new background. Light adjustments to edge thickness and screen matte settings can also help enhance overall visual quality and add finesse to your work.
Conclusion
Green screen photography produces excellent results, and its ease of use makes it indispensable for videographers of all levels. In this guide, we’ve discussed chroma key technology, its role in the industry, and how to apply it to your craft to elevate visual content.
Chroma key, also known as green screen or blue screen, is a cool hack for seamless visual storytelling, allowing content creators to replace backgrounds with any image or video they want. This technique is widely embraced in film, television, and online content, and has opened the door to limitless creative possibilities. Aside from its ability to maximize creativity, it is also cheap to employ and convenient to set up, which has made it a staple for everyone who works with visuals.
In this simple guide, we’ll delve into the fundamentals of the chroma key effect, how it is used for video making, and how to leverage that as you perfect your visual content.
YouTube Video Background Creating realistic video scenes at your will is easy to complete with Filmora green screen removal.
Create Video Backgrounds Create Video Backgrounds Learn Green Screen
How Does Chroma Key Work?
Chroma Keying is done by singling out a specific color (usually green or blue) from the foreground, removing it, and replacing it with a different background (for example, a sunset). This process typically follows a series of steps:
- Background Selection:
A solid, single-color background, often green or blue, that contrasts well with the subject must be used. The color chosen should not be present in the subject or any props in the camera field to avoid unintentional transparency.
- Color Keying:
This requires the use of specialized visual effects software to key out the chosen color. The green or blue background is designated as transparent, making everything of that color see-through. The software distinguishes between the keyed color and the subject, creating a mask for the transparent areas.
- Foreground Filming:
This involves filming the subject against the live chroma key background. During filming, the chosen background color (green or blue) won’t appear in the final result due to its transparency. The subject is captured as if separately from the isolated background.
- Post-Processing:
In post-production processing, the editor takes the keyed-out color and replaces it with the new background of their choice. This step creates the illusion that the subject is in a different setting or environment. The transparent areas become filled with the chosen background which, if done right, results in a cohesive and visually appealing composition.
Why Green?
Theoretically, the chroma key background can be any solid color. However, the most commonly used colors are studio blue and bright green, with the latter far more common.
The choice of background color depends on the specific requirements of the production and the colors present in the scenes being filmed.
Free Download For Win 7 or later(64-bit)
Free Download For macOS 10.14 or later
Contrast
The less similar your chosen background color is to natural skin tones, the easier to isolate and replace in your footage. Bright green provides a strong contrast to most human skin tones and is less likely to be present in costumes or natural surroundings, making it easier to isolate subjects during the color separation.
Luminance
The color green emits light with greater intensity than blue, allowing for far more effective isolation by cameras during filming. This also means that blue screens demand increased lighting for proper exposure compared to green. This situation may be less than ideal if you lack powerful lighting or you don’t have the big bucks for them.
Digital Sensors
Many digital cameras and sensors are more sensitive to green wavelengths, resulting in cleaner and more accurate color keying during post-processing. Modern technology has also evolved to optimize for a green background, making it a more practical choice for the chroma key effect.
Wardrobe and Set Design
Bright green occurs less naturally in costumes and set designs than other colors, making green the optimal choice for reducing the likelihood of color spill and keying issues. However, if you know your scene will have lots of green, it is probably best to film with a blue screen, so there’s less risk of color spill and less post-production work.
Setting up Your Own Chroma Key Studio
Setting up your chroma key is convenient and straightforward, but there are some key factors to consider while setting up to ensure maximal performance.
Choosing the Right Background Color
The first step in the chroma key setup is selecting the right background color to be keyed out. This choice determines your effective color separation and ensures a smooth keying process during editing. Choosing a chroma-key background color that contrasts distinctly with the subject’s colors is essential for effective color separation. This prevents unintentional transparency, color spill, and ensures a polished final result.
Lighting Considerations
Lighting is an important part of the chroma-keying process. Bold, uniform, and consistent lighting on both the subject and the background makes it easy to delineate one from the other fully. This minimizes shadows and variations in color, creating a smooth and seamless keying process. Multiple diffuse lights from different angles are often used to illuminate the green screen evenly.
Positioning/Camera
Proper subject and camera placement are necessary to ensure an even color-keying process during post-production. To prevent shadow interference, the green screen should be smooth, tense, and without wrinkles or shadows.
High-quality cameras are essential every time, especially for chroma keying. Images with better definition are easier to key, so camera quality significantly affects the outcome. Even if your camera isn’t the best, merely shooting well can ensure a clean color-keying process during editing, resulting in professional-looking visuals.
Recording Tips for Chroma Key
- Proper Lighting
Maintaining uniform and well-defined lighting during recording is essential for a successful chroma-keying process. This consistency ensures a seamless keying process during post-production.
- Keep Distance from the Green Screen
The optimal distance between the subject and the green screen minimizes color spill and allows for natural movements. Proper distance between subject and background allows for easier isolation of the background and much smoother post-editing. A recommended starting point for the issue is around 6 to 10 feet from the background.
- Subjects and Clothing
As mentioned before, the choice of costume for Selecting appropriate clothing that doesn’t match the chroma key color prevents transparency issues. Subjects also have to be positioned in such a way that there is minimal light interference and reflection. These contribute to a flawless chroma key outcome.
3 Basic Troubleshooting Strategies
- Color Spill
Sometimes, reflected light from your green background can be cast on your subject and may remain so when the background light is keyed out. This phenomenon is known as a color spill. It is usually because of uneven lighting or shooting around reflecting surfaces. Avoiding spill can differentiate between good and lousy chroma key aftereffects.
Human hair is one area where color spill can show up unsuspectingly. Due to the translucency of hair, it is common for some unintended light to seep through. This allows some background visibility, which you do not want with a chroma key. This is especially notable with lighter hair colors like blond hair.
There are ways to account for this. Many video-editing software have features such as spill suppression and screen matte adjustments that can enhance the final footage. Specialized plugins also go a long way in ensuring minimizing spill. Addressing spill correction tackles unwanted green artifacts and ensures a clean keying process.
- Poor Lighting
Suboptimal green screen lighting can lead to inconsistencies in keying and editing, undermining your product. One way to avoid this is to light the screen and subject separately. Another tip, although expensive, is using multiple diffuse light sources and trying to maintain even lighting across every square foot of your scene. Super bright or dark spots can ruin your output, so it’s worth the extra effort if you don’t want to deal with problematic post-production.
- Poorly Refined Edges
Chroma keying should leave your videos with crisp, defined, natural-looking edges. But post-production editing can make all the difference if it doesn’t come out to your taste. Softening and refining edges make a smoother transition between the foreground object and the new background. Light adjustments to edge thickness and screen matte settings can also help enhance overall visual quality and add finesse to your work.
Conclusion
Green screen photography produces excellent results, and its ease of use makes it indispensable for videographers of all levels. In this guide, we’ve discussed chroma key technology, its role in the industry, and how to apply it to your craft to elevate visual content.
- Title: [Updated] Flipping the Script Turning Online Games Into Channel Gold for 2024
- Author: Jeffrey
- Created at : 2024-08-20 16:23:25
- Updated at : 2024-08-21 16:23:25
- Link: https://eaxpv-info.techidaily.com/updated-flipping-the-script-turning-online-games-into-channel-gold-for-2024/
- License: This work is licensed under CC BY-NC-SA 4.0.