![[Updated] From Raw Footage to YouTube Perfection - Premiere Pro Techniques for 2024](https://thmb.techidaily.com/4622c737506cba1a23868ce6098299cf82c4724d17bc893106f7883eb3c1b7e3.jpg)
"[Updated] From Raw Footage to YouTube Perfection - Premiere Pro Techniques for 2024"
From Raw Footage to YouTube Perfection - Premiere Pro Techniques
How to Edit YouTube Videos in Adobe Premiere

Richard Bennett
Mar 27, 2024• Proven solutions
You just made a few videos, and you want to edit them first before uploading to YouTube. The truth is that you may find the editing part a bit more challenging compared to uploading. However, there are now tools like Adobe Premiere that can help make the editing process easier. Read on and learn how to edit YouTube videos with Adobe Premier so that you can create amazing videos.
Related article:Adobe Premiere User Guide
Adobe Premiere is largely targeted towards professional users, and the best alternative you can use today, whether you are a professional user or just a casual YouTube user, is Wondershare Filmora . This is not only a highly effective video editing program, but it is also user-friendly and very easy to use.
 Download Mac Version ](https://tools.techidaily.com/wondershare/filmora/download/ )
Adobe is well known for having some of the leading video production tools in the industry. In fact, most of their tools ranging from the Premier Pro and Photoshop to Audition and many others have been used in many video and movie productions, including some of the popular theatrical releases of our times. Their latest professional video editor, Adobe Premier can be summarized as one of the best editors with versatility, depth, and power for high-quality video editing.
How to edit YouTube Videos with Adobe Premier
Step 1: Import the Video Clips
The first step in how to edit YouTube videos with Adobe Premier is to basically import the video clips you want to edit. This is achieved using a simple process of clicking “import” from the “file” drop-down menu. Once you have finished importing your photos or video files, you can then drag them from the sidebar and into the editing area.

Note
- If the videos you want to import are already published online, you can start the process by first downloading them directly from YouTube first, making sure to save them as MP4 files.
- The best way of importing videos from YouTube is by using an innovative video converter like Wondershare Video Converter Ultimate. This program will help in downloading and converting files to a format that is supported by Adobe Premier.
Step 2: Editing
The next step in how edit YouTube videos with Adobe Premiere is to start modifying the video files or photos the way you want. To achieve this, click on “Effects Control” and apply the desired effects. If you want to insert some text or words into your video, select “title” and then click “new title.” Now choose how you would like the words to behave, for instance, “Default Roll” makes the text roll upwards in the page.
Now drag the text that you have created into the editor area. If you want to edit the text, simply double-click to select it, and it will bring up a separate page where you can make further edits. You can then modify the text, font, and the positioning as well. This page also allows you to set whether the text will crawl or roll.

The final part of the process is to import your chosen audio file. This could be the chosen soundtrack for your presentation. Simply drag the audio file onto your editor. You can then modify how the length of your videos or photos by selecting and dragging the specific photo or video. Finally, press enter and your video will start rendering.
Step 3: Save the Edited File and Upload to YouTube
It is important to note that even as you edit YouTube videos with Adobe Premier, the software does not allow direct uploads to YouTube. This means you will need to save the edited file first on your computer and ensure you use a YouTube supported format. The most effective option is to use the codec, which will then save your file in the MPEG-4 format. This is the preferred format for YouTube and Video uploads.
Richard Bennett
Richard Bennett is a writer and a lover of all things video.
Follow @Richard Bennett
Embedding YouTube Playlists with Minimal Complexity and Maximum Impact
YouTube is an excellent resource for entertainment, education, and general information, but did you know you can also display a YouTube playlist on your website?
Embedding a YouTube playlist will allow you to showcase a collection of videos on a topic or theme on your website. It’s also a great way to keep your visitors engaged on your site for more extended periods.
To help you with the process, we’ll explore different step-by-step methods to embed a YouTube playlist on a website to add interactivity to your site.
So, if you’re ready to get started, read on!
How To Embed a YouTube Playlist on a Website
If you want to embed and display a YouTube playlist on your website, we’ll give you a complete rundown of the three methods you can try to get this done. But, of course, each method has its pros and cons, so you’ll need to decide which is right for you.
Here’s how to embed a YouTube playlist on a Website:
Embedding a YouTube Playlist on Website Using WordPress Plugin
The plugin is the simplest way to add a YouTube Playlist to your WordPress website. This will help you get this done in no time without having to write any code for the process.
With plugins like YouTube Feed Pro by Smash Balloon , you can extend your website’s functionality and create, customize, or embed a YouTube playlist with just a few clicks of a mouse.
To embed and add a YouTube playlist on your website page/post, do the following steps in sequence:
Step1 Launch a browser on your PC and head to your WordPress website’s login page. Sign in to your dashboard using your username and password.
Step2 Click the “Plugins” option from the left-hand side menu on the WordPress dashboard. Now, click “Add New” and use the search option to find and install the YouTube Feed Pro plugin. Afterward, click the “Activate” option to enable the plugin.
Step3 Click the “YouTube Feed” option from the left menu and open “All Feeds.” On the next page, click “Add New” at the top left of the screen.

You will now be asked what type of feed you want to create. Select “Playlist” and click “Next.”

Step4 You need to create your YouTube API Key , copy it, and paste it into the pop-up. Click “Add” to connect your YouTube account to the plugin.
Step5 Select the Playlist you want to display on your WordPress website and take its ID. Paste that in the next pop-up window and click “Next” to continue the process.

Your YouTube playlist will be connected to your WordPress website. To further customize it, select the template you want and click “Next.” You can also configure the Feed Layout and Color Scheme.

Step6 Once you are done with customization, click the “Embed” option on the top-right side of the screen, and a pop-up window will appear. Next, click “Add to a Page,” and a list of pages on your website will be displayed.
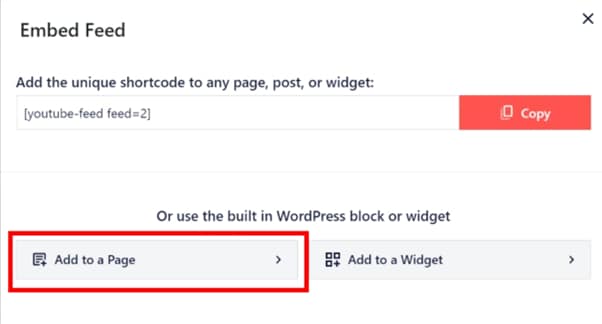
Choose your page and click “Add” at the bottom of the pop-up window. You’ll be directed to a new page where you can embed the feed. Click the “Plus” icon at the top-left of the screen, search for YouTube Feed and choose the Feeds for YouTube block to embed and add your playlist.
That’s about it! You’ve successfully embedded a YouTube playlist on your WordPress website.
Embedding a YouTube Playlist on a Website Using oEmbed Code
Another method to embed a YouTube playlist on your WordPress website is to use oEmbed Code. This method requires basic CSS, HTML, or Java knowledge; otherwise, you won’t be able to customize your playlist.
Moreover, this method is too complicated for beginners, and you will miss the customer support provided by WordPress plugin developers in case of any mishaps.
To use the oEmbed Code method, do the following steps:
Step1 In the first step, head to your YouTube account and access the Playlist you want to embed. Next, click the three dots below it and copy its URL.
Step2 Now, login to your WordPress dashboard and open the post or page editor where you want to add the playlist.
Step3 Paste the URL directly in the editor and click “Update” to save the changes.
WordPress will grab your playlist from YouTube and automatically show it in your post using oEmbed. The outcome is a single video with a menu that your viewers can click to see other videos in the playlist.
Embedding a YouTube Playlist on WebsiteUsing
Step4 Log in to your WordPress dashboard and open the page/post editor where you want to embed the playlist. Click the “Plus” icon, search for “custom HTML,” and select “Custom HTML block” to add to the page/post.
Now, paste the iFrame embed code you’ve copied from YouTube and click “Update” at the top-right of the screen to save the changes and embed your playlist.
This method will also display one video with a menu from where you and your website viewers can access the playlist. Moreover, there are few customization options to change the appearance.
A Bonus Tip: YouTube Video Maker - Filmora
If you find your YouTube videos as boring and not engaging as other content on your website, we recommend using Wondershare Filmora for your next project.
Free Download For Win 7 or later(64-bit)
Free Download For macOS 10.14 or later
With this software, you can quickly make eye-captivating YouTube videos by recording from a screen or webcam and can edit them using advanced editing features. Filmora also allows you to instantly export your content to YouTube with just a few clicks, which you can later embed into your website.
Some key features of Wondershare Filmora are as follows:
- Advanced video editing features include keyframing, speed ramping, Boris FX, Motion Tracking, Titles, and more.
- Massive library of preset templates, effects, transitions, animations, and royalty-free music.
- Instant Export to YouTube channel.
- Record from webcam, screen, and voiceover.
- Simple drag-and-drop interface.
Conclusion
This article discusses step-by-step methods to embed a YouTube playlist on a website using the WordPress plugin, oEmbed code, and iFrame embed code.
Additionally, we’ve recommended Wondershare Filmora for making engaging and captivating YouTube videos that you can export directly to your channel from the software.
We hope you’ve found this article informative and can now display your YouTube playlist on your site without hassle.
Also read:
- [New] 2024 Approved From Raw Footage to Highlight Hits
- [New] 2024 Approved Get Clipped Onto YouTube Audio Submission Made Easy
- [New] 2024 Approved The Comprehensible Guide to Selecting Popular YouTube Openings
- [New] Brilliant Visuals Uncover the Magic in These 7 Grades
- [New] In 2024, How to Extract YouTube Trailers & More
- [New] In 2024, How To Upload Videos to YouTube [a Step-by-Step Guide]
- [New] In 2024, The Expert's Manual to Efficient Screencasting
- [Updated] 2024 Approved Grow Your Channelnode Through Joint Videography Endeavors
- [Updated] From Free to Fortune Unlocking YouTube's Earnings at the 500 Subscriber Level for 2024
- [Updated] Gain an Edge - Access These Top 8 Sites for FREE Eco-Screen Backdrops and Clips for 2024
- [Updated] How-To Guide for Effortless YouTube Playlist Downloads for 2024
- 2024 Approved Peering Into the World of LUTs and Their Effect on Pixels
- App Wont Open on Your Poco C50? Here Are All Fixes | Dr.fone
- Forgot Your Apple ID Password and Email On iPhone 14? Heres the Best Fixes
- In 2024, Tips for Superior Viral TikTok Image Tweaks
- Step-by-Step Guide: Converting and Playing SRT, ASS, SSA Subtitled Burned DVDs on Windows 11
- Unlocking Made Easy The Best 10 Apps for Unlocking Your Oppo K11 5G Device
- Title: [Updated] From Raw Footage to YouTube Perfection - Premiere Pro Techniques for 2024
- Author: Jeffrey
- Created at : 2025-02-06 16:00:12
- Updated at : 2025-02-07 16:31:33
- Link: https://eaxpv-info.techidaily.com/updated-from-raw-footage-to-youtube-perfection-premiere-pro-techniques-for-2024/
- License: This work is licensed under CC BY-NC-SA 4.0.