
!["[Updated] Glam up Video Images Integrating Shimmering Neons for 2024"](https://thmb.techidaily.com/506707788e28afb0dd333ede3d14b446e4802e54b3be096a7cd03abb7e8cbcbb.jpg)
"[Updated] Glam up Video Images Integrating Shimmering Neons for 2024"
Glam up Video Images: Integrating Shimmering Neons
Your YouTube video, or any other clip published on any forum, gets a larger number of hits if it has an attractive thumbnail. And, the fact is, a thumbnail becomes 10x more attractive when the main character that the image has have a neon border around it.
With that said, in the following sections, you will learn a couple of methods on how to add a YouTube thumbnail border around the main characters and/or objects that are significant to the clip.
In this article
01 Add Glowing Neon Border to YouTube Thumbnail with Filmora
02 Add a Glowing Neon Border in YouTube Thumbnail with Canva
03 Outline a Person in a YouTube Thumbnail with Photoshop
Part 1: How to Add Neon Border to YouTube Thumbnail for Free with Filmora
Being one of the most versatile and intuitive post-production tools available in the market today, Wondershare Filmora X allows you to add a neon border to a YouTube thumbnail quite conveniently. You can learn how to get this done on Windows or Mac by following the steps given below.
For Win 7 or later (64-bit)
For macOS 10.12 or later
Step 1: Define Project Settings and Add Image to the Timeline
Launch Wondershare Filmora X on your PC (a MacBook Pro M1 is used here), ensure that the project aspect ratio is set to 16:9 (Widescreen) on the splash screen, and click New Project. On the main interface, click the Preview quality and display settings icon from the upper-right area of the Timeline, click Change Project Aspect Ratio, click to select 1280 x 720 (HD) from the Resolution menu of the Project Settings box, and click OK to save the custom project settings.

Then select My Media from the menu bar if not already selected, click Project Media from the navigation pane, and click Import from the Media box to select and import the image of the main character or object that you want to use in the thumbnail.

Now, drag the image from the Media box to the Timeline at the bottom.

Step 2: Clear Image Background, Add Border, and Add Custom Background
Go to Effects from the menu bar, click to select the Default tab and then AI Portrait from the navigation pane, and click and drag the Human Segmentation preset from the right box, and place it over the image track in the Timeline.

Double-click the image layer, scroll down the upper-left box to the Video Effects section, and use the Edge Thickness and Edge Feather sliders to adjust the character’s edges to make them as realistic as possible. Click OK when done.

Next, click and drag the Human Border preset over the image track in the Timeline, and follow the same procedure to customize the border. This will give the character a neon border effect.

Now, use the method explained earlier to import a custom image for the background, and drag and place it under the previous track in the Timeline.

If you are running the latest version of Filmora, you will find there are some neon light effects available under AI Portrait as well.

Step 3: Add Titles to Thumbnail
Go to Titles from the menu bar, click to select the Default tab and then Lower 3rds from the navigation pane, and click and drag your preferred lower-third preset from the right window to a separate layer in the Timeline. Double-click the lower-third layer, and use the available options in the upper-left window to change the text, its color, etc., and drag the textbox to place it to your preferred position on the image as well. Click OK to save the changes.
Next, click to select Titles from the navigation pane, and drag your preferred title from the right window to the upper-most track in the Timeline. Now use the method explained earlier to edit the text, its color, position, etc. to make it look professional.

For more tips and tricks for creating YouTube thumbnail, you can check this You Tube thumbnail creating guide.
Step 4: Get the Neon Border Thumbnail
Click the Snapshot (Camera) icon from the upper-right area of the Timeline, go to My Media from the menu bar, right-click the thumbnail of the screenshot you captured, and click Reveal in Finder (on Mac) or Reveal in Explorer (on Windows) to get to the folder the YouTube thumbnail border is saved in.

Part 2: How to Add a Glowing Neon Border in Your YouTube Thumbnail with Canva
Canva is another intuitive editing program that works on the web interface rather than having you download and install an app on your PC. You can add a neon border for YouTube thumbnails using Canva by following the instructions given below:
Step 1: Define Project Settings and Add a Background
After signing in to your Canva account, click Create a design from the top-right corner of the page, click Custom size from the bottom, define 1280 and 720 in the Width and Height fields on the box that appears respectively, and click Create new design.

Now, click to select Background from the navigation bar on the left (if the Background tool is not visible, click More and then choose Background from the expanded list), and click to select a background from the images available in the center pane.

Step 2: Upload an Image and Add Effects
Click Uploads from the navigation bar, click the More icon from the right of the Upload media button present at the top of the center pane, choose your preferred method to upload the image (with the transparent background) that you want to use, upload the image, and drag it from the center pane to the Canvas.
Note: You can use any of the tools available online to remove the background from your image for free.

To add a YouTube thumbnail border, make sure that the image that you added to the Canvas is selected, click the Duplicate icon from the upper-right area, and use the scaling handles of the copy of the image to increase its size a bit. Reposition the image back to its original location as well.
Then, click Edit image from the upper-left corner of the Canvas, click Duotone from the Edit image pane at the center, if need be, click See all, choose your preferred duotone effect to apply on the image, choose your preferred highlight and shadow colors from the box that appears next, and click Back from the top of the pane.

Next, click See all next to the Adjust section from the center pane, and drag the Blur slider to the right to increase the blur effect on the image.

Step 3: Position the Layers
While keeping the duplicate image selected, click the Position button from the upper-right area of the Canvas, and click Background to send the second image behind the first one to get the neon border effect for the photo.

Part 3: How to Outline a Person in a YouTube Thumbnail with Photoshop
Because YouTube thumbnails are nothing but static images, creating YouTube thumbnail border with Adobe Photoshop is comparatively easier. The process of doing this is given below:
Step 1: Define Document Preferences and Import an Image
Launch Adobe Photoshop on your PC, click Create new, and on the New Document customization box, define the width and height values to 1280 and 720 pixels respectively. Select Transparent from the Background Contents menu as well if not already selected. Click Create from the bottom to create a new Photoshop document with the specified document settings. Next, open the folder that contains the source image, drag the photo to Photoshop, and press Enter to place the photo.

Step 2: Remove Background from the Image
Make sure that the image layer is selected in the Layers panel on the right, go to Select from the menu bar at the top, and click Subject. From the bottom of the Layers panel, click the Add a mask icon to get rid of the background, leaving only the human on the Canvas.

Step 3: Add a Custom Background and an Outline Around the Subject
Use the method explained earlier to import a background image of your choice to Photoshop. Drag the background image layer to the bottom in the Layers panel. Double-click the masked layer, click to select Stroke from the left pane of the Layer Style box, and use the options available on the right to manage the size, color, position, etc. of the stroke that has been added around the human subject. Click OK when done, and then export the image normally to use it as a YouTube thumbnail border.

Summary
It is important to know that the default resolution of a YouTube thumbnail is 1280 x 720 pixels that is usually written and referred to as 720p. While adding a YouTube thumbnail border, it is also imperative to have a good sense of color combination and fonts. Furthermore, a decent tool like Wondershare Filmora X must be used to add an appealing neon border around the main subject in the thumbnail image easily and quickly.
02 Add a Glowing Neon Border in YouTube Thumbnail with Canva
03 Outline a Person in a YouTube Thumbnail with Photoshop
Part 1: How to Add Neon Border to YouTube Thumbnail for Free with Filmora
Being one of the most versatile and intuitive post-production tools available in the market today, Wondershare Filmora X allows you to add a neon border to a YouTube thumbnail quite conveniently. You can learn how to get this done on Windows or Mac by following the steps given below.
For Win 7 or later (64-bit)
For macOS 10.12 or later
Step 1: Define Project Settings and Add Image to the Timeline
Launch Wondershare Filmora X on your PC (a MacBook Pro M1 is used here), ensure that the project aspect ratio is set to 16:9 (Widescreen) on the splash screen, and click New Project. On the main interface, click the Preview quality and display settings icon from the upper-right area of the Timeline, click Change Project Aspect Ratio, click to select 1280 x 720 (HD) from the Resolution menu of the Project Settings box, and click OK to save the custom project settings.
Then select My Media from the menu bar if not already selected, click Project Media from the navigation pane, and click Import from the Media box to select and import the image of the main character or object that you want to use in the thumbnail.
Now, drag the image from the Media box to the Timeline at the bottom.
Step 2: Clear Image Background, Add Border, and Add Custom Background
Go to Effects from the menu bar, click to select the Default tab and then AI Portrait from the navigation pane, and click and drag the Human Segmentation preset from the right box, and place it over the image track in the Timeline.
Double-click the image layer, scroll down the upper-left box to the Video Effects section, and use the Edge Thickness and Edge Feather sliders to adjust the character’s edges to make them as realistic as possible. Click OK when done.
Next, click and drag the Human Border preset over the image track in the Timeline, and follow the same procedure to customize the border. This will give the character a neon border effect.
Now, use the method explained earlier to import a custom image for the background, and drag and place it under the previous track in the Timeline.
If you are running the latest version of Filmora, you will find there are some neon light effects available under AI Portrait as well.
Step 3: Add Titles to Thumbnail
Go to Titles from the menu bar, click to select the Default tab and then Lower 3rds from the navigation pane, and click and drag your preferred lower-third preset from the right window to a separate layer in the Timeline. Double-click the lower-third layer, and use the available options in the upper-left window to change the text, its color, etc., and drag the textbox to place it to your preferred position on the image as well. Click OK to save the changes.
Next, click to select Titles from the navigation pane, and drag your preferred title from the right window to the upper-most track in the Timeline. Now use the method explained earlier to edit the text, its color, position, etc. to make it look professional.
For more tips and tricks for creating YouTube thumbnail, you can check this You Tube thumbnail creating guide.
Step 4: Get the Neon Border Thumbnail
Click the Snapshot (Camera) icon from the upper-right area of the Timeline, go to My Media from the menu bar, right-click the thumbnail of the screenshot you captured, and click Reveal in Finder (on Mac) or Reveal in Explorer (on Windows) to get to the folder the YouTube thumbnail border is saved in.
Part 2: How to Add a Glowing Neon Border in Your YouTube Thumbnail with Canva
Canva is another intuitive editing program that works on the web interface rather than having you download and install an app on your PC. You can add a neon border for YouTube thumbnails using Canva by following the instructions given below:
Step 1: Define Project Settings and Add a Background
After signing in to your Canva account, click Create a design from the top-right corner of the page, click Custom size from the bottom, define 1280 and 720 in the Width and Height fields on the box that appears respectively, and click Create new design.
Now, click to select Background from the navigation bar on the left (if the Background tool is not visible, click More and then choose Background from the expanded list), and click to select a background from the images available in the center pane.
Step 2: Upload an Image and Add Effects
Click Uploads from the navigation bar, click the More icon from the right of the Upload media button present at the top of the center pane, choose your preferred method to upload the image (with the transparent background) that you want to use, upload the image, and drag it from the center pane to the Canvas.
Note: You can use any of the tools available online to remove the background from your image for free.
To add a YouTube thumbnail border, make sure that the image that you added to the Canvas is selected, click the Duplicate icon from the upper-right area, and use the scaling handles of the copy of the image to increase its size a bit. Reposition the image back to its original location as well.
Then, click Edit image from the upper-left corner of the Canvas, click Duotone from the Edit image pane at the center, if need be, click See all, choose your preferred duotone effect to apply on the image, choose your preferred highlight and shadow colors from the box that appears next, and click Back from the top of the pane.
Next, click See all next to the Adjust section from the center pane, and drag the Blur slider to the right to increase the blur effect on the image.
Step 3: Position the Layers
While keeping the duplicate image selected, click the Position button from the upper-right area of the Canvas, and click Background to send the second image behind the first one to get the neon border effect for the photo.
Part 3: How to Outline a Person in a YouTube Thumbnail with Photoshop
Because YouTube thumbnails are nothing but static images, creating YouTube thumbnail border with Adobe Photoshop is comparatively easier. The process of doing this is given below:
Step 1: Define Document Preferences and Import an Image
Launch Adobe Photoshop on your PC, click Create new, and on the New Document customization box, define the width and height values to 1280 and 720 pixels respectively. Select Transparent from the Background Contents menu as well if not already selected. Click Create from the bottom to create a new Photoshop document with the specified document settings. Next, open the folder that contains the source image, drag the photo to Photoshop, and press Enter to place the photo.
Step 2: Remove Background from the Image
Make sure that the image layer is selected in the Layers panel on the right, go to Select from the menu bar at the top, and click Subject. From the bottom of the Layers panel, click the Add a mask icon to get rid of the background, leaving only the human on the Canvas.
Step 3: Add a Custom Background and an Outline Around the Subject
Use the method explained earlier to import a background image of your choice to Photoshop. Drag the background image layer to the bottom in the Layers panel. Double-click the masked layer, click to select Stroke from the left pane of the Layer Style box, and use the options available on the right to manage the size, color, position, etc. of the stroke that has been added around the human subject. Click OK when done, and then export the image normally to use it as a YouTube thumbnail border.
Summary
It is important to know that the default resolution of a YouTube thumbnail is 1280 x 720 pixels that is usually written and referred to as 720p. While adding a YouTube thumbnail border, it is also imperative to have a good sense of color combination and fonts. Furthermore, a decent tool like Wondershare Filmora X must be used to add an appealing neon border around the main subject in the thumbnail image easily and quickly.
Amplify Your Video’s Impact: Increasing View Count on YouTube Shorts
How to Get More Views with YouTube Shorts

Richard Bennett
Mar 27, 2024• Proven solutions
One of the biggest challenges that people face while using YouTube Shorts is how to get more views. Many new users wonder what and how should they prepare a video that is both 15-to-60 seconds long, and at the same time, it is engaging enough to make the audience view them with excitement.
With that said, the following sections discuss some best practices, and share a couple of tips to increase views on your YouTube Shorts videos.
- Part 1: Get More Views by Adding Shorts Video to the ‘Featured’ Section
- Part 2: Create Attractive Thumbnail for YouTube Shorts to Get More Views
- Part 3: Optimize YouTube Shorts to Get More Views
- Part 4: How to Analyze YouTube Shorts Performance
Part 1: Get More Views by Adding Shorts Video to the ‘Featured’ Section
Comparatively different from other videos, the ones that are added under the ‘Featured’ section are recommended to the audience throughout the YouTube platform on the basis of the algorithms that automatically determine which clips should be liked beach viewer individually.
![]()
A cross-platform for making videos anywhere for all creators

Why your video editing isn’t good enough? How about some creative inspo?
- 100 Million+ Users
- 150+ Countries and Regions
- 4 Million+ Social Media Followers
- 5 Million+ Stock Media for Use
* Secure Download

To elaborate, generally, YouTube suggests you a video as per your viewing history, browsing statistics, and other such information that the streaming media giant collects over time. On the other hand, the ‘Featured’ videos are suggested according to what YouTube ‘thinks’ might be of your interest, or could be somehow useful to you.
Therefore, when any clip is added as a ‘Featured’ video, YouTube suggests it to more viewers as compared to those that are published under the ‘Recommended’ category.
Note: Although there is a lot more to cover under the ‘Featured’ videos and channels section such as branding, advertisements, etc., such topics are beyond the scope of this piece.
Adding YouTube Shorts videos to the ‘Featured’ section is fairly simple, and the instructions given below explain how this can be done:
Note: It is assumed that you already have a couple of shorts video published on YouTube.
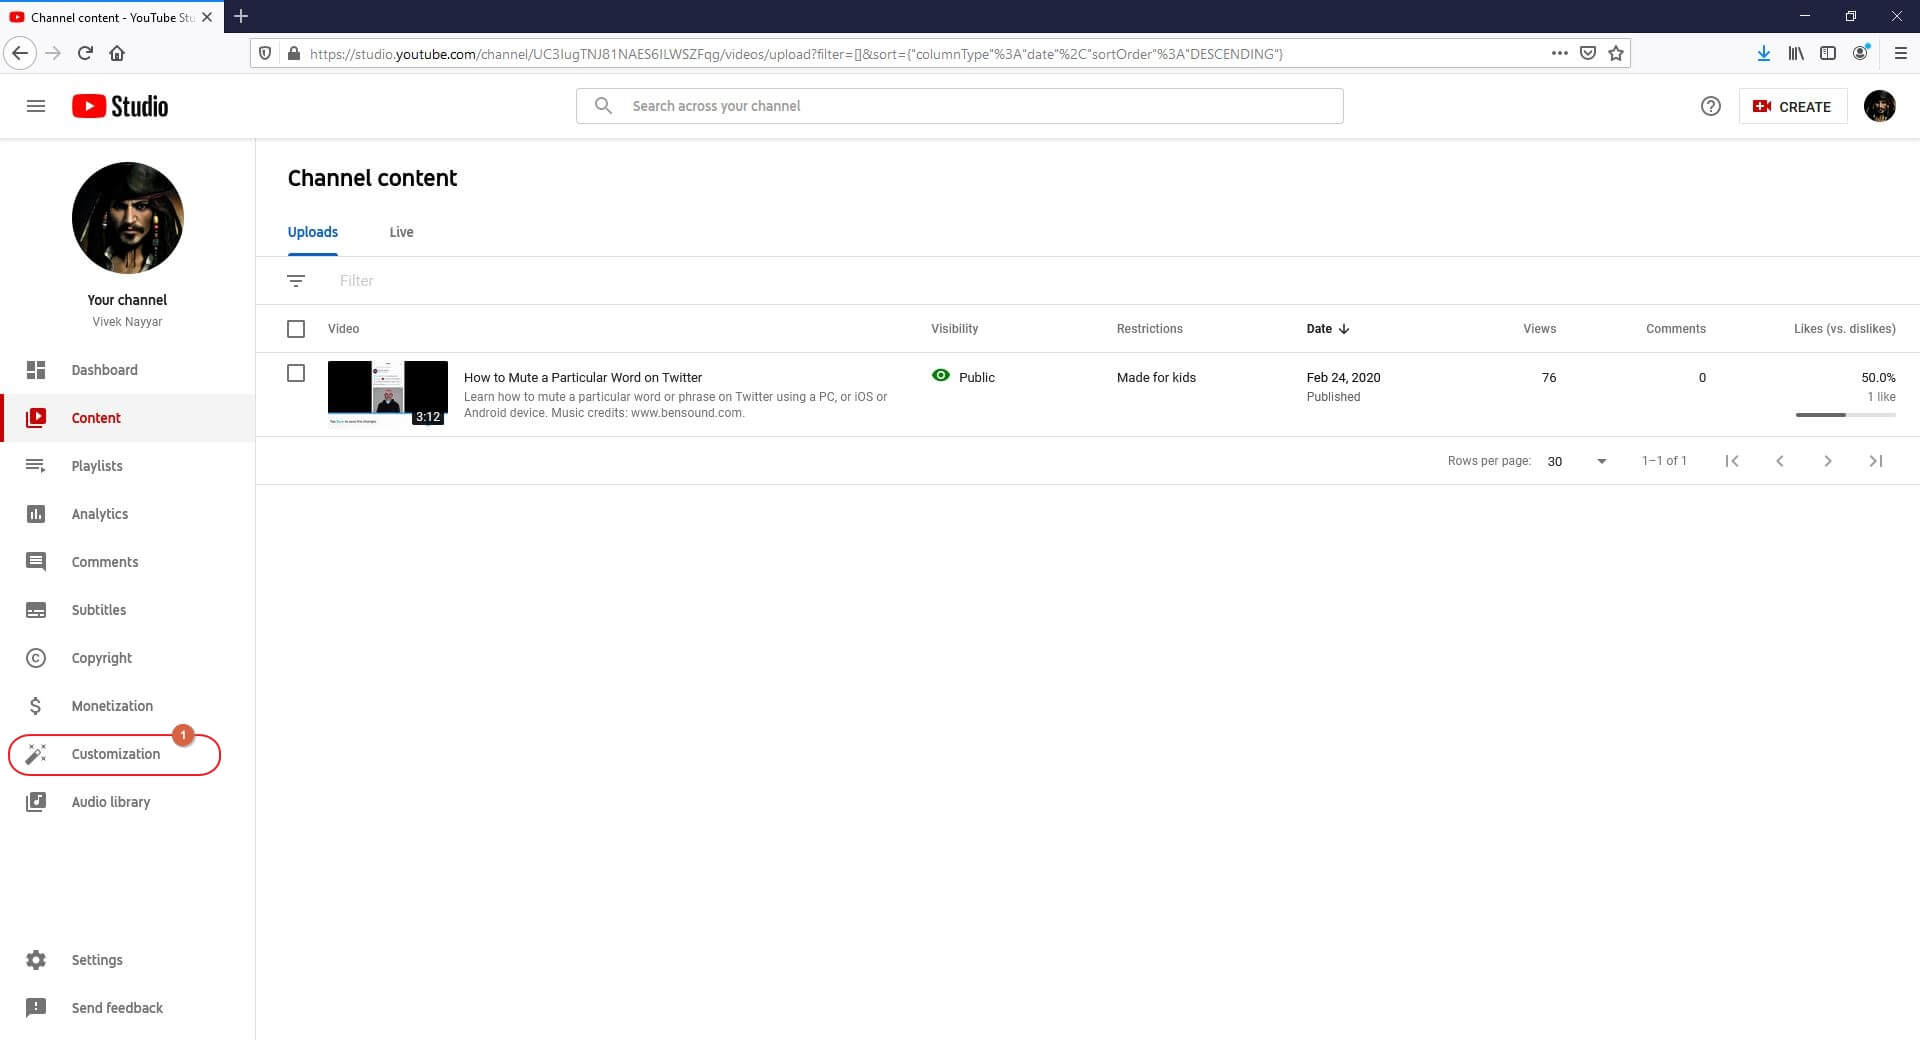
Step 1: Get to YouTube Studio Customization Section
Go to YouTube on your PC’s web browser, sign in to your Google account, click Your videos from the navigation bar in the left, and click Customization from the left bar when the Studio page opens up.
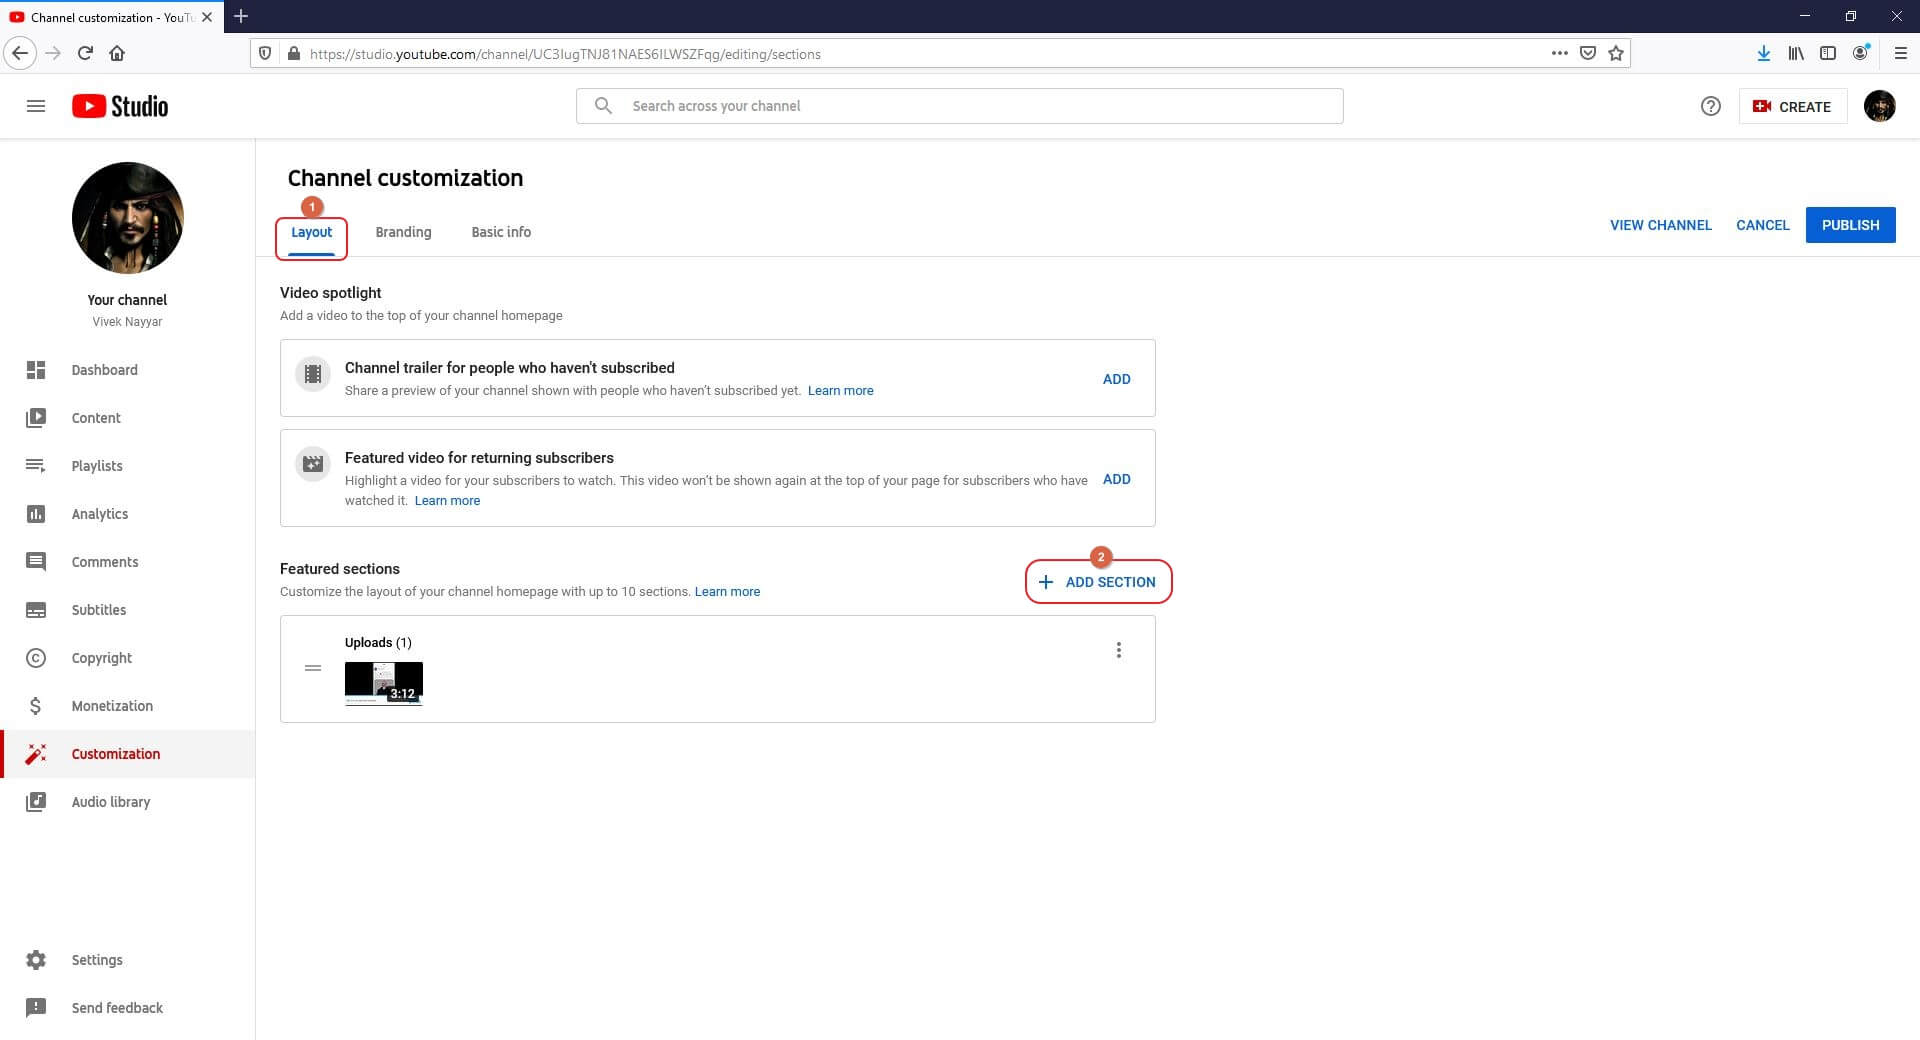
Step 2: Add YouTube Shorts
Click ADD SECTION from the Layout tab in the right window, and click Short videos from the list that appears next to add the YouTube Shorts category.
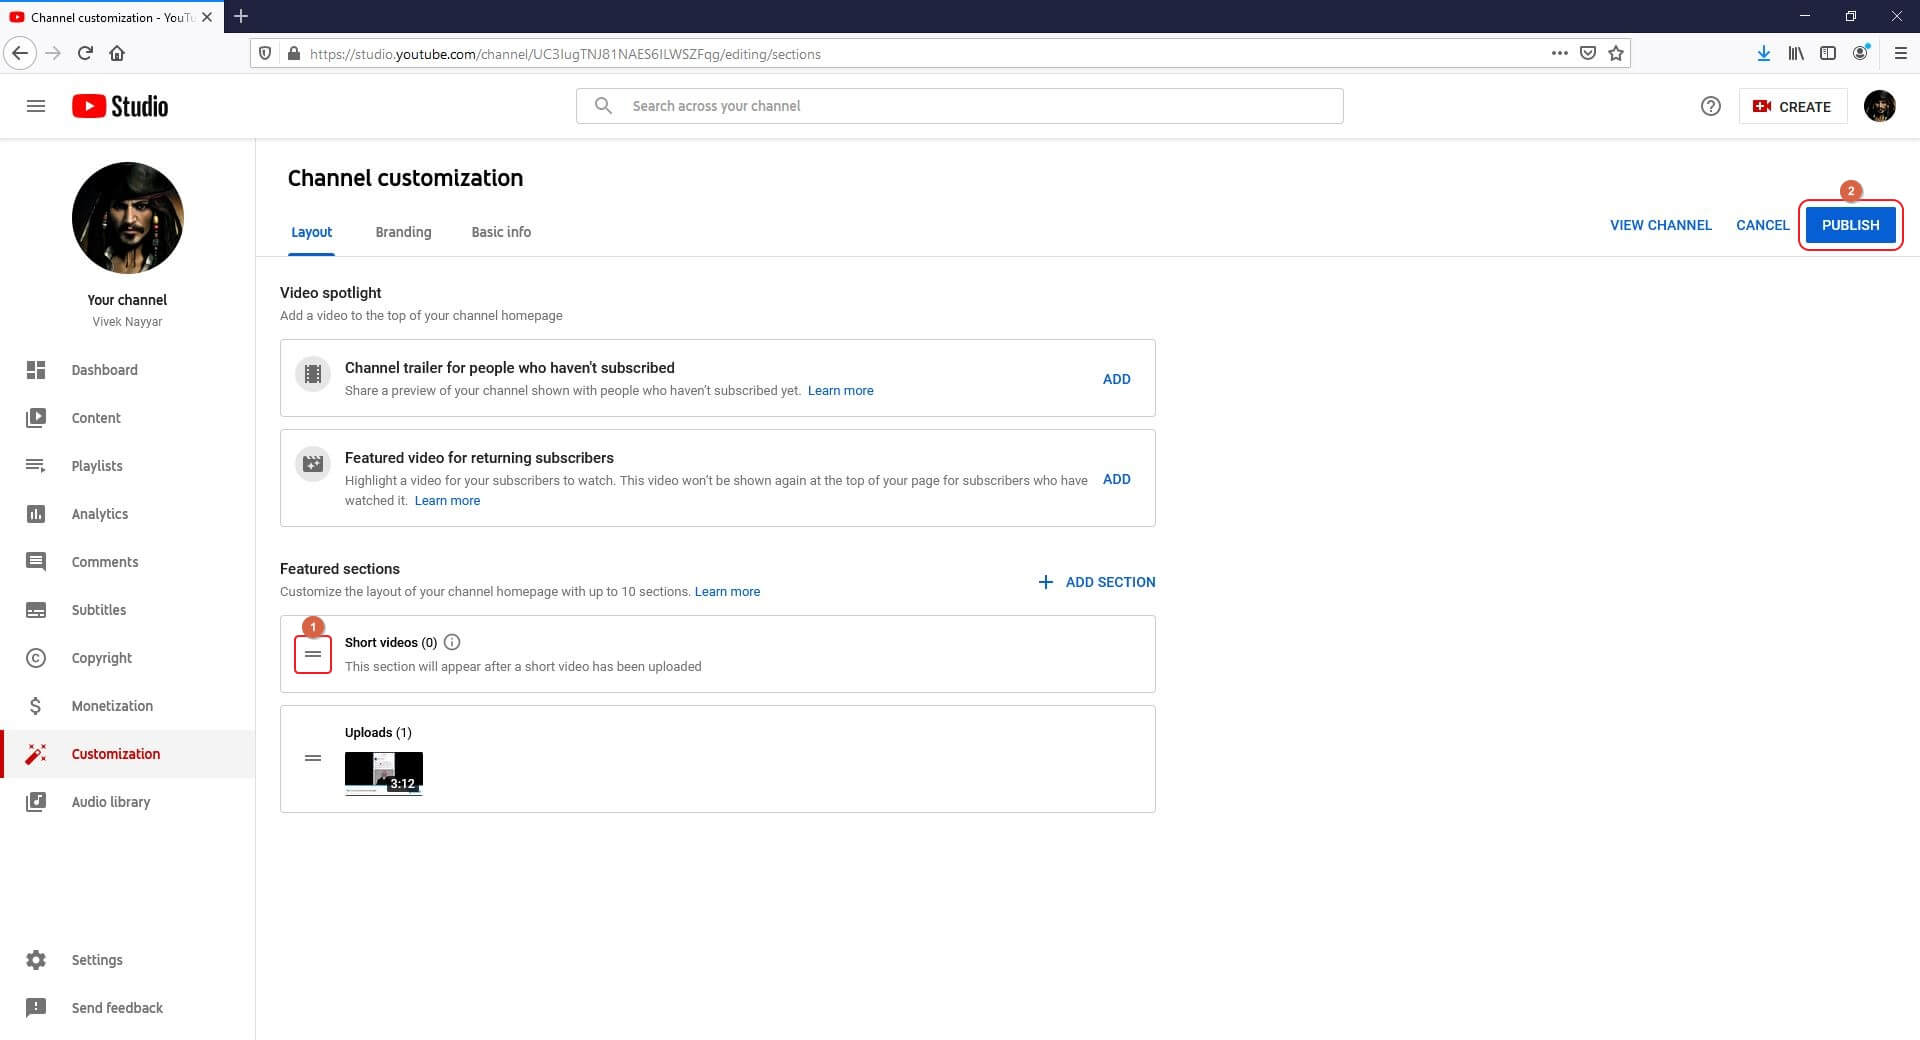
Step 3: Add Short videos to Featured sections and Save the Changes
Hold the Short videos bar from the moving handle at the left, and move it right below the Featured sections segment. Once the Short videos category is in the right place, click PUBLISH from the top-right corner of the page to save the changes. From this point onward, any YouTube Shorts video that you publish on your channel will be automatically added as ‘Featured’ after its approval.
Part 2: Create Attractive Thumbnail for YouTube Shorts to Get More Views
The thumbnails are the face of the videos that you publish anywhere online. Therefore, it is imperative to take down the default one that is automatically added by YouTube, and add your own, custom image instead.
To have your own thumbnail, you can either pick any frame from within the video itself, or you can upload a separate photo from your PC, and replace the existing one with it.
Things to Consider for creating attractive thumbnail
While using your custom image as a thumbnail for your YouTube Shots videos, a few things that you should keep in mind include:
- Relevance
Make sure that the new photo that you are planning to use as a thumbnail is relevant to the short video. Any image that is out of context might confuse the viewers, and you may lose your audience and the subscribers forever and for good.
- Clarity
Always use an image with clear content and large text (if any). This lets the viewers easily determine whether the video is of their interest.
- Correctness
You should avoid using misleading images as thumbnails. While such photos would attract more viewers initially, people will gradually lose trust in your channel if they do not find what they expect by the glimpse of the thumbnail.
Part 3: Optimize YouTube Shorts to Get More Views
The fact of the matter is, YouTube Shorts videos aren’t much different that any other video that you publish on the platform. Therefore, the process of optimizing both short and regular videos is identical.
A few things that are extremely important, and play a vital role in optimizing YouTube Shorts videos include:
- Attractive Thumbnail
As mentioned above, the thumbnail of a video is its face, and the prettier and appealing the face is the more audience will it attract, and the more hits your video will get. Therefore, ensure to make the thumbnail of your short videos as attractive as you possibly can.
- Compelling Title
The title says it all. Your short videos will have good chances of getting noticed and hits if they have an impulsive and compelling title that can give the viewers a summary of what they can expect from the clip.
- Detailed Description
The description of your short videos should be complete, and must explain the theme, genre, and nature of the clip. With the detailed description, the viewers will be able to assess if the video would be helpful to them in some manner.
- Tags
Make sure to add relevant tags to your short videos. For instance, adding ‘#Shorts’ in the title or description of the video tells YouTube that the clip is created for YouTube Shorts. Likewise, other tags that are related to the genre and/or theme of the short videos help YouTube suggest your media to the relevant audiences across the website.
![]()

Filmora - Best YouTube Shorts Video Editor for PC
- Easily record a video on PC and Mac.
- Edit videos quickly with a wide range of gaming effects.
- Rich video tempaltes and resources for YouTube videos.
- Export to MP4, MOV, MKV, GIF and multiple formats.
For Win 7 or later (64-bit)
For macOS 10.12 or later
 Secure Download


Part 4: How to Analyze YouTube Shorts Performance
YouTube Shorts are videos that are no more than 60 seconds long in length. When added under the ‘Featured’ category, you can see a significant amount of increment in the hits, and therefore the view count and the playback duration of your YouTube channel gets directly affected.
However, because these short videos cannot be monetized, at times you may notice that even though the total playback duration and view counts of your YouTube channel are high, your earnings may not be as much as what you would receive if those clips were published as regular videos.
FAQ: Will YouTube Shorts Performance Impact Other YouTube Stats?
Yes. As mentioned above, the view counts and playback durations of YouTube Shorts videos are added to your channel’s statistics. Therefore, with the number of views your short videos get, the overall performance of your YouTube stats is affected accordingly.
Richard Bennett
Richard Bennett is a writer and a lover of all things video.
Follow @Richard Bennett
Also read:
- [New] How to Add Custom YouTube Shorts Thumbnails Effortlessly for 2024
- [New] Free End Credits Excellence Top 6 Tutorials for 2024
- [Updated] In 2024, Decoding Digital Dollars An Effective Triple Step Process to Determine Your Subscriber Profits
- [Updated] In 2024, Exclusive Access Prime Video Downloader Picks
- [New] In 2024, Gamer's Dream The Ultimate Compilation of Best YT Game Entrances
- [New] In 2024, Cutting Edge Techniques Pushing Boundaries in YouTube Cinematography
- [Updated] Turning Videos Into Dollars The Ultimate Mobile-Focused YouTuber's Manual for 2E24
- [Updated] Efficiently Shortening YouTube Content for 2024
- [Updated] Harmonizing Cityscapes and Nature The Role of Green Spaces for 2024
- [Updated] 2024 Approved From Raw to Radiant Youtube's Art of Visual Aesthetic
- Updated 2024 Approved Must-Have Specifications in Mac Audio Editing Applications
- [New] Channel Your Content Earning Through Evaluative Endeavors Online
- Photographic Patchwork Crafting Unique Collages for 2024
- [New] In 2024, From Free to Funded Monetization Mastery for FB Pages
- In 2024, Unlocking Viral Success Boost Your Business with TikTok
- New Install Lumafusion for Mac or Get Best Alternatives on Mac
- [New] Installing Social Media Adding Snapchat to Your Mac for 2024
- A Beginners Guide to Downloading and Mastering Windows Movie Maker
- [Updated] In 2024, How to Screen Capture Anything, Including Netflix, on a Mac in Six Steps
- [New] Unveil Secrets to Speedy Caption Design in Facebook Media for 2024
- Title: "[Updated] Glam up Video Images Integrating Shimmering Neons for 2024"
- Author: Jeffrey
- Created at : 2024-06-06 14:07:30
- Updated at : 2024-06-07 14:07:30
- Link: https://eaxpv-info.techidaily.com/updated-glam-up-video-images-integrating-shimmering-neons-for-2024/
- License: This work is licensed under CC BY-NC-SA 4.0.
