![[Updated] How to Clear the Clutter Blurring Backgrounds for Engaging YT for 2024](https://thmb.techidaily.com/eae25c8cb1f012b237b4735a8d726d09f7b30b165b0175087b89427fe82c8e76.jpg)
"[Updated] How to Clear the Clutter Blurring Backgrounds for Engaging YT for 2024"
How to Clear the Clutter: Blurring Backgrounds for Engaging YT
How to Blur Background of Your YouTube Video


Richard Bennett
Mar 27, 2024• Proven solutions
A lot of YouTubers like to vlog in front of blurred backgrounds. Blurring the background of your YouTube video is a fast way to make it look more professional – you stand out when you are entirely in focus, and everything behind you is blurry. Plus, it is an easy way to disguise the room you are vlogging from.

Even if your set is clean, there could be things like books behind you, which will distract viewers; they will be trying to read the spines. Blurring out the background of your shot makes your video look polished and keeps people’s focus entirely on you.
- Part 1: Blur YouTube Video Background in Shooting Videos
- Part 2: Add Tilt-Shift Effects to Video in Editing
Part 1: How to Blur Background of Your YouTube Video in Shooting Videos
Blurring your background is also how you create a beautiful bokeh lighting effect. Bokeh is when you blur lights in the background of your shot, creating halo-like circles of light. By attaching a filter with a shape cut out to the camera lens, you can even generate bokeh lights in other shapes, like hearts or stars.
Aperture refers to the hole in your lens which allows light into your camera. A narrow aperture lets in less light, and a wide aperture lets in more. The wider your aperture is, the shallower your depth of field will be. Widening your aperture also helps your camera perform better in low-light situations. Widening your aperture too much under the wrong circumstances can let in too much light and result in your footage being overexposed.
Depth of Field is the area of your image that is in focus. If you have a large depth of field, then objects close to and far away from your camera will all be in focus. Only a select area will be focused and the rest will be blurred if you have a shallow depth of field.
F-Stops are the measurement of an aperture’s width. The higher your f-stop, the narrower your aperture will be. To create a blurred background or a bokeh effect, you need a wide aperture, and thus a small f-stop. F-stops are written like ‘f/1.4’. You need an f-stop of less than f/4 to blur your background, and less than f/2.8 for bokeh.
1. Blurring and Bokeh
Blurred backgrounds and bokeh are very closely related. A bokeh effect is essentially a blurred background that includes lights.
To achieve a blurred background or a bokeh effect, you need to have a shallow depth of field. That means a wide aperture and a low f-stop.
2. How to Blur your Background
Place your subject – in the case of a vlog, your subject is probably yourself – in a shallow depth of field, and they will remain sharply in focus while everything behind them is blurred.
If the subject is yourself, you might need a helper to either operate your camera or stand in for you while you set up your camera. You will need to be able to check that the place you plan to stand or sit is in focus.
To get a shallow depth of field, make sure your aperture is wide. Do this by setting a low f-stop. Ideally, your f-stop will be 2.8 or lower, but if your camera cannot go that low, then f/3 or f/4 can also work.
Creating a bokeh effect is mostly the same, except that it works best when your subject/depth of field is very close to the camera, and you have a light source off in the background. Zoom Lenses do not usually have wide enough apertures to create bokeh backgrounds.
Blur Video Background in Post-Production with Wondershare Filmora Video Editor
If you need to blur the video background after shooting, you can use some video editing software to add the bokeh effect or the tilt-off effect in post-production. Here, I will show you how to do that in Filmora.
Filmora is one of the most widely used video editing software among YouTubers. Its user-friendly interface and tutorial guide enables green-hands to start video editing quickly. Besides, you can find many free filters, effects, and elements pre-programmed, so you can use them directly without looking for presets and templates somewhere else.
1. Add Bokeh Filter to Video in Filmora
There are about 20 bokeh effects available in filters and overlays. You can find them easily by typing bokeh in the search bar in Effects.
Note: you should select Included to see all bokeh effects pre-programmed in Filmora. If you need more visual effects, just go to the Filmstock effects store.

Double click the bokeh effect to preview the result, and if you find the bokeh effect fits the video, just drop it to the track above the video. And the bokeh filter or overlay will be applied to the video automatically.
2. Use Tilt-Shift Circle/Linear Effect to Blur Video Background
Filmora features two tilt effects, tilt-shift circle and tilt-shift linear, which allows you to highlight people in the video, blur, and conceal the video background.
Go to the Effects tab and then switch to the Utility menu under Included category.
Here, I will select the Tilt-Shift Circle effect and drop it to the track above the video. Now, you can adjust the size, position, and intensity of the tilt-shift circle effect

You see, the video background is blurred, and the people are highlighted. Now it’s your turn to download the Filmora video editor and try it yourself.


Richard Bennett
Richard Bennett is a writer and a lover of all things video.
Follow @Richard Bennett
How To Securely Extract and Convert YouTube Audios as MP3
How to Convert YouTube to MP3 in 3 Ways [Safe]

Benjamin Arango
Mar 27, 2024• Proven solutions
There is a wide range of prominent tools available in the digital market to convert YouTube to MP3 files. The basic idea behind these tools is that you can extract the audio content from your favorite youtube video and save it to an mp3 file. The RIP of the audio process differs from the program built-in within the application. Many sound professionals opt for an mp3 file format because of its smaller file size, high-frequency audio quality, etc.
After you convert youtube to mp3, you will be able to listen to the background music or audio offline and the MP3 file format guarantees flawless audio quality for you.
You may also like: Best Free Youtube to MP3 Converters You Should Know
Three Ways to Convert YouTube Videos to MP3
Now it is a perfect time to explore unique ways to convert youtube to mp3 files. I will share three different ways in this article. Let’s take a quick look at it below:
- **1. How to Convert YouTube to MP3 by an Online YouTube to MP3 Tool
- **2. How to Convert YouTube to MP3 by q Video Converter
- **3. How to Convert YouTube to MP3 by a Video Editing Software

1. How to Convert YouTube to MP3 by an Online YouTube to MP3 Tool
It is a free service and allows you to convert any videos within the one-hour time limit. The whole conversion process completes within a few minutes effectively. There is no need to register to avail of this online service. You can save the converted files at your desired location and play it during your comfort zone. This online application is compatible with PC, gadgets, tablets, etc.
- Get YtMp3 tool: Click Here on your browser and step into the online YouTube converter platform
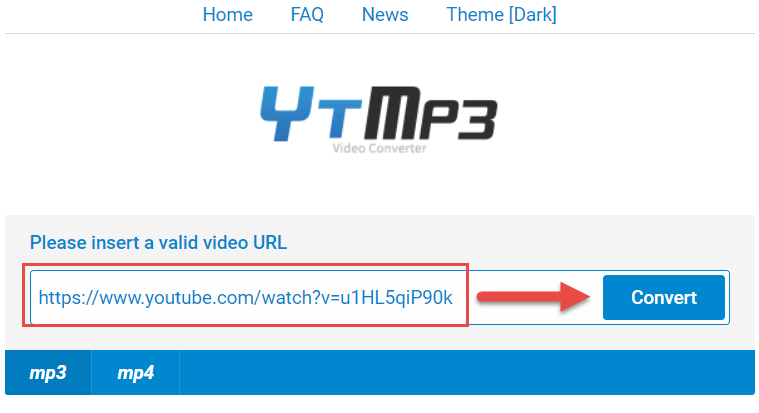
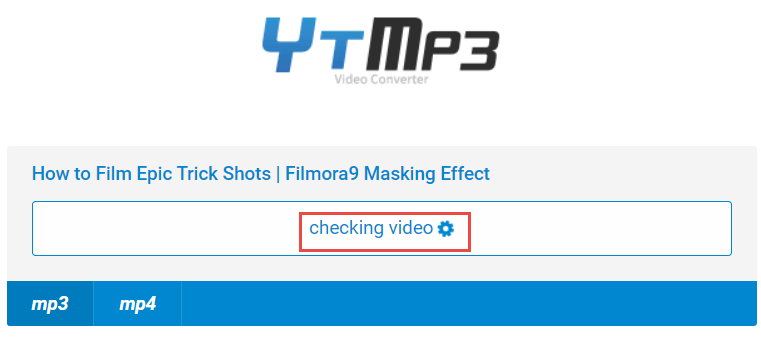
- **Paste the URL: Now copy your favorite track URL from YouTube and paste it on the box. Then hit the ‘Convert’ button beside the pasted URL. You have to wait for a few minutes until the conversion process completes.
- **Download mp3: Immediately you must tap the ‘Download‘ button and choose the desired location by navigating between drives and folders to save the converted MP3 files. You can also choose the ‘Dropbox’ option to store it on the virtual location for easy retrieval.

Tips:
The converted YouTube video in the MP3 file format is available for further transfer to other external gadgets. Make use of the MP3 files according to your convenience without any limitations.
2. How to Convert YouTube to MP3 by a Video Converter
If you take a deeper look at the converter tools at the online platform you will end with piles of collection of software. The key factor which you must bear in your mind is the reliability of the conversion program. Wondershare Uniconverter is an ultimate tool and it meets the expectations of the users without any compromises. Let’s see how to convert youtube to mp3 with this video converter:
- Click Here to download and install Wondershare Uniconverter on your computer
- Visit your favorite YouTube channel and copy the link of your favorite tract at its address bar.
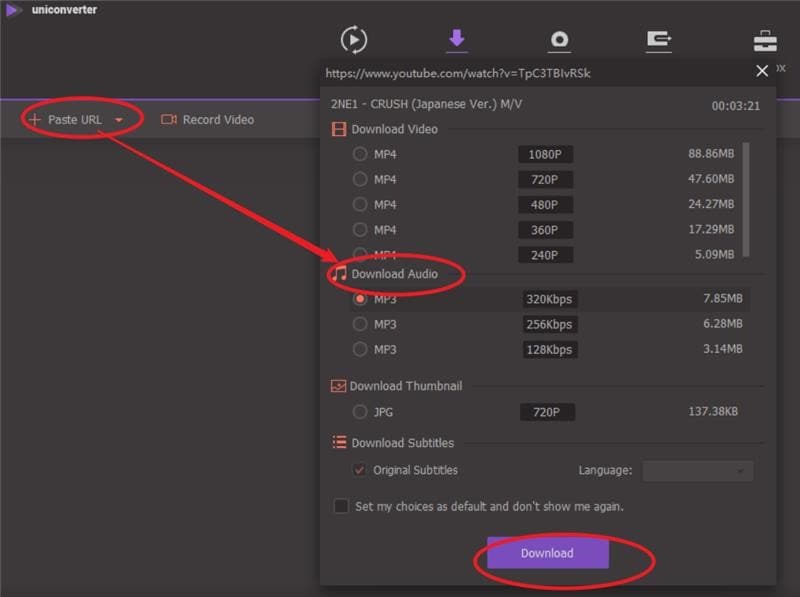
- Launch Wondershare Uniconverter, then click the ‘Paste UR L‘ option at the top left side of the screen and select ‘Download MP3‘ from the drop-down icon. The audio extraction process commences immediately.
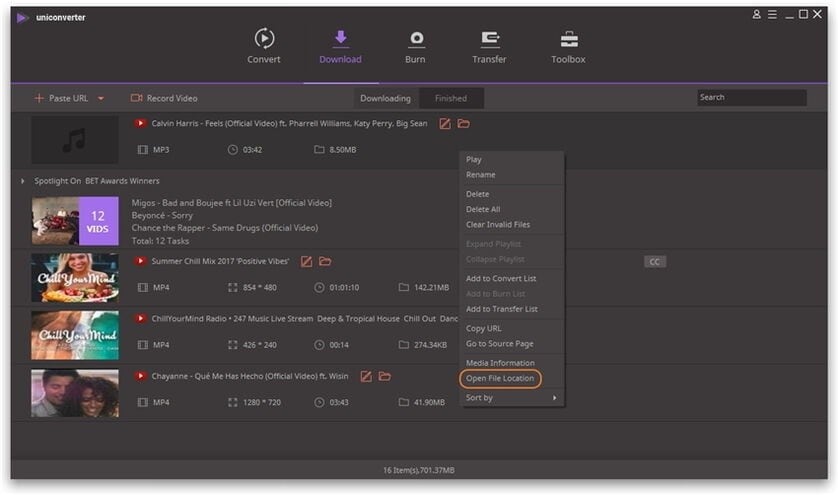
- After the download completes, you must hit the ‘Finished’ tab at the top of the screen to obtain the audio view. If you want to find out the folder details then you have to right-click and choose ‘Open File Location‘. This action takes you to the folder where the MP3 is available to carry out further tasks on it.

3. How to Convert YouTube to MP3 by a Video Editing Software
This method gives you access to convert Youtube to mp3 using a Video Editor. Wondershare Filmora not only offers many basic and professional editing tools and video effects but also can convert youtube to mp3. If you need further editing for mp3 after converting, Filmora will be the right one for you.
Here are the guidelines to convert YouTube to MP3 using Filmora:
Note:
This is a video editing software, and cannot convert a Youtube URL to an mp3 directly. You should convert the youtube URL to a local video in mp4 or other supported video formats first. You can read Convert Youtube to MP4 Guide and try some Youtube video downloaders to convert Youtube to mp4.
- Once you convert Youtube to mp4, please download Filmora below and install it on your computer
Download Mac Version ](https://tools.techidaily.com/wondershare/filmora/download/ )
- Open Filmora, then go to File-Import-Media to load the converted mp4 video to the Media Library

- Add or drag the video to the timeline(If you need to further edit or cut your video, you can double click the video on the track, and get more video and audio editing tools as you like, such as audio fade in/out and volume adjustment).
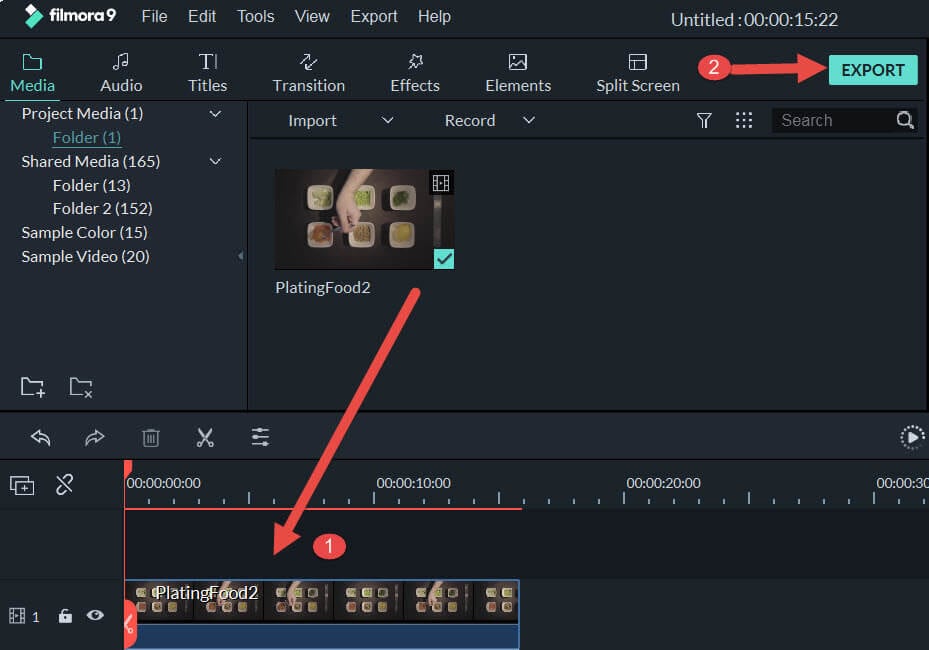
- Then hit the ‘Export‘ button and select ‘MP3’ format from the expanded list. You can click Settings in the export panel to customize the output audio settings, such as the audio bitrate for higher audio quality.


Warnings
Authorized Download—YouTube allows only legal download and conversion of videos on its platform. You can work on your videos on YouTube without any issues. You must own the copyrights if you want to download third person videos. As per the legal policy of YouTube, unauthorized download is strictly prohibited.
To sum up
There are multiple methods to convert youtube to mp3 effectively. The great challenge you may face while choosing the perfect app which fits your needs optimally. It is highly recommended to follow the YouTube copyrights guides and carryout legal downloads without any issues.
Stay tuned for more exciting facts on video converters. Leave your valuable comments and suggestions on this article.
Benjamin Arango
Benjamin Arango is a writer and a lover of all things video.
Follow @Benjamin Arango
- Title: [Updated] How to Clear the Clutter Blurring Backgrounds for Engaging YT for 2024
- Author: Jeffrey
- Created at : 2024-08-20 15:49:09
- Updated at : 2024-08-21 15:49:09
- Link: https://eaxpv-info.techidaily.com/updated-how-to-clear-the-clutter-blurring-backgrounds-for-engaging-yt-for-2024/
- License: This work is licensed under CC BY-NC-SA 4.0.