![[Updated] In 2024, Get Going on YouTube Video Upload Tutorial in Premiere](https://www.lifewire.com/thmb/8MTzrAHTJbYBBi5bOm99aG1dqKY=/400x300/filters:no_upscale():max_bytes(150000):strip_icc()/delete-text-messages-from-iphone-2000548-1538ff10388f4876bcbe18bad9f43f33.png)
"[Updated] In 2024, Get Going on YouTube Video Upload Tutorial in Premiere"
Get Going on YouTube: Video Upload Tutorial in Premiere
How Do I Use Adobe Premiere To Upload YouTube Videos?

Benjamin Arango
Mar 27, 2024• Proven solutions
Whilst getting the editing and post work just right on any project is what we all aim for, the ultimate aim is for other people to see our creations, and the most popular way to achieve that is YouTube . Chances are, if you are producing video, you will be putting some of it on YouTube at some point, so let’s have a look at the most efficient way to get your work from Premiere to YouTube.
Check if your computer meet the Premiere System Requirements >>
This is a basic tutorial about Adobe Premiere, professional video editing software. However, if video editing is new to you, consider Wondershare Filmora , which is a powerful but easy-to-use tool for users just starting out. Download the free trial version below.
 Download Mac Version ](https://tools.techidaily.com/wondershare/filmora/download/ )
How Do I Use Adobe Premiere To Upload YouTube Videos
1. Master Copy
Before exporting your work, it is important to first create a master copy of your project that is ‘as is’, in that it reflects the settings and codecs used in the original footage.
To do this you simply select the sequence within the Timeline or in the Project Panel, and go through the menu tree via File > Export > Media to bring up the export dialogue.

To create your Master Copy, simply select the first option of ‘Match Sequence Settings’, this exports a file that is of the same quality as your original footage, essentially producing a digital copy of the work for archiving before anything else is done.
With you work safe and secure it is now time to look at ensuring the project is suitable for YouTube. With our sequence selected in the Timeline or Project Panel again, we go through the same File > Export > Media path to bring up the media export dialogue as before.
2. Container
The first option we have to consider is the file format that our finished video needs to be in. Here you should refer to YouTube for its guidelines, whilst they do accept a number of file formats, digging through the YouTube help system to find the settings for highest quality we find that they recommend MPEG4 as the container, using the codec.

We can also see further recommended settings in this screenshot that will be covered later.
The good news is that Premiere automatically selects the appropriate container for us when we select our codec, however it is worth knowing the file type YouTube is expecting just to check yourself.
3. Video Codec
So having established that YouTube recommends the MPEG4 container using the codec, the first option we need to look for in the media export dialogue is to select the appropriate Format.
This is the first drop down in the dialogue box, and in this case we simply select from the list.

Once you select you can check the ‘output name’ field and see that premiere is automatically set the output file to .mp4 which is exactly what we need.
4. Preset
The next field we come to is the ‘Preset’ dropdown menu. This is a major help to most people, as Adobe have very kindly included large numbers of presets to quickly adapt video settings to suit specific uses. They vary depending on the exact version of Premiere you are using, and each format type does have its own list of presets, as we can see has a large number for YouTube, but also has many presets for specific devices (presets for iPad, Kindle, Nook, various other tablets and phones, Vimeo and a host of others) to make getting the right settings that bit easier for us.

It is important here to select the correct preset from the various YouTube options. You want to select the resolution and frame rate that match your source file, for the best results. So, if your source file is 1080p with a frame rate of 29.97 fps then that is the YouTube setting you would select.
Once a preset is selected a summary of the settings is displayed below, normally these will be well suited to your project, however you can fine tune anything you wish by selecting the video or audio tabs at the bottom which give you the chance to adjust each parameter individually. If you do this, you can save these changes as a custom preset by clicking the button at the side of the Preset dropdown menu and simply use it on later projects by selecting it from the list the same as any other, a great time saving tool.

5. Rendering
Once you are satisfied with the settings, either from the Preset alone or if you have adjusted anything yourself, you are nearly ready to render the file and export it.
For YouTube it is recommended you select the ‘Use Maximum Render Quality’ option to maintain the best output you can, it does add time to the render process but if you value the quality of your work it is worthwhile.
Finally you can choose a suitable filename and the destination of the file by clicking on the ‘Output Name’ field.
I normally use a filename that includes the destination medium so I can differentiate between different versions of a project and know which one to upload where, in this case I include ‘youtube’, but if I were planning on uploading clips of the project to vimeo as well for instance there may be a cut of the project with ‘vimeo’ in the name too. The destination is personal preference, because I do use filenames to differentiate versions I can put the various iterations into a single project file, others have folder structures for each type of file , so all YouTube output goes into a single folder and so on, how you organize is entirely dependent on how you work.

Once those are selected clicking ‘Export’ starts the rendering process, and eventually (how long depends on the speed of your computer and the size and type of file involved), you will end up with your YouTube optimized video in the location you chose.
Here I created 4 key frames that let the ‘Animation’ object move around the ‘Demo Text’ Object and finally come to rest below it. Whilst this type of effect does look very effective on screen, such is the ease of use of After Effects it really is just a few minutes work to achieve.
Learn more details about How to add text in Premiere >>
6. Uploading
Now you have your file, the next step is to go to your YouTube account and log in if you need to.
On the top of your homepage on the right is the upload button, selecting that brings up the select file menu as below.

You can either drag your file into the window or click on it to open a standard file browser to locate the desired file, click and the upload will begin. The dropdown underneath allows you to set the video as Public, Unlisted or Private. You can change this at any time once the video is uploaded as well.
This opens the upload progress window, where you can add in a name, description and tags as well as add the video to a playlist or adjust the privacy settings as the video is uploading.

Once the upload as finished, you can do final adjustments to settings and choose a thumbnail for the video. The final step is to click the ‘Publish’ button and your video will be processed and go live.

Benjamin Arango
Benjamin Arango is a writer and a lover of all things video.
Follow @Benjamin Arango
Cutting Through the Clutter: YouTube’s Copyright Evolution
The Ultimate Guide to YouTube Copyright

Richard Bennett
Nov 01, 2022• Proven solutions
One of the trickiest terrains for new YouTubers to navigate is the land of copyright rules.
We get it, it’s confusing and stressful, especially when what you want to focus on is making videos, but instead, you are worried about getting your account terminated or being sued.
Can you or can’t you use that song or that clip from the movie? That’s all you want to know.
In this article, we are going to address the key areas that YouTubers need to understand when it comes to YouTube copyright. What is okay and what isn’t? What may be considered risky or what would be worth taking a chance?
Remember that everything discussed in this article is only best practices and shouldn’t be taken as definitive legal advice.
Now that we are set, let’s dive in:
Part 1: What is Fair Use?
When we talk about YouTube copyright, we have to talk about fair use.
Without fair use, there wouldn’t be any flexibility for creators. There wouldn’t be mashups, parodies, or lip dubs. Without fair use, any video with copyright content such as music in the background or a reference to a scene from a famous movie will require approval from the content owner and can be removed. Because of fair use, you can publish a video with copyrighted material in it and not have to ask anyone.
Think of fair use as exceptions to copyright rules.
Part 2: What YouTube Considers Fair Use
There are a few aspects YouTube looks at when it comes to determining whether creators are using copyrighted content that meets the fair use exceptions.
- Is the copyrighted content being creatively or purposefully used?
- Are there more original content used than copyrighted content in the video?
- Will your video benefit the original copyrighted content?
Part 3: Types of Content That Meet Fair Use
Some acceptable styles of videos that allow you to exercise fair use are:
Critiques and Reviews: You can use clips of a movie that you review or play a chorus from a song that you are analyzing in a video and it will be okay to use because it’s serving a purpose of educating the viewer.
Tutorials and Commentary: A YouTube gamer streaming the video games and making comments throughout, that is within fair use, because it can be said that it is giving the video game exposure. Additionally, anything that can be classified as tutorials can also fall under fair use. If you have a video teaching people how to play a famous song, like The Beatles’ Let It Be , on piano, that’s fine!
Mashups: Mashups tend to be built entirely out of copyrighted material, but when done well this style of videos are very creative and often serve to promote the original work as opposed to replacing it.
There couldn’t be two more different movies than Toy Story and Fight Club, but somehow thanks the the creativity of a YouTube creator, there is a now a mashup of it. Some might call it an abomination, but this type of recycled art takes skills and planning, and it wouldn’t exist without fair use.
Parody: Imitation for comedic or dramatic effect is an artistic pursuit as long as it is done in a transformative manner. What does transformative mean? It means in some way, the original is being examined.
In this example from The Hillywood Show, we see a parody of both BBC’s Sherlock Holmes and Macklemore & Ryan Lewis’s Thrift Shop. The nuisance of the show and song recreated are there, but nobody who enjoys the originals will sit down and appreciate it in the same way. A parody is in no way trying to replace the original, but rather using the subject, structure, and style of the original as a vessel to another creative work.
Part 4: What To Do When You Get a YouTube Copyright Strike
If you are reading this, you may have already gotten a YouTube copyright strike.
This may have surprised you. Don’t be too concerned. If it was a mistake, the copyright strike merely acts as a warning, letting you know that the content in your video is copyrighted material.
However, if you were to get 3 copyright strikes in 90 days, you may be penalized by:
- Having all your accounts and videos removed
- Not being able to create a new channel
So what should you do? Here are the steps to take after you receive a copyright strike:
- Review the copyright strike by going into Creator Studio > Video Manager > Copyright notice
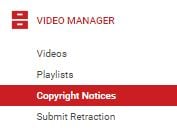
- Click on the “Copyright Strike” link beside the flagged video to see details
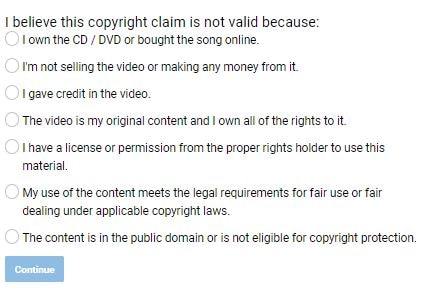
- Decide how to respond to the strike:
- Allow the strike to expire after 90 days and complete the YouTube’s copyright school
- Contact the person who reported your video and get the claim retracted
- Dispute the claim with a counter notification
Part 5: 5 Ways to Avoid Copyright Strike
It’s not always clear what YouTube deems fair use, but there are a few things you can do to improve your chances of meeting the qualification.
1. Use non-fictional copyright content instead of creative and fictional copyrighted content. You’ll have a better chance of meeting fair use if you use footages from a news broadcast than you would from a movie or television show.
The intent is clear when using non-fictional copyright content, such as in Bad Lip Reading. They aren’t trying to rebroadcast the Mark Zuckerberg integration, they are parodying it. The easier it is for the public to recognize that the content is from a source, and understand that the creator isn’t trying to take credit for it, the more likely it’ll pass the fair use qualification.
However, if Bad Lip Reading posted the content without lip dubbing, then one can argue that they are taking views away from the original news sources and that wouldn’t be fair use.
2. Make sure your video with copyrighted content isn’t replacing the original one. Only use enough of the source material to get your point across and ensure you are not negatively affecting the original through views and sales.
In this example from Screen Prism, we see scenes from Wes Anderson movies all through the video, however, it is not replacing any of the original films. In fact, you can say that because of this video, people will be motivated to go and watch a Wes Anderson movie, those benefiting the original creator.
3. The copyrighted material is essential to your video. Whether the copyrighted content is needed in order to illustrate a point or if that one moment from a well-recognized movie helps tie together the message, as long as the copyrighted material is serving the video in some significant way, then it will be consider fair use.
4. Give the original creator credit. Just because you give the original creator credit doesn’t mean you can rightfully use their content, however, it does give you a better chance at avoiding copyright strike. Most often, the original creators simply want credit for their work. If they see that you have noted that the content was made by them, it will only give them more exposure.
5. Keep it short. There is no precise number of seconds or ratio of copyrighted to original footage you should have in your video to qualify as fair use. But generally, if the copyrighted clip is short and/or broken up, then it stands a better chance at being approved by YouTube.
Part 6: What to Do When Other YouTubers Are Copying Your Content
As a new YouTuber, it’s a little freaky to think that someone is taking your content and republishing it or using your creations in their video without your permission.
If you ever notice that your content is being copied without your approval — if they have duplicated your video completely or is using your video without giving credit — and it is not benefiting your channel in any way, don’t worry, YouTube is designed to protect you.
Steps to Report Copyright Infringements on YouTube
- View the video that contains your copyrighted material.
- Click on “Report”
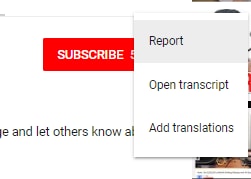
- Select “Infringes my rights” in the pop up window and click “infringes my copyright” in the dropdown options.

- Supply additional information to the report form, including the URL of the video infringing your copyrighted content and the URL of your own video.
- Submit report and wait for an email confirmation that the infringing content has been removed.
Part 7: YouTube Copyright Match
In 2018, YouTube launched a new feature called Copyright Match Tool, which automatically finds videos that are very similar or the same as the ones you’ve created. This gives you the power to determine what to do once you know the video exist.
- You can choose to do nothing.
- You can contact the publisher.
- You can report the video to YouTube for removal.
Key Takeaways
I hope this article has clarified what you can and cannot do with copyrighted content. Here is a quick summary of what we touched on in this post:
- Avoid having 3 copyright strikes on your channel at all costs.
- When using copyrighted material, ensure it is essential to the video and you are not overdoing it.
- Make sure that the copyrighted content does not take views and sales away from the original source.
- Strive to use the copyrighted content in a transformative way, as a parody or a commentary, to educate or inform.
- Give the original creator credit or have it benefit the original by giving more publicity.
- Report any creator that is infringing on your content.
Got any questions on YouTube copyright? Leave a comment below and we’ll help you answer it.
Richard Bennett
Richard Bennett is a writer and a lover of all things video.
Follow @Richard Bennett
Also read:
- [Updated] In 2024, Bringing the Web to Reality Embedding YouTube Videos in Slides
- [Updated] In 2024, FrameCraft VideoCutter
- [Updated] Timestamping Your YouTube Videos Desktop & Mobile Guide
- [Updated] Top Tech to Record Your Live Video Feeds Online
- 2024 Approved YouTube's Iconic Counter-Based Awards System
- Can You Trust Pornhub? Essential Tips for Securely Exploring Adult Websites
- Crafting Dazzling Instagram Stories with Multi-Image Techniques for 2024
- Decide on Simple ChatGPT Vs. Web-Enabled Plugins
- Expert Guide on Resolving Razer BlackShark V2's Non-Functional Microphone Problems
- Hacks to do pokemon go trainer battles For ZTE Blade A73 5G | Dr.fone
- Optimizing Engagement with These Exceptional 5 AI Tools
- Troubleshooting Windows 11 SD Card Detection Issues: Effective Techniques and Tips
- Zero-Cost Expertise in Analyzing YouTube Videos Frame by Frame for 2024
- Title: [Updated] In 2024, Get Going on YouTube Video Upload Tutorial in Premiere
- Author: Jeffrey
- Created at : 2025-02-11 23:49:39
- Updated at : 2025-02-17 01:10:54
- Link: https://eaxpv-info.techidaily.com/updated-in-2024-get-going-on-youtube-video-upload-tutorial-in-premiere/
- License: This work is licensed under CC BY-NC-SA 4.0.